
Build a Web Form with HTML: Part 8
Welcome to the eighth and final installment in this series on Web Forms. Unlike the previous seven parts, which focused on how to create and style common form controls, this tutorial will cover the third piece of the HTML development triad: JavaScript (the other two being HTML and CSS of course). In doing so, we’ll explore JavaScript’s role in web forms, its common uses, and view some practical examples.
Before we move on, however, you may want to refresh your memory by revisiting the previous articles in this series:
- How to Build Web Forms in HTML
- Building Web Forms in HTML: Part 2
- Styling Form Controls with CSS – Part 3
- CSS for Labels, Buttons, and Form Interactions – Part 4
- Styling Radio Buttons and Checkboxes in HTML Forms – Part 5
- Styling the Standard Select with CSS and HTML – Part 6
- Customizing Multi-select Lists with CSS
JavaScript: the Workhorse of the Internet
As mentioned in the intro, web pages are generally made up of three standard Web technologies: HTML, CSS, and JavaScript. Whereas HTML defines the the web page content, and CSS governs the appearance of the various elements, JavaScript performs actions triggered by browser, page, and/or element. Some of these are precipitated by the user, others are simply part of the page and/or element lifecycle. Back in the early days of the World-Wide-Web, there were some people who chose to turn off JavaScript in their browser preferences, making JavaScript more of an enhancement. Today, you would be hard pressed to find any web forms that didn’t utilize JavaScript. In fact, it is not at all uncommon for websites to include a user message stating that JavaScript MUST be enabled in order to view the page.
JavaScript is an extremely powerful language. It can present a full-fledged application delivered via the browser. With so much functionality, it can take many years to become a master scripter. Having said that, you can code JavaScript to increase the interactivity of your web forms with only a modicum of expertise.
Practical JavaScript Form Examples
For the remainder of the article, we’ll incorporate three common uses of JavaScript into a web form that displays a login or registration form based on the user’s selection:
- Setting the focus
- Dynamically setting element styles/classes
- Data validation
To do that, we’ll start with a couple buttons that determine which form to show:
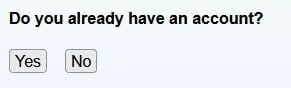
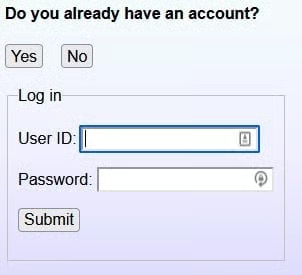
If the user already has an account, the login form is displayed:
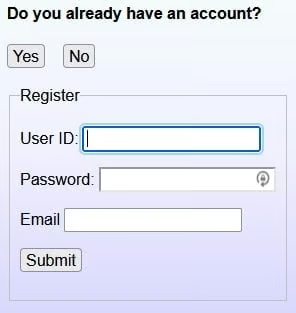
Otherwise, we get the registration form which includes an email field for confirmation purposes:
In reality, both are part of the same form; only the <fieldset> changes. Here is the complete HTML:
<h4>Do you already have an account?</h4>

<button onclick="showFieldset('fieldset_login', 'fieldset_register')">Yes</button>
<button onclick="showFieldset('fieldset_register', 'fieldset_login')">No</button>
<br>
<br>
<form id="login" name="login" method="post" action="noaction.html">
  <fieldset id="fieldset_login">
    <legend>Log in</legend>
    <p>
      <label for="user_login">User ID:</label>
      <input type="text" id="user_login">
    </p>
    <p>
      <label for="pw_login">Password:</label>
      <input type="password" name="pw" id="pw_login">
    </p>
    <p>
      <button name="button" id="button">Submit</button>
    </p>
  </fieldset>
  <fieldset id="fieldset_register">
    <legend>Register</legend>
    <p>
      <label for="user_register">User ID:</label>
      <input type="text" id="user_register">
    </p>
    <p>
      <label for="pw_register">Password:</label>
      <input type="password" name="pw" id="pw_register">
    </p>
    <p>
      <label for="email">Email</label>
      <input type="text" name="email" id="email">
    </p>
    <p>
      <button name="button" id="button">Submit</button>
    </p>
  </fieldset>
</form>
Toggling <fieldset> Visibility n JavaScript
When the form is first displayed, both fieldsets are hidden using the CSSdisplay of “none”. To show a <fieldset>, the show_fieldset class is added:
fieldset {
  display: none;
}

.show_fieldset {
  display: inline;
}
If you look at the HTML code above, you’ll see that both button include an onclick handler which calls the showFieldset() function, passing in both a fieldset to show, and one to hide (in case the user changes his or her mind). Here is the showFieldset() code in its entirety:
function showFieldset(fieldsetToShow, fieldsetToHide) {
  fieldsetToShow = document.getElementById(fieldsetToShow);
  fieldsetToHide = document.getElementById(fieldsetToHide);
  var userInput = fieldsetToShow.querySelector("input");
  fieldsetToShow.classList.add("show_fieldset");
  fieldsetToHide.classList.remove("show_fieldset");

  setTimeout(function () {
    userInput.focus();
  }, 500);
}
Let’s take a moment to go over what is happing in the above code.
The fieldsetToShow and fieldsetToHide function arguments are the ids of each fieldset. Hence, they need to be replaced with the actual elements before we can do anything with them. These are retrieved via the document.getElementById() method, which updates the local variable. This is possible because of JavaScript’s loose data typing; it allows us to change a variable’s data type at any time, such a string to a reference to a form element.
Next, we obtain a reference to the first input element in the <fieldset> using the HTMLElement querySelector() method.
The next two lines of code add and remove the “show_fieldset” class respectively.
Setting the Focus
Usually, the focus follows the document order or as dictated by the tabindex number. However, there are cases where you may wish to set it on a particular element. Within the setTimeout() callback function, we’re setting the focus on the userInput field. The delay provided by the setTimeout() gives the <fieldset> a change to appear. It just looks a little nicer.
Read: HTML, CSS, and JavaSCript Tools and Libraries
Form Validation in JavaScript
There are two ways to go about submitting a form to the server:
- Using a button.
- By invoking the form’s submit() method.
In most cases, the first option is the way to go. However, there are times where it may be preferable to handle everything yourself. In our case, we need to perform some validation on one of the fieldsets, i.e., the one containing the Submit button that was clicked. If we performed validation within the form’s onsubmit handler, it would be difficult to ascertain which button triggered the form submit. By passing the this pointer to our submitForm() function, we now have instant access to the button:
<button type="button" name="button" id="button" onclick="submitForm(this)">Submit</button>In the submitForm() function, we can find the parent <fieldset> element using the closest() method. It accepts a CSS selector and navigates up the parent chain until it finds a matching element. From there, we can find the email field among its children using the HTMLElement querySelector() method. Prefacing the selector string with the pound sign (#) identifies the string as an element id. If the fieldset does not contain an email field, querySelector() will return a value of undefined. Hence, we should check that there an email element was located before calling the validateEmail() function. Only, if the email field contains a valid email, is the form submitted:
function submitForm(submitButton) {
var fieldSet = submitButton.closest("fieldset");
var email = fieldSet.querySelector("#email");
if (email && validateEmail(email)) {
document.getElementById("login").submit();
}
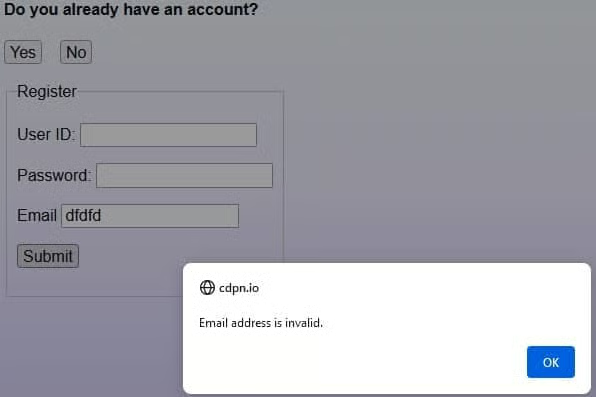
}Validating emails is actually very difficult, but you can do an OK job using a Regular Expression. Our function also tests that the field isn’t empty so that a more meaningful message can be displayed:
function validateEmail(email) {
  var validRegex = /^[a-zA-Z0-9.!#$%&'*+/=?^_`{|}~-]+@[a-zA-Z0-9-]+(?:\.[a-zA-Z0-9-]+)*$/;
  if (email.value.trim() === "") {
    alert("Please provide an email address.");
    email.focus();
    return false;
  } else if (email.value.match(validRegex)) {
    return true;
  } else {
    alert("Email address is invalid.");
    email.focus();
    return false;
  }
}
You can see a validation message below:
There’s a demo for this tutorial on codepen.io.
Conclusion to JavaScript Forms Tutorial
I hope that you found this series to be helpful. Aimed at novice coders, a lot of the code we sampled would not necessarily be applicable to Enterprise level development. But as an introduction to web forms, I think that it will get you on your way. We’ll delve deeper into many if not all of the topics covered here in due time!
