
Part 1: Form, Input, and Label Elements
HTML Web forms have been gaining a lot of traction over the past several years as the World-Wide-Web has become increasingly interactive. HTML forms are used to collect user input. The user input is most often sent to a server for processing. Client-side JavaScript is sometimes employed as well to enhance the user experience. In this short series on HTML Forms, we’ll familiarize ourselves with form controls by building one that accepts the user’s contact details for a newsletter subscription or site membership. In this article, we’ll learn how to use the Form, Input, and Label Elements. In Part 2, we’ll cover the Select, Checkbox, and Button controls. From there, we’ll learn how to employ CSS and JavaScript to enhance our form.
The Role of CSS and JavaScript in Web Forms
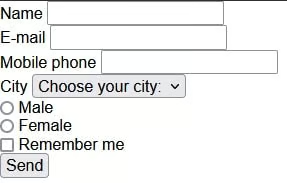
In this tutorial, we’ll be working mainly with HTML, which determines the raw building blocks of the form, which is only a piece of the puzzle. In addition, CSS may be employed to enhance the form’s appearance. To illustrate, here is the form that we will be building as it appears without CSS styling:
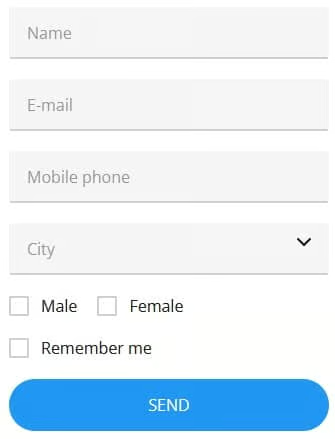
Compare that with the styled form!
JavaScript also plays a part to perform actions such as input validation, change data in response to user selections, and much more.
Read: Introduction to HTML5 Forms.
How to Use the <form> Element in HTML
The HTML <form> tags are used to delineate an HTML form for user input. Although not strictly necessary to use form controls, it helps define which controls should be submitted when a Submit button is clicked. Hence, you can think of the <form> element as a container for a related group of input elements, such as: text fields, checkboxes, radio buttons, submit buttons, etc…
Here is our form container:
<form class="content">
 <!-- form contents -->
</form>
The class attribute identifies the <form> element for the purposes of CSS styling.
The <input> and <label> Elements in HTML
The HTML <input> element is the most used form element. Perhaps that’s because it may define several control types, depending on the type attribute. For example, to display a single-line text input field, we can set the type to “text”. It’s also the default, if no type is supplied.
The first field of our form is a text input:
<div class="form-group">
  <div class="form-input js-form-input">
  	<label class="form-input__label">Name</label>
  	<input class="form-input__input" type="text" value="John Doe">
  </div>
</div>
There is a lot extra markup in there for CSS styling; without all of that, you basically have a label and the text input:
<label>Name</label>
<input type="text" value="John Doe">
The <label> tag defines an identifier for form controls. In addition to informing sighted users what data the control pertains to, labels are also read by screen-readers when the associated input element receives focus. Functionally, label elements become part of the element which they identify by responding to clicks in the same way as their associated control. For example, clicking the text within the <label> element next to a radio button/checkbox toggles the control.
To do that, the for attribute of the <label> tag should be equal to the id attribute of the <input> element to bind them together, like so:
<input type="checkbox" id="check1">
<label for="check1" style="background-color: yellow">Click me to toggle the checkbox</label>
Try it out below!
Click me to toggle the checkbox
You can also wrap the <label> tags around the control as long as you don’t mind it appearing before the control:
<label for="check2" style="background-color: yellow">Click me to toggle the checkbox
  <input type="checkbox" id="check2">
<label/>
Here’s what that looks like:
Click me to toggle the checkbox
Specialized Text Inputs in HTML Forms
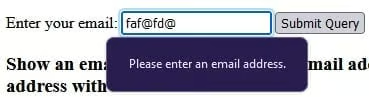
As HTML forms have become increasingly sophisticated, newer and more specialized form controls have been added to the HTML specification. Case in point, the email type. As any experienced Web developer will attest to, validating email addresses is a challenge! Input fields defined with type=”email” are validated automatically on form submission. An email field may also allow multiple email addresses by including the “multiple” attribute. Here’s an example of a message that you’d see when trying to submit an improperly formatted email address:
The second field in our form is an email field. Here is the markup for it:
<div class="form-group">
  <div class="form-input js-form-input">
  	<label class="form-input__label">E-mail</label>
  	<input class="form-input__input" type="email" value="jdoe@gmail.com">
  </div>
</div>
And again without all of the additional styling DIVS and classes:
<label>E-mail</label>
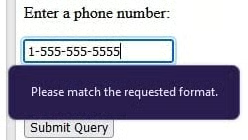
<input type="email" value="jdoe@gmail.com">Another specialized type of text input validates telephone numbers. Like email addresses, telephone numbers come with virtually limitless variations. To cover these, the tel type accepts a pattern attribute for defining a valid telephone number format. The pattern is basically a Regular Expression that defines which digits are acceptable as well as how many may be grouped together. Here’s an example:
<label for="phone">Enter your phone number:</label>
<input type="tel" id="phone" name="phone" pattern="[0-9]{3}-[0-9]{2}-[0-9]{3}">
Like the email type, fields with type=”tel” are validated when the form is submitted. Here is a sample validation message:
The third field of our form accepts the user’s phone number:
<div class="form-group">
  <div class="form-input js-form-input">
    <label class="form-input__label">Mobile phone</label>
    <input class="form-input__input js-mask-phone" type="tel">
  </div>
</div>
Here is the basic field markup:
<label>Mobile phone</label>
<input type="tel">
Read: How to Create a Dynamic Form in WordPress.
Going Forward
If you look at the completed form on codepen.io, you’ll notice that there are some discrepancies between it and your basic HTML Form. That’s because of the CSS and JavaScript enhancements. For now, try it out and and explore all of the source code. By the end of this series, you’ll know exactly what does what.
