A short time ago, I wrote the Referencing DOM Elements using the Angular ViewChild Decorator tutorial. It covered the recommended way to access a single directive, child component, or DOM element from a parent component class in Angular applications. You could say that ViewChild is the Angular equivalent of the document.getElementByID() JavaScript selector.
Angular also provides alternatives to selectors, such as getElementsByClassName() or getElementsByTagName() that fetch a collection of similar elements. For instance, the ViewChildren Directive provides a list of element references rather than returning a single reference. We can then iterate over the list of elements captured by ViewChildren’s selector. In this Angular programming tutorial, we will learn how to use the ViewChildren Directive to reference template-reference variables, built-in directives, and child components, just as we did with ViewChild.
Read: Referencing DOM Elements Using the Angular ViewChild Decorator
How to Reference Native Elements in Angular
Recall from the Referencing DOM Elements using the Angular ViewChild Decorator article (linked above for reference) that, when supplied a template reference variable, the ViewChild directive returns an ElementRef that contains a reference to the underlying DOM element. Similarly, ViewChildren returns a QueryList that stores a list of ElementRefs. Moreover, when the state of the application changes, Angular will automatically update the ElementRefs for you. In the template, we will just add a reference variable that is prefixed with the # pound symbol:
<div class="singlesList">
  <input
    *ngFor="let single of singles; let i = index"
    [(ngModel)]="singleNames[i]"
    type="text"
    #singleName
  />
</div>
QueryList implements the iterable interface, so it can be used in Angular templates with the ngFor directive.
In the component, we can create a QueryList as follows:
export class AppComponent implements AfterViewInit {
@ViewChildren("singleName")
private singleNamesRef: QueryList<ElementRef<
Note that both the QueryList and ElementRef accept a Type parameter for increased type safety.
The QueryList is initialized just prior to the ngAfterViewInit lifecycle hook, therefore, it is available only from this point. We will bind the form controls to the model later, as we would if the data was retrieved via an API. This results in an ExpressionChangedAfterItHasBee
export class AppComponent implements AfterViewInit {
@ViewChildren("singleName")
private singleNamesRef: QueryList<ElementRef<
The QueryList object provides many helpful methods for working with it. These include first() and last(), which get the first and last item respectively. It also implements many Array methods such as map(), filter(), find(), reduce(), forEach(), and some(), as well as the length property. If that is still not array-like enough for your liking, you can always convert the list to a true array via the toArray() method.
It even has a changes() event that can be subscribed to. Any time a child element is added, removed, or moved, the QueryList will be updated, and the changes observable of the query list will emit a new value.
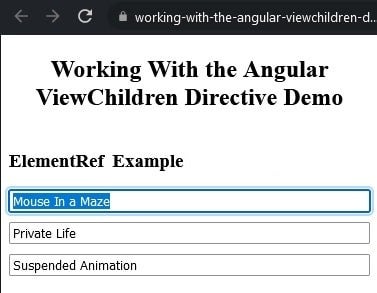
We can now use the QueryList to access form components in much the same way that we would using vanilla JavaScript. Here’s some code that selects the text in the first text input and sets the focus on it:
// clone the original array to track changes this.singleNames = [...this.singles]; this.changeDetectorRef.detectChanges(); setTimeout(() => { const firstElement: HTMLInputElement = this.singleNamesRef.first. nativeElement; firstElement.focus(); firstElement.select(); }); }
It should be noted that the QueryList selector can be a single or set of comma-delimited template references:
<div>
  <input type="text" #single1 />
  <input type="text" #single2 />
  <input type="text" #single3 />
</div>
This allows us to reference individual controls, where we know what we’re working with in advance:
@ViewChildren("single1, single2, single3")
private QueryList<ElementRef<
Read: Respond to DOM Changes in Angular with MutationObserver Web API
Using ViewChildren with Angular Directives
ViewChild can also read built-in directives like NgModel. That will populate the QueryList with all the elements that have the NgModel directive attached to it. To do that, all we need to do is replace the template reference variable and the generic Type parameter to NgModel:
@ViewChildren(NgModel)
private singleNamesNgModelRef: QueryList<NgModel>;
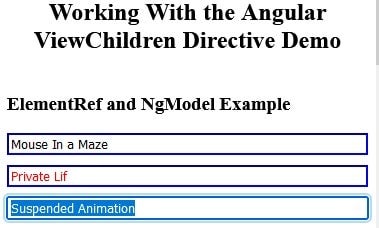
An interesting thing about NgModel is that it automatically sets classes on bound controls such as ng-pristine, ng-touched, ng-valid, and ng-dirty. Even without accessing NgModel properties directly, we can tailor the look of form controls using CSS:
input[type="text"].ng-touched {
  border-color: blue;
}

input[type="text"].ng-dirty {
  color: red;
}
You can see their effects in the form:
Read: Creating Custom Attribute Directives in Angular
Accessing Child Components in Angular
Angular components are meant to be reusable, so it is quite common to see several instances of the same component within another. For instance, here are three instances of a component that lets users enter their names and greets them accordingly:
<h3>child component example</h3>
<greet></greet>
<greet></greet>
<greet></greet>
No template reference variables are required here. Just pass the component class name to ViewChildren and the QueryList type parameter (in this case, GreetComponent):
@ViewChildren(GreetComponent)
private greetComponentRef: QueryList<GreetComponent>;
Inspecting the QueryList Objects
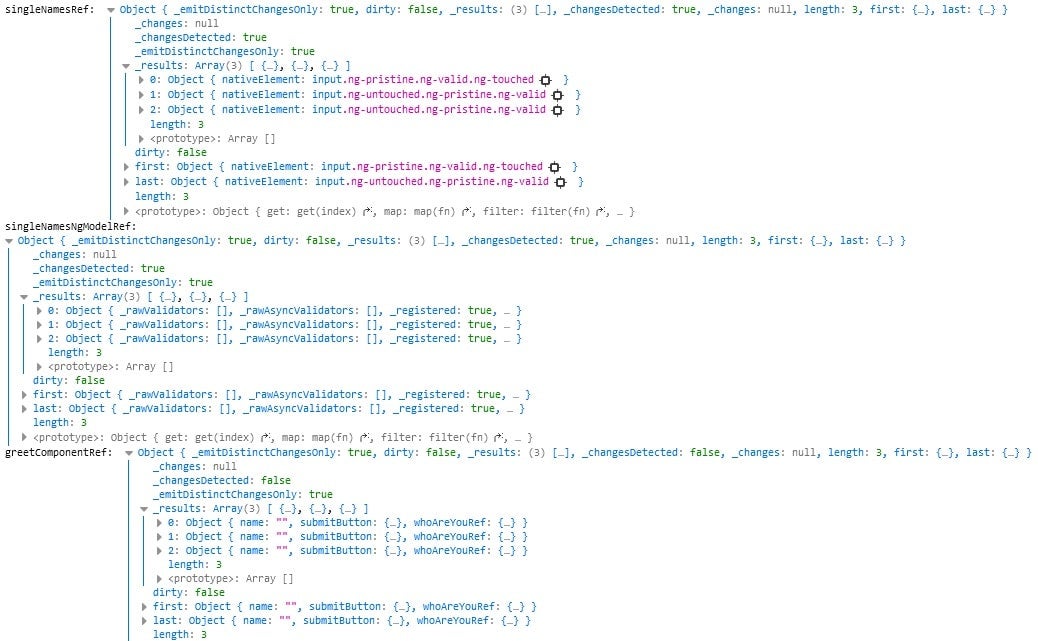
To highlight the similarities and differences between the three QueryList’s, we can output them to the console for inspection:
console.log(
  'singleNamesRef: ', this.singleNamesRef,
  '\nsingleNamesNgModelRef: ', this.singleNamesNgModelRef,
  '\ngreetComponentRef: ', this.greetComponentRef
);
We can see that, although the wrapper object is the same in each case, the _results arrays contain different object types, namely ElementRefs, NgModels, and GreetComponents:
There’s a demo with today’s code on stackblitz. Be sure to open the browser console to see the output.
Conclusion to Working with Angular ViewChild Directives
In this tutorial, we learned how to use the ViewChildren Directive to reference template-reference variables, built-in directives, and child components, just as we did with ViewChild previously. There are other ways to reference page elements in Angular, but ViewChild and ViewChildren are the two that you will find yourself turning to again and again.


