In the Respond to DOM Changes with Mutation Observers article, we learned about DOM Mutation Observers, which replaced the clunky DOM Mutation Events. Both Mutation Events and Mutation Observers were designed to inform your script of changes to the DOM structure. These include:
- the adding or removing of elements
- changes to an element’s attributes
- character data changes (i.e., changes to a text node)
Looking at the above list, it quickly becomes apparent that Mutation Observers can also help Angular developers respond to DOM events that would remain elusive otherwise. In this tutorial, we will see just how easy it is to harness the power of the MutationObserver Web API to receive updates whenever a Component’s child elements change.
Introducing the Singles Catalog Management Console App
Here’s an Angular app for managing the cover art for a catalog of digital music singles:
It’s a very simple app that allows us to add and remove items from an unordered list. Unsurprisingly, there is not a whole lot of HTML markup required to make it work:
<h1>Singles Catalog</h1>
<ul>
  <li *ngFor="let artwork of singlesArtwork">
  <img [src]="artwork" /><button (click)="removeArtwork(artwork)">Remove</button>
  </li>
</ul>
<button *ngIf="showAddButton; else showMessage" (click)="addArtwork()">Add Next Single</button>

<ng-template #showMessage>No more singles to add.</ng-template>
Read: Declare and Respond to a Dom Element Ready Event
Creating an AppService in Angular
The images are served up from a service via the public fetchSinglesArtwork() method. It removes elements from the start of the list and emits them as an RxJS Observable. A delay of 500 milliseconds is added in order to emulate a network call that would be employed to fetch image URLs from an external data store. It also has a method to remove images that replaces previously removed items:
import { Injectable } from '@angular/core';
import * as Rx from 'rxjs/Rx';
const ROOT = 'https://i1.sndcdn.com/
Fetching the Initial List
On startup, our app shows the first three images. To fetch them, the AppComponent injects our service into the constructor and invokes its fetchSinglesArtwork() method. In the subscription callback function, the URLs to the singles artwork are stored in the public singlesArtwork variable that is referenced from the template. It is a Set rather than a regular array so that we can guarantee that the list never contains duplicates. Of course, if the service is coded properly, that should never happen.
@Component({
selector: 'my-app',
templateUrl: './app.component.html',
styleUrls: ['./app.component.css']
})
export class AppComponent {
private singlesArtwork: Set<string>;
public showAddButton = true;
constructor(private appService: AppService) {
appService.
Read: RXJS Observables Primer in Angular
Adding an Item to the List
Clicking the Add Next Single button invokes the addArtwork() method, which in turn calls fetchSinglesArtwork(). In the addArtwork() subscription callback function, the artwork is added as long as there are elements left in the array; otherwise, the Add button is replaced by a message stating that there are no more singles to add:
public addArtwork(): void {
this.appService
.fetchSinglesArtwork()
.subscribe(singlesArtwork => {
if (singlesArtwork.length > 0) {
this.singlesArtwork = this.singlesArtwork.add(
Removing an Item from the List
Beside each image, there is a button to remove it from the list that invokes the removeArtwork() method. It, in turn, calls the service’s removeSinglesArtwork() method, passing along the image URL so that the missing data may be replaced in the AppService’s singlesArtwork array:
public removeArtwork(artwork: string): void {
this.singlesArtwork.delete(
The DomChange Directive in Angular
In Angular applications, the MutationObserver API is probably best implemented as a directive. The ElementRef is injected as a constructor parameter so that we can access the node element directly. Then every DOM change emits a custom event that passes the change itself as an argument:
import { Directive, ElementRef, EventEmitter, OnDestroy, Output } from '@angular/core';
@Directive({
selector: '[domChange]'
})
export class DomChangeDirective implements OnDestroy {
private changes: MutationObserver;
@Output()
public domChange = new EventEmitter();
constructor(private elementRef: ElementRef) {
const element = this.elementRef.nativeElement;
this.changes = new MutationObserver((mutations: MutationRecord[]) => {
mutations.forEach((mutation: MutationRecord) => this.domChange.emit(mutation))
We can now bind the directive to the onDomChange() handler in the template as follows:
<ul (domChange)="onDomChange($event)">
In this case, the $event will be an ElementRef to the <ul> element.
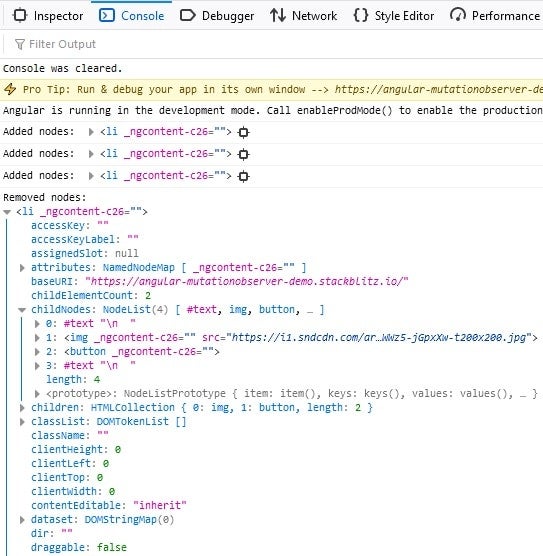
In the AppComponent’s onDomChange() handler, we can respond to the DOM changes any way we wish. For demonstration purposes, we’ll just look for the addition and removal of <li> elements and output the first one to the console:
public onDomChange(mutationRecord: MutationRecord): void {
  const addedNodes   = mutationRecord.addedNodes;
  const removedNodes = mutationRecord.removedNodes;

  if (  addedNodes.length > 0
    && (addedNodes.item(0) as HTMLElement).tagName === 'LI') {
    console.log('Added nodes: ', addedNodes.item(0));
  } else if (removedNodes.length > 0
         && (removedNodes.item(0) as HTMLElement).tagName === 'LI') {
    console.log('Removed nodes: ', removedNodes.item(0));
  }
}
Note that both the addedNodes and removedNodes elements are Node objects in TypeScript, so we have to cast them as an HTMLElement in order to gain access to its attributes and methods. We can see some sample output here:
You’ll find the Singles Catalog application on stackblitz.
Conclusion
Thanks to the MutationObserver Web API, we can do things in our Angular apps that would be very difficult to otherwise. Just be careful to respect the component hierarchy and avoid listening to changes within other components. For instance, if you need to respond to DOM changes within a child component, add the directive to its template and then pass up the data you need to the parent via an EventEmitter.


