Graphical User Interfaces (GUIs) handle user interactions using something called the “event-driven programming model”. All that means is that when a user does something in the user interface, such as clicking a button or selecting an item from a list, the application fires an event behind the scenes to alert processes that may want to do something in response to the action. The Vaadin Mobile Application Framework takes a two-pronged approach to events: first, it implement something called the Observer pattern. It also adds an abstraction layer to HTML/JavaScript events. We learned about generating Vaadin controls in the Build a User Interface using the Vaadin Mobile App Framework and Exploring Vaadin Add-ons tutorials. In today’s instalment, we’ll learn more about the Observer pattern and attach event handlers to our controls.
The Observer Pattern: Events and Listeners
The Observer pattern is a behavioral design pattern whereby a GUI element, called the subject, notifies subscribed listeners whenever a change in its state occurs. Listeners are able to register and unregister themselves at any time. Any time that that a subscribed event fires, a special event handler method executes. Usually this method received information about the event source or even a reference to the element itself.
With respect to Vaadin, it is important to note that Vaadin handles the sending of client-side browser events and firing its own events on the server side. Thus, we only need to subscribe to the events that interest us and implement the associated event handler. Here’s an example:
final Button button = new Button("Click me!");

button.addClickListener(new Button.ClickListener() {
    public void buttonClick(ClickEvent event) {
        event.getButton().setCaption("You clicked me!");
    }
});
In the code above, the addClickListener() method is the subscribing event. Note that each control type offers subscription methods for their various event types. In addition to ClickListener, one could also subscribe to Focus and/or Blur events as well.
The addClickListener() method’s one argument is a Button.ClickListener Interface. Usually you can’t put the new keyword in front of an Interface because it is not instantiable. However, the exception is when you create an anonymous class, which is what we did here. In fact, this is the defacto way to assign our event handlers because you never need to invoke them directly once declared. The buttonClick() method is the one method required by the Button.ClickListener Interface and is our event handler. It receives a ClickEvent object that contains a number of details about the event that was fired, including the triggering button. The convenience getButton() method returns it. From there you have full access to the button’s attributes, events, and methods.
Exploring the ValueChangeListener Event
As part of the AbstractField class, all fields inherit the addValueChangeListener() method, so that other fields may be notified whenever their value changes. It replaced the deprecated addListener() method in version 7. If you haven’t used addValueChangeListener() before, it can be tricky to get right – especially if you follow the convention of implementing the ValueChangeListener argument in an anonymous class. That’s where you use the new keyword in front of the Interface and create the implementor class right then and there:
new AnInterface() {
    @Override
    public void implementedMethod1() {
        //do something…
    }
    @Override
    public String implementedMethod2(AClass aClassArg) {
        return "a string";
    }
}
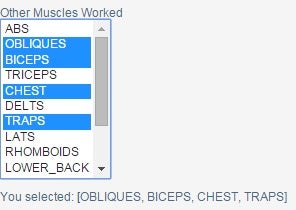
Our next example adds a ValueChangeListener to the lstOtherMusclesWorked ListSelect. Take a look at the third line where it says “new Property.ValueChangeListener() {“; that is the inline instantiation of the implementor class. On the next line, the @Override annotation demarcates the implemented valueChange() method. It accepts a ValueChangeEvent that can relay information about the event to you. Some events – like the ClickEvent above – provide the element that fired the event. However, the ValueChangeEvent returns the affected Property. The Property in turn has a getValue() method for retrieving the the latest Property value. That’s where things get a bit tricky. A Property can be just about anything, so getValue() returns an Object type. Since Object has very few useful methods, you have to cast the return value into something more usable. What that is depends on the element and what it contains. In the case of a multi-select ListSelect, that is a java.utils.Collections Set interface. That in itself could represent a number of classes, but a good bet is Collection<String>. You’ll have to add the @SuppressWarnings(“unchecked”) annotation to the valueChange() method to get rid of warnings in Eclipse, but other than that, in the infamous words of a consultant that I used to work with, “it should just work!”.
final ListSelect lstOtherMusclesWorked = new ListSelect("Other Muscles Worked", musclesWorkedContainer);
final Label lblSelectedOtherMusclesWorked = new Label();
lstOtherMusclesWorked.addValueChangeListener(
      new Property.ValueChangeListener() {
          @SuppressWarnings("unchecked")
          @Override
          public void valueChange(ValueChangeEvent event) {
              Collection<String> values = (Collection<String>) event.getProperty().getValue();
              lblSelectedOtherMusclesWorked.setCaption(values.size() == 0 ? "No items selected" : "You selected: " + values);
          }
     });

// Multiple selection mode
lstOtherMusclesWorked.setMultiSelect(true);
lstOtherMusclesWorked.setImmediate(true);

layout.addComponent(lstOtherMusclesWorked);
layout.addComponent(lblSelectedOtherMusclesWorked);
The selected items are listed in a label called lblSelectedOtherMusclesWorked:
Conclusion
Anyone with a solid background in the Java Event Model should be able to manage in Vaadin. I personally would like to see less casting, but that’s fairly small potatoes. Some complex controls like the UploadField may implement various Interfaces to respond to a variety of events. We’ll delve deeper into some of those in the next installment.


