In the previous article in this series, we employed the NestedTreeControl’s getDescendants() method to filter selected nodes as well as those which matched a search string. In today’s web development tutorial, we will make the matched search terms stand out by expanding those nodes and highlighting the matched text.
You can read the first part of this series by visiting: Filtering Angular Material NestedTreeControl Nodes.
Expanding Matched Nodes in Angular
Typically, it’s nice to see the nodes that you’re searching for. The problem is, those nodes may or may not be already expanded. Conveniently, the NestedTreeControl offers a couple of handy methods that can assist us. For instance, isExpanded() tells us whether a given node is visible (i.e. expanded) or not. We could apply it in out public hideParentNode() method like so:
public hideParentNode(node: VehicleNode): boolean {
  const hide = this.treeControl
        .getDescendants(node)
        .filter(node => node.children == null || node.children.length === 0)
        .every(node => this.hideLeafNode(node));

  if (!hide && !this.treeControl.isExpanded(node)) {
    // expand the node
  }
  return hide;
}
To expand the parent node, the NestedTreeControl provides expandDescendants(). It accepts a node and expands its subtree recursively so that all of its descendants are also expanded. We would invoke it as follows:
this.treeControl.expandDescendants(node);
While this works, it also prevents the user from collapsing any of the nodes that contain matching text! The reason is that hideParentNode() is invoked by Angular many times as it evaluates and reevaluates template expressions. A far better solution is to bind the text field to a separate handler via the ngModelChange event:
<label>Filter by:
    <input [(ngModel)]="searchString" (ngModelChange)="filterStringUpdate($event)" />
  </label>
The ngModelChange $event receives the latest and greatest model value, which in this case, is the searchString.
One slight hitch to expanding matching nodes here is that we no longer get a reference to individual nodes. As such, we have to basically perform the search against all leaf nodes in order to determine which ones to show. On the bright side, we already have a method that can check child nodes for us. That method is of course hideParentNode(). We still need some root nodes to iterate over. Those are available from the TreeControl or DataSource. We will use the latter:
public filterStringUpdate(searchString: string) {
    if (searchString) {
      this.dataSource.data.forEach(node => {
        if (!this.hideParentNode(node)
         && !this.treeControl.isExpanded(node)
        ) {
          this.treeControl.expandDescendants(node);
        }
      });
    }
  }
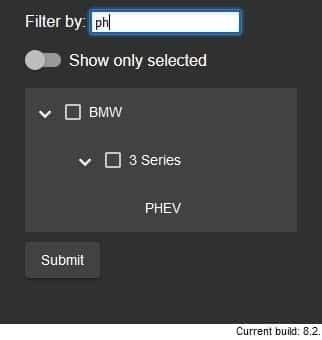
Now branches will expand as soon as matching node text is found:
Read: Filter DOM Nodes Using a TreeWalker
Highlighting Matched Search Terms in Angular and CSS
In addition to expanding tree nodes to show matching node labels, we can also highlight the matched search terms by setting their background color. This might sound like a daunting task, but, in Angular, it is relatively easy.
There are probably several ways to go about it, but one solution is to create a pipe that accepts the searched text as an argument and returns a SPAN element based on the result of a regular expression or RegEx. Here is the code for just such a pipe:
import { Pipe, PipeTransform, SecurityContext } from '@angular/core';
import { DomSanitizer } from '@angular/platform-browser';

@Pipe({
  name: 'highlight',
})
export class HighlightPipe implements PipeTransform {

  constructor(private sanitizer: DomSanitizer) { }

  transform(text: string, search: string): string {
    if (!search) {
      return text;
    }

    const regex =
      new RegExp(
        this.sanitizer.sanitize(SecurityContext.HTML, search), 'gi'
      );
    const match = text.match(regex);

    if (!match) {
      return text;
    }

    return text.replace(regex, `<span class='highlight'>${match[0]}</span>`);
  }
}
Read: Fine Tuning Your RegEx Patterns
If you look closely at the above code, you’ll notice that there are three return statements. That is because the pipe just never knows what it will get:
- There may not be a search string at all. In that case, we return the full, unaltered, text.
- The search term may not match any part of the text. Again, we return the original text.
- If the RegEx does hit, we wrap the matched portion within SPAN tags and return that.
Another observed curiosity in the transform() method is the sanitize() method. Sanitization refers to the modification of untrusted input so that it is rendered safe to insert into the DOM. The sanitize method is exposed by the DomSanitizer class, which is why it is injected via the constructor.
The type of sanitization performed depends on the context, because a value that is harmless in CSS could be potentially dangerous in a URL. For that reason, the first argument of the sanitize() method is a SecurityContext enum. Since we are generating HTML markup, the correct context is SecurityContext.HTML.
The HighlightPipe returns a string, so it is not enough to filter the node.name through the pipe. That will display the SPAN markup as text! The way to get around that is to assign the piped value to a nested element’s innerHTML property. We do not want to alter the mat-checkbox’s innerHTML because that will replace it with the output from the highlight pipe. Instead we can add a SPAN element that will contain the nested highlighting SPAN:
<mat-checkbox
  class="checklist-leaf-node"
  (change)="itemToggle($event.checked,node)"
  [checked]="node.selected"
>
<span [innerHTML]="node.name | highlight: searchString"></span>
</mat-checkbox>
The only thing left to do now is add the highlight class rule to the styles.css file:
.highlight {
  background-color: rgba(255, 255, 0, 0.5);
  font-weight: bold;
}
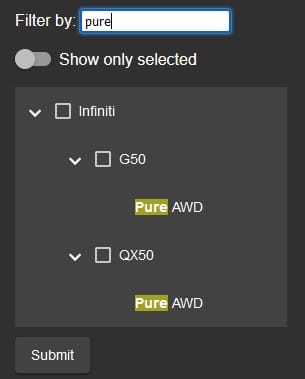
That will give the matched text that familiar yellow marker highlighting that we all remember from school:
There’s a demo of today’s code on stackblitz.
Conclusion
In today’s Angular web development tutorial, we learned how to make matched search terms stand out by expanding those nodes and highlighting the node text. It took a bit of ingenuity, but where there’s a will, there’s always a way!
Read more JavaScript and Angular web development tutorials and programming guides.


