


A-frame is an easy-to-use library that can be applied in the same manner as HTML tags to create virtual reality (VR) worlds within a web page. If you are unfamiliar with A-frame, you can get a quick introduction in the article Web-based VR Made Simple with A-Frame here on HTMLGoodies. In that virtual reality programming tutorial, you can see how shapes can be added into a simple VR scene by including a script and then adding a little bit of markup.
In a second article, Creating a Better Environment in Web-based VR Using A-Frame, the use of pre-created scenes in A-frame solutions was introduced. The article not only showed how to add the various scenes to your A-frame VR solutions, but also presented information on setting various parameters, such as determining the number of trees displayed in a forest.
In this article, we will shift away from the constructed environments included in A-frame and instead create the illusion of something from the real world. Below, VR developers will learn how to give your user a 360-degree view of a 360-degree panoramic image.
Granted, there are existing programs that will let you view a 360 degree image in your VR headset or on a web page, so you might wonder what makes doing this in A-frame different? The answer is simple: using A-frame, you can add other objects and models into your view. For example, I have a 360 photo from the inside of Lucas Oil Stadium in Indianapolis.
What is a 360-Degree Image in Virtual Reality?
If you are unfamiliar with a 360-degree image, it is not a mysterious element. Rather, it is simply a panoramic image that surrounds a central point. If you attach the left side of the image to the right, it should flow into a circle. The following is the 360-degree image I have from Lucas Oil Stadium in Indianapolis taken during the GenCon conference:

How to Create a 360-Degree Image
The easiest way to create a 360-Degree image is with an application on your phone or digital camera. Apps that take 360-degree images will generally have you stand in one spot. You then take a number of pictures in a row. After each picture, you will be prompted to turn and take another. You keep turning and taking pictures until you go in a full circle. Once you have taken a full circle of pictures, the app will then stitch them together into a single panoramic view.
I use the free version of an app called P360 (also called Panorama 360 and Virtual Tours), which was designed for iPhone but also works on Android phones. There are numerous other apps as well. With P360, an indicator is placed on the screen when you are taking pictures so you know how far to turn before taking each photo. It then stitches the results together. The app includes the ability to then download the images. I downloaded the above Lucas Oil Stadium image as a .jpg file from the app.
Read: Virtual Reality Tutorial: How to Build an Android VR App
Using 360-Degree Images in A-frame VR
Once you have a 360-degree image, you can place it into your A-frame page as the sky background. If you recall from the previous article, an A-frame VR page is created by including the aframe.min.js script and then building a scene. Within the following listing, we create a scene that only contains a sky element:
<html>
  <head>
    <script src="https://aframe.io/releases/1.0.4/aframe.min.js"></script>
  </head>
  <body>

    <a-scene>
      <a-sky src="GenCon.jpg"></a-sky>
    </a-scene>
  </body>
</html>
The sky element is identified with the tag. This element actually creates a sphere around your entire scene and then paints it with either a color or an image. In the code above, we have used a panoramic, 360-degree photo called GenCon.jpg that is in the same folder as the HTML file. The result adds the image to your scene. Note that you can save the Lucas Oil Stadium image above with the name GenCOn.jpg to duplicate this effort. The result of the above listing when ran in a browser is shown here:

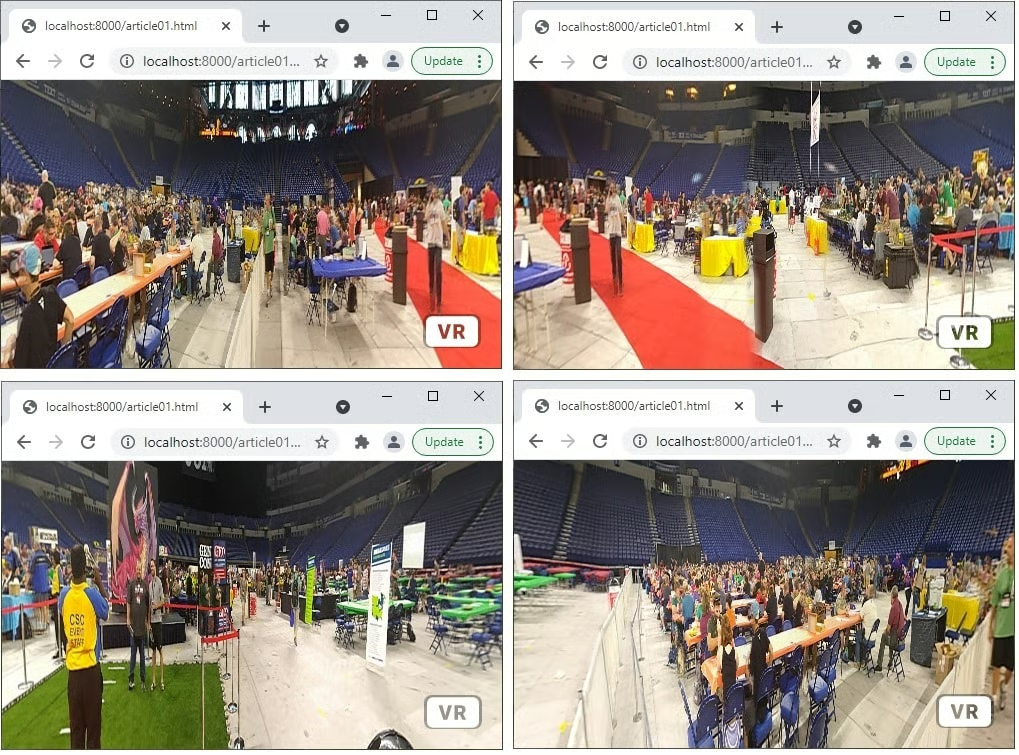
If you view the code running on a web page, you will be able to scroll around with your mouse. If you are using a VR headset, you will be able to look in any direction and see that the image wraps around you. The following images are from looking in a circle in the browser.
At this point, you have the code to incorporate a 360-degree image into your scene; however, there is one change you should make. In the earlier code, you are loading the image with the tag. You are better to load the image with an asset tag and then use the id of the asset from within the tag’s source attribute. The updated code to do this is:
<html>
  <head>
    <script src="https://aframe.io/releases/1.0.4/aframe.min.js"></script>
  </head>
  <body>
      <a-assets>
        <img id="MySky" crossorigin  src="GenCon.jpg">
      </a-assets>

    <a-scene>
      <a-sky src="#MySky"></a-sky>
       </a-sphere>
    </a-scene>
  </body>
</html>
In this code, you can see that an tag was added that loads an image using a standard HTML tag. The image is given an id of “MySky” that is then used from the tag instead of the image URL. With this change, the page should look exactly the same. The difference is that the image will be loaded once as an asset for the page.
NOTE: If you are creating this code locally, you might find that running it from a local browser does not display your background image. If this is the case, then you might need to run a local server (localhost) and run the page using that server.
Read: Microsoft Mesh: Adding VR to Presentations and Videoconferencing
Setting an A-frame Virtual Reality Sky Color
The focus of this article is to show how to display a 360-degree image. The tag can also be used without an image to simply set a background color to your VR environment. This is done by setting the color attribute. You can use a standard hex code for setting the color. The following should set the color to sky blue:
<a-sky color=”#87CEEB”></a-sky>You can also use standard predefined colors:
<a-sky color=”blue”></a-sky>Ultimately, as mentioned, what the attribute does is create a sphere around your scene that has the designated color or image mapped to the inside. The default value of the radius of the sky sphere is 500. You can change the radius to match your scene. Often, you will adjust the radius to match the size of the plane (floor/ground) of the world you create.
A-Frame Virtual Reality Programming Summary
You can see how easy it is to add a 360-degree panoramic image to a VR scene using A-frame. With just a couple lines of code, you have a web page that a person using a VR headset can interact with by looking in any direction.
What was not shown in this article is that in addition to adding your sky, you can also add any of the other elements from A-frame into your scene. In the city where I live, 5G cell towers are being added to neighborhoods. Using what is presented in this article, a 360-degree image can be taken in front of an area where a tower will be added (usually someone’s house). This can be pulled into A-frame. A 3D model file of the tower itself can then be added into the scene in the position where it will be installed. This will let everyone see how it will look once completed and help determine if moving the tower a little one way or the other will make a difference.
Of course, there are a multitude of other examples that are possible as well. Feel free to share what you’ve done in the comments of this article!
