


If you want to create your own Joomla! template from scratch, you need to download and install the latest version of Joomla!, most preferably to your localhost. There are a few reasons to do this.
First, you need to have Joomla! installed so you can see what you’re creating. When you design your template files you won’t be able to test them by simply opening an HTML test page. You will need to run the template files through Joomla! itself to see your code in action. This also means that you won’t be creating your template files through a WYSIWYG tool like Dreamweaver. If you’re accustomed to using web development software to create your sites, and now you want to start developing for Joomla!, you will need to get back to basics and learn how to code by hand.
I’ve always been a purist when it comes to developing by hand, especially after my initial experiences working with FrontPage and not getting it to do exactly what I wanted. Because of that frustration, I picked up an HTML 4 book and taught myself how to hand code. Through that experience, I never bothered to learn Dreamweaver or any other software. Instead, I turned to Chami’s HTML-kit, which is a free download and an excellent HTML editor. From that tool, I perfected my craft of hand coding HTML, which lead nicely to hand coding CSS; if your coding background is anything like mine, you’re in a prime situation to start coding for Joomla!. It’s time to get back in the trenches and design your code by hand.
Now that you’ve come to terms with hand coding your Joomla! template, it’s time to learn where your files will reside. If you haven’t already read my article, “Working with CSS in Joomla!” now is a good time to do so. That article covers where to find the CSS and template folders and files and provides some basic Joomla! CSS information. The templates folder is the same folder in which you’ll save your brand new template.
There are only two files that you need to create your own Joomla! template. The first is the index.php file. The index.php file includes the markup for the Joomla! includes. For example, the php file is used with modules, etc. The second file is the templateDetails.XML. After those two files are set up and working, you then create the CSS. All three files will work together to produce the content that appears in your Joomla! site.
Within the Templates folder, create a new folder and name it. Inside that folder create one plain text file as index.php and a second file as templateDetails.XML. Open the XML file and copy and paste in:
<?XML version="1.0" encoding="utf-8"?>

<!DOCTYPE install PUBLIC "-//Joomla! 1.5//DTD template 1.0//EN"

"http://dev.joomla.org/XML/1.5/template-install.dtd">

<install version="1.5" type="template">

      <name>your_template_name</name>

      <creationDate>15-3-2011</creationDate>

       <author>your_name</author>

       <authorEmail>your@email.com</authorEmail>

       <authorUrl>http://www.siteurl.com</authorUrl>

       <copyright>You 2011</copyright>

       <license>GNU/GPL</license>

       <version>1.0.0</version>

       <description>My First Joomla Template</description>

       <files>

               <filename>index.php</filename>

               <filename>templateDetails.XML</filename>

               <filename>css/template.css</filename>

        </files>


       <positions>

                 <position>top</position>
                               <position>left</position>
                               <position>right</position>
                               <position>bottom</position>
                               <position>banner</position>
                               <position>syndicate</position>
                               <position>footer</position>
                               <position>user1</position>
                               <position>user2</position>
                               <position>user3</position>
                               <position>user4</position>          </positions>

</install>The above code adds your personal details to the template and assigns some basic module positions.
Open the index.php file and paste in the beginnings of your code:
<!DOCTYPE html PUBLIC "-//W3C//DTD XHTML 1.0 Transitional//EN" "http://www.w3.org/TR/xhtml1/DTD/xhtml1-transitional.dtd">

<html XMLns="http://www.w3.org/1999/xhtml" XML_lang="<?php echo $this->language; ?>" lang="<?php echo $this->language; ?>" >

<head>

<jdoc:include type="head" />

</head>

<body>

<jdoc:include type="component" />

<jdoc:include type="modules" name="left" />

</body>

</html>
This code provides your doctype and some basic PHP code. This is the furthest extent of PHP that you will need to know. This code also includes the left module that you defined in your templateDetails.XML file. Go ahead and save and close both of these files if you have them open.
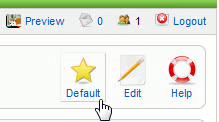
Now go into the backend of Joomla! and create a new article that is published to the front page. Click Preview and you should see your new article. What you don’t see yet is the new template you just created. To add in your new template, go to the Template Manager. You should see your personally-named template in the list of available templates. Click the radio button next to your template and then click the yellow star to make it the default.
Now click Preview again and you should see your recently added article, your header information and title. You should also see a Home menu item at the bottom of your article. This appeared in the left module position because during the basic Joomla! install, the main menu module is created as a default. If you did not include the left include in your php file, the main menu would not have appeared, because there would have been no call to it. Congratulations on creating your first Joomla! template, of course, it’s minus any decoration…but that comes next.
Go back to your templates folder and create a folder named CSS, and within that folder, create a file called template.css. You now need to link your CSS file to your index.php file. You also need to add div tags for each of your modules. Here’s the code for linking your CSS file:
<link rel="stylesheet" href="<?php echo $this->baseurl ?>/templates/your_template_name/css/template.css" type="text/css" />And here’s the complete code with some sample div tags:
<!DOCTYPE html PUBLIC "-//W3C//DTD XHTML 1.0 Transitional//EN" "http://www.w3.org/TR/xhtml1/DTD/xhtml1-transitional.dtd">
<html XMLns="http://www.w3.org/1999/xhtml" XML_lang="<?php echo $this->language; ?>" lang="<?php echo $this->language; ?>" >
<head>
<jdoc:include type="head" />
<link rel="stylesheet" href="<?php echo $this->baseurl ?>/templates/your_template_name/css/template.css" type="text/css" />
</head>
<body>
<div id="container">
<div id="header"><jdoc:include type="modules" name="top" /> Header information</div>
<div id="sidebar_left" class="float">
<jdoc:include type="modules" name="left" />
</div>
<div id="sidebar_right"class="float"><jdoc:include type="modules" name="right" />Right sidebar</div>
</div>
</div>
</body>
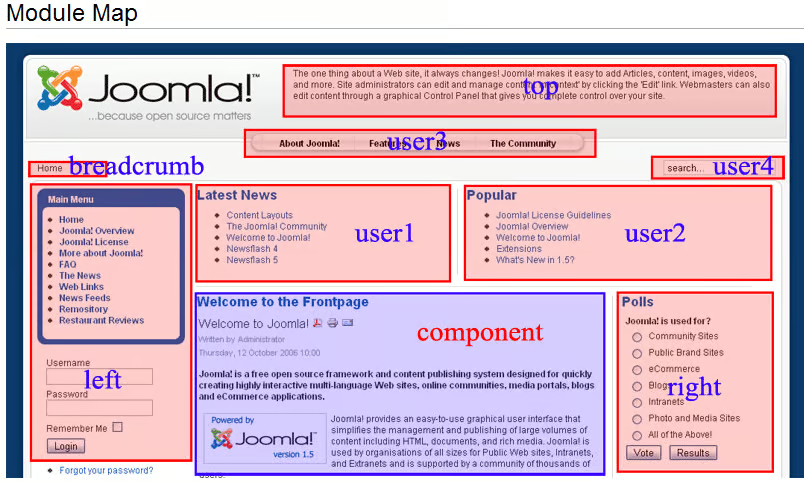
</html>Notice that each div tag contains an include that is a defined module position. The basic Joomla! installation files defines these positions for you, which you can override. The following map for default module positions was taken from the Joomla! documentation.
Basically, for the CSS, you want to define styles for each of your div tags from your PHP file. Here is some starter code for the CSS file:
* {

        padding: 0;

        margin:0;

        }

ul {

        list-style:none;

        }

.float {

        float: left;

        }

.clear {

        clear: both;

        }

#container {

        width:960px;

        margin: auto;

        }

#header {

        background-color:#999999;

        height: 150px;

        }

#content {

        width: 660px;

        text-align: center;


        }

#sidebar_left {

        text-align: center;

        background-color:#CCCCCC;

        width: 150px;

        }

#sidebar_right {

        background-color:#CCCCCC;

        width: 90px;

        }
These are the basics to get started creating your own Joomla! template. To summarize, the XML file is used to define to your template’s personal information and to list the module positions. The PHP file is used to further define the modules and connect them to the CSS file. Finally, the CSS file completes the definition of the modules by adding in the decoration and alignment.
