HTML and CSS have come a long way from where they started. In the 90’s, before CSS was formally introduced, the focus was purely on the functionality of web pages. They looked ugly, but no one really complained since they were not aware of what promises CSS would bring. The only way to make the page look beautiful was to use loads of images but the lack of high speed internet connections prevented developers from using that approach since it hampered the user’s experience.
Over the years, as CSS advanced, it enabled the developer to style certain form elements like text fields and textareas. Other elements like select menus, radio buttons and checkboxes were left unstylable. When I first read the discussions about CSS3 on the internet, I became hopeful that it will allow us to style these form elements too. Unfortunately, my wishes were not granted. So until they do, we are forced to use work-around solutions for it.
Of the three elements that can’t be styled using CSS, the radio buttons and the checkboxes are easy to simulate. With very basic markup including hidden fields and a few lines of JavaScript, you can quite easily replicate their behavior. Select menus however are harder to handle. There are two methods that you have to choose between:
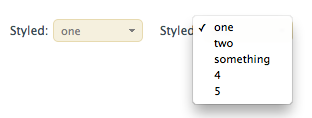
Sometimes a problem that seems apparently very hard to solve, has the simplest of solutions. And there is a beauty in a simple solution that not many can appreciate. In my opinion, this is one such case. In very simple words, here is what we are doing to achieve this result. When the page loads, we insert a span exactly behind the select menu and drop the opacity of the select menu to 0 so that only the text shows through. When the user clicks on the menu, the options show up in the usual manner. Unfortunately we can’t style that in CSS. Setting the opacity of the select menu is not supported in Internet Explorer 6 or older. All modern day browsers support this technique.
One thing you must remember is that we are using absolute positioning to place the span exactly behind the select menu. You should assign position relative to the parent element so that the absolute position doesn’t affect other elements on the page.
Let’s See The Code
This solution requires a bit of everything: some HTML, JavaScript and CSS. The HTML markup is the easiest of the lot so we will see that first.
The HTML
<
select class=
”
styled
”
>
<
option
>
one
<
/option
>
<
option
>
two
<
/option
>
<
option
>
something
<
/option
>
<
option
>
4
<
/option
>
<
option
>
5
<
/option
>
<
/select
>
The important part is to give the select element an ID or a class so that we can style it using CSS and access it using jQuery.
The Javascript
The JavaScript function that does the needful to style the select menu is quite simple to understand, but don’t worry if you can’t follow what it does. Copy and paste it in your code and it should work. At most you will have to change one line of the code.
This solution is based on jQuery, so you will need to download it here. The following code does what we explained in the previous section.
(function($){
$.fn.extend({
customStyle : function(options) {
if(!$.browser.msie || ($.browser.msie
&
&
$.browser.version
>
6)) {
return this.each(function() {
var currentSelected = $(this).find(
‘
:selected
’
);
$(this).after(
‘
<
span class=
”
customStyleSelectBox
”
>
<
span class=
”
customStyleSelectBoxInner
”
>
’
+currentSelected.text()+'
<
/span
>
<
/span
>
’
).css({position:
’
absolute
’
, opacity:0,fontSize:$(this).next().css(
‘
font-size
’
)});
var selectBoxSpan = $(this).next();
var selectBoxWidth = parseInt($(this).width())
–
parseInt(selectBoxSpan.css(
‘
padding-left
’
)) -parseInt(selectBoxSpan.css(
‘
padding-right
’
));
var selectBoxSpanInner = selectBoxSpan.find(
‘
:first-child
’
);
selectBoxSpan.css({display:
’
inline-block
’
});
selectBoxSpanInner.css({width:selectBoxWidth, display:
’
inline-block
’
});
var selectBoxHeight = parseInt(selectBoxSpan.height()) + parseInt(selectBoxSpan.css(
‘
padding-top
’
)) + parseInt(selectBoxSpan.css(
‘
padding-bottom
’
));
$(this).height(selectBoxHeight).change(function() {
selectBoxSpanInner.text($(this).find(
‘
:selected
’
).text()).parent().addClass(
‘
changed
’
);
});
});
}
}
});
})(jQuery);
The customStyle function can be applied to any select menu element in the DOM. The function changes the opacity of the select menu and inserts a span element positioned exactly behind it. To call it, you would write code like this:
$(function() {
$(
‘
select.styled
’
).customStyle();
});
The CSS
The CSS style for this is very straightforward. You need to define the following:
span.customStyleSelectBox { font-size:11px; background-color: #f5f0de; color:#7c7c7c; padding:5px 7px; border:1px solid #e7dab0; -moz-border-radius: 5px; -webkit-border-radius: 5px;border-radius: 5px 5px; line-height: 11px; } span.customStyleSelectBox.changed { background-color: #f0dea4; } .customStyleSelectBoxInner { background:url(images/arrow.gif) no-repeat center right; }
Conclusion
And there you go. With some JavaScript and CSS you have been able to customize the look of a select menu. As we are targeting all select menus with the class ‘styled’, all you need to do is assign the ‘styled’ class to all select menus that you want styled this way on the page. On browsers like IE6, that don’t support setting the opacity of a select menu, this solution will degrade gracefully, so you don’t need to worry about checking for legacy browsers.