By Rob Gravelle with Gyula Németh
In the last few months, Gyula Németh and his team have been working on a in-depth tutorial series about coding HTML emails. Every chapter discusses a different topic and they help the readers learn how they have to use ancient techniques to ensure that their newsletter looks nice on most of the email clients.
The tutorial series already covered the most important issues, so it’s time to show you how to create a nice looking newsletter from scratch that will be enjoyable in most of the email clients.
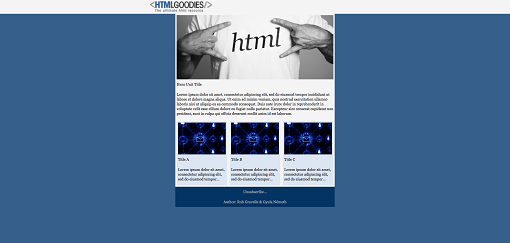
The email template we will build in this tutorial looks like this:

Robust Frame
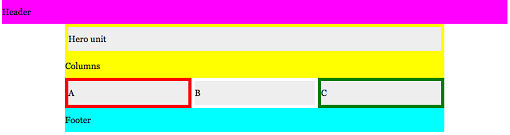
First of all, we need to create a robust framework for our template. As you can see in the preview, there are wide stripes going across the template. In each one of them, the content is aligned in the middle. The standard width for the content of the email is 600px. It has historical reasons, and it’s already proven that you can play around with different widths.
In our example, we use a 800px wide header and 600px wide content:
...
<center>
  <table cellpadding="0" cellspacing="0" border="0" style="width:100%;max-width:800px;margin: 0 auto;">
    <tr>
      <td width="100%" style="text-align:left;background-color:#ff00ff;">
        <p style="font-family:Georgia,Arial,sans-serif;font-size:14px;line-height:18px;padding-top:10px;padding-bottom:10px">Header</p>
      </td>
    </tr>
  </table>
</center>
<center>
  <table cellpadding="0" cellspacing="0" border="0" style="width:100%;max-width:600px;margin: 0 auto;">
    <tr>
      <td width="100%" style="text-align:left;background-color:#ffff00;">
        <p style="font-family:Georgia,Arial,sans-serif;font-size:14px;line-height:18px;padding-top:10px;padding-bottom:10px">Content</p>
      </td>
    </tr>
  </table>
</center>
<center>
  <table cellpadding="0" cellspacing="0" border="0" style="width:100%;max-width:600px;margin: 0 auto;">
    <tr>
      <td width="100%" style="text-align:left;background-color:#00ffff;">
        <p style="font-family:Georgia,Arial,sans-serif;font-size:14px;line-height:18px;padding-top:10px;padding-bottom:10px">Footer</p>
      </td>
    </tr>
  </table>
</center>
...

<style>
.col50 {
width: 50%;
}
@media all and (max-width: 599px) {
.reorder {
width: 100% !important;
}
}
</style>
...
<table width="100%" cellpadding="0" cellspacing="0" border="0">
<tr>
<td width="100%" valign="top" style="min-width: 100%;">
<table class="ol col50 reorder" width="100%" align="left" style="width: calc(50%);" cellpadding="0" cellspacing="0" border="0">
<tr>
<td width="100%" valign="top">
###LEFT_CONTENT###
</td>
</tr>
</table>
<table class="ol col50 reorder" width="100%" align="left" style="width: calc(50%);" cellpadding="0" cellspacing="0" border="0">
<tr>
<td width="100%" valign="top">
###LEFT_CONTENT###
</td>
</tr>
</table>
</td>
</tr>
</table>
The result after this step:
Adding Images, Setting Background and Font Colors
You might think that adding images is a very easy thing to do, but if you want your images to look nice everywhere, you will need to use the following code:
<div width="###WIDTH###" height="auto">
    <img alt="###ALT###" width="###IMAGE-WIDTH###" style="display: block; width: 100%; max-width: 100%;" src="###SRC###"/>
</div>
It’s the extended version of Julie Ng’s image code, and the details are described here.
I have a good rule of thumb when it comes to colors. You should always set the colors on the full-width element level. The advantage is that you always set it at the same place. It’s also worth mentioning that these color properties are inherited correctly in every email client, so it’s not a problem to define them on top-level elements.
<table width="100%" border="0" cellspacing="0" cellpadding="0">
<tr>
<td>
<table border="0" cellspacing="0" cellpadding="0">
<tr>
<td bgcolor="### COLOR ####" style="#### STYLES ####; -webkit-border-radius:3px; border-radius:3px;" align="center">
<a href="### HREF ###" target="_blank" style="### FONT PROPERTIES ###;text-decoration:none; line-height:54px; width: 150px; display: inline-block;">
<p style="### FONT PROPERTIES ###; line-height:54px;">
I am a button →
</p>
</a>
</td>
</tr>
</table>
</td>
</tr>
</table>
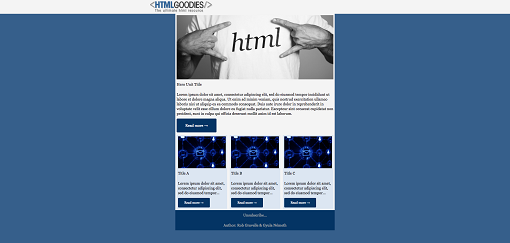
It won’t render in the same way across email clients, but it will radically increase the user experience on the modern ones.
Personally, I don’t like to over complicate things when it comes to font families. I use two different font families in this example: one for the headlines and one for the paragraphs.
You have to do the following modifications in the head of your email HTML:
<link href="https://fonts.googleapis.com/css?family=Roboto" rel="stylesheet" type="text/css">
It’s best to inline font related properties, so wherever you use them, font-family should be inlined.
<h1 style="font-family:'Roboto',sans-serif;font-size:24px;line-height:32px;padding-top:10px;padding-bottom:10px">Hero Unit Title</h1>
Now, you might have a sense how complicated email coding can be. You have learned a way to create complex layouts with robust content images, different content widths, with bulletproof buttons and custom fonts.
If you get stuck on one of the steps, you should check out the linked resources for more information or just leave a comment below.

Rob Gravelle resides in Ottawa, Canada, and has built web applications for numerous businesses and government agencies. Email him.
Rob’s alter-ego, “Blackjacques”, is an accomplished guitar player, that has released several CDs. His band, Ivory Knight, was rated as one of Canada’s top hard rock and metal groups by Brave Words magazine (issue #92) and reached the #1 spot in the National Heavy Metal charts on ReverbNation.com.

Gyula Németh
Co-founder & CTO @ EDMdesigner.com