We don’t usually write hardware reviews at HTMLGoodies.com. Our focus is more on helping you to design and build better Web sites, but sometimes, we encounter certain pieces of hardware that can make our work much easier. This is one of those times.
I’m sure there are some of you (myself included) who can still remember when a 10 MB hard drive was more than enough space for Windows and all our applications. Then the World Wide Web arrived, and the opportunity to download knowledge — as well as a lot of junk — caused our hard drives to bulge at the seams. We needed bigger and bigger hard drives. We’ve long since moved past megabyte storage. Now we’re even beginning to move past gigabytes (approximately 1,000 megabytes) into terabytes (approximately one trillion bytes). With all the graphics and Flash files used to create Web sites, not to mention the numerous pages of code, documents, content, videos, MP3’s and downloaded programs, hard drives can fill up pretty fast. They’re not that expensive anymore and they’re easy to replace, but one problem that can arise (when moving to a larger hard drive) is how to transfer the data from the old drive to the new one.
When moving up to a larger hard drive, you might find it’s advantageous to leave the operating system on the old drive and just move the data to the new one. A good habit is to place your data on a separate partition, or better yet, on a separate hard drive. That way, if you have to replace the operating system, the data stays intact. (Caution: Trying to partition a drive with data already on it could destroy the data. It’s best to partition the disk before using it.)
However you do it, when you start running out of room on your old drive, you may still need to transfer it to a new drive. While there are several different methods for doing so — some easy and some difficult. I recently found one that’s easy to use and doesn’t cost an arm and a leg.
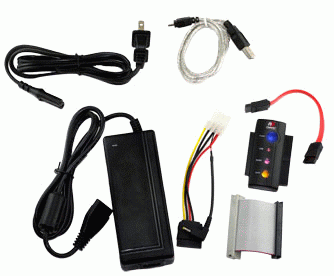
The NewerTech USB 2.0 Universal Drive Adapter is as simple to use as hooking up a hard drive to your computer. In fact, that’s all you’re really doing. After removing the old drive and installing the new one, a power adapter is plugged into the old drive — just like the power lead in your computer system, and then it’s plugged into the wall. Next, one end of a cable is connected to the back of the drive and the other end, a USB 2.0 connection (backwards compatible with USB 1.1), is connected to your computer. After a second or two, the computer will recognize the USB connection and the drive is ready to use, just as if it were physically installed inside the computer case. You can’t get much simpler than that. An instruction sheet is also included (which you can view as a PDF online).
The Universal Drive Adapter works on Windows 2000/XP, Linux 2.4.X, and Mac OS 9.2 and higher. Supported hard drives include Maxtor, Seagate, IBM, Hitachi, Samsung, Western Digital and Fujitsu. It works with optical drives (e.g., LG, Panasonic, Pioneer, Plextor, Sony, Teac and Toshiba) and removable media drives (e.g., Iomega Zip). It also works with CD-ROM, CD-RW and DVD-ROM drives. It’s compatible with almost any 2.5″, 3.5″, 5.25″ IDE or SATA device.
The system, also known as the “Swiss army knife of disk connectivity,” comes with the following items:
- USB UDA adapter
- Heavy Duty 2.0 Amp AC Power Adapter
- Power Cable
- ATA extension cable
- SATA 2.5″ Power Adapter Cable
- USB 2.0 Connecting Cable
- SATA-SATA Connecting Cable

As you can see, you’re covered for 99% of all hard drives found in desktop computers.
The hard drive needs to be set as a master or single drive but don’t worry if you don’t have the information on how to do that. (It’s generally printed on a label on the hard drive itself but it may have come off or been rubbed off.) A link is provided to a page listing spec sheets for most major drives (Hitachi/IBM DeskStar, Maxtor, Seagate and Western Digital).
Silicone protective sleeves can also be purchased in order to use a bare, swapped-out hard drive as an external storage solution. This system can also be used to add another drive to a system when there are limited connections on the motherboard.
The maker of the USB 2.0 Universal Drive Adapter, NewerTech, has been around since the 1980s providing all types of computer innovations, along with batteries, external hard drives and iPhone accessories.
When I tried it out on both a Windows (XP) and a Linux (Ubuntu) system, using ATA 100 hard drives, it worked flawlessly. Once the system recognized the drive (usually within a second or two), I was able to copy, delete, and drag and drop files just as if they were on a hard drive physically installed in the computer case. I didn’t notice any difference in speed between the internal or external drives. Using USB 2.0, files can be transferred at up to 480 Mbps.
If you’re looking to upgrade to a larger hard drive, wanting to transfer files from an old drive, add an external hard drive, CD drive, or even give more life to a switched-out drive, this system is as simple as it gets. If you have problems booting from a hard drive, you may be able to use this system to access the data, setting the hard drive up as an external drive and booting from another drive. For $34.99 you can’t go wrong. A one year warranty is included.
This article originally appeared on WebRef.


