


In our previous article on cloud computing, we went through the basics of signing up with Amazon EC2 and launching an Instance, which is a self-contained virtual server. Now we’ll learn to connect to it from a typical Windows machine.
For this exercise, you’ll have to sign on to your AWS Management Console. Look on the left side of the screen and choose “Instances” and you’ll see something like this:
![]()
This displays your running Instance and shows you some assorted details. While this screen gives you a URL (“Public DNS”) to connect to, you may encounter some problems just attempting to copy it for pasting purposes, depending on your browser. The trick here is to right-click on the Instance line, which will bring up a menu; pick “Connect” and it will display the URL in an easy-to-select way. Copy it, then paste it into your browser and you should see a default web page. You’ve now successfully connected to your web server. That’s a good start, but all web developers want to put their own content up; how do you actually deal with the machine itself?
SSH: It’s Not A Secret
As all security-minded people know, sending login/password pairs over unencrypted lines is frowned upon by anyone who isn’t an evil hacker type. So you’ll need a secure way to connect to your server, virtual or not. Fortunately, all this kind of software was worked out quite awhile ago and much of it is now available free for the downloading. If you’re running Windows, you’re going to have to use a SSH (Secure SHell) client; you might as well use PuTTY because it’s small, fast, standard, and free. Go here to download it, and pick up the PuTTYgen program while you’re there because you’ll need it for converting between different key file formats. PuTTY is essentially a secure old-school terminal emulator and is kind of basic, but it’s enough to get started with. Once you successfully connect with PuTTY, you can upload files to your Instance using FileZilla, which is also based on PuTTY.
The PuTTY programs are so well-coded that they’re not only tiny by Windows standards but don’t even have to be installed. So fire up PuTTYgen and hit “Load”; you’ll be loading in the Key Pair file you created and downloaded when you originally created your Instance (it’s a .PEM file, so you might have to tell the dialog window to load All Files):
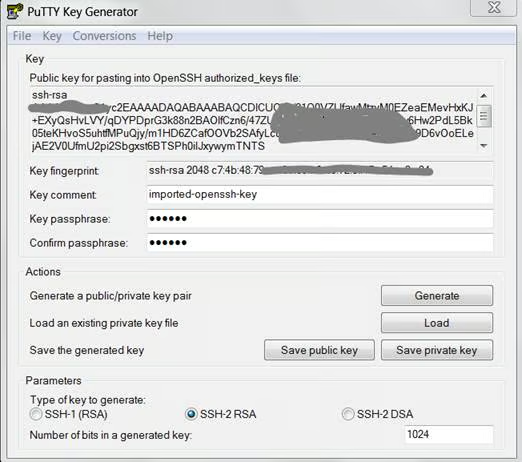
You’ll be asked to type in the passphrase you also created with the Key Pair. Then click the “Save Private Key” button and you’ll be saving a new file as a .PPK (PuTTY Private Key) file; you should use the same name for obvious reasons. Now you have a PuTTY-compatible version of your Key Pair.
Don’t panic; the Instance is costing you only about 25 cents every 3 hours.
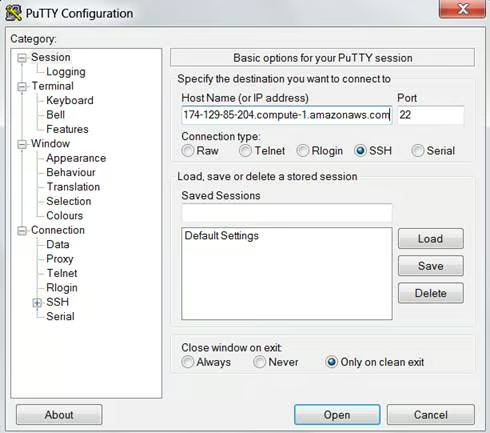
Now it’s time to launch the PuTTY application itself (it’s less than half a megabyte). Remember the Public DNS URL that you got from the AWS Management Console? Paste it into the Host Name field…but don’t hit the Open button just yet.
PuTTY now knows what address to connect to, but it still needs your private key. So click on the plus sign next to SSH on the left side, under “Connection”, and find “Auth”.
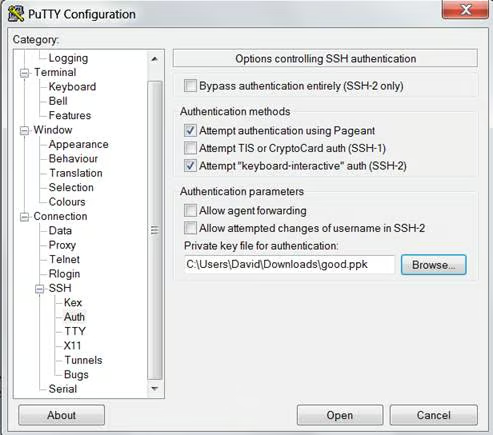
Browse for the .PPK file you created with PuTTYgen, and when it’s loaded, now you can hit Open. The PuTTY terminal window opens up, its Windows icon loses its “settings wrench”, and you’re all set. What do you do next? You log in as “root” of course, using that passphrase you created!
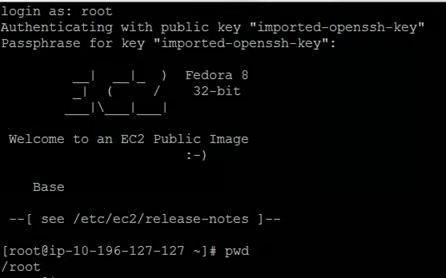
We will save you a bit of trouble: the directory you’re looking for to put your HTML files into is /home/webuser/helloworld/htdocs (at least for the AMI we told you to use in the previous article). From there, you should know what to do if you’re familiar with running a Linux server from scratch. If not…perhaps that’s a topic for another day!
