In the Parent-child Component Interaction in Angular 11 article, we learned how to pass data to a child component using the @Input decorator. It’s not only easy to use, but manages updates automatically for us so that template variables are updated immediately whenever an @Input variable’s value changes. But what happens if we need to modify an @Input variable before referencing it in the template? If only there was an event that fired whenever an @Input variable’s value changed. As it turns out, there is! It’s called the ngOnChanges() event, and by the end of this tutorial, you’ll know exactly how it works and how to use it.
ngOnChanges() Primer in Angular
ngOnChanges() is but one of the many Angular lifecycle hooks. Others include, ngOnInit(), ngAfterViewInit(), and ngOnDestroy(). The ngOnChanges() method is invoked before ngOnInit(), as well as each time Angular sets a data-bound @Input property, making it ideal for responding to changes to an @Input variable. Changes can occur for a number of different reasons, such as a user interaction, async call, etc.
The ngOnChanges() method accepts one argument: a SimpleChange object that is mapped to each changed property. It defines three properties as follows:
SimpleChange {
  previousValue: any;
  currentValue: any;
  firstChange: boolean;
}
The first two properties hold the current and previous property values respectively, while the firstChange tells us whether it was the first time the change has taken place.
Working With the ngOnChanges() Method
We can tell the compiler that we wish to respond to @Input variable changes by implementing the OnChanges interface. From there, we can have VS Code generate the ngOnChanges() method by hovering the cursor over the class name and clicking the quick fix icon when it appears. That will bring up a suggestion to “Implement interface ‘OnChanges'”:
That will place the method just below the component name. I like to move it a little lower down, somewhere after component-scoped variables, but there is no requirement to do so.
SimpleChange Object Mapping
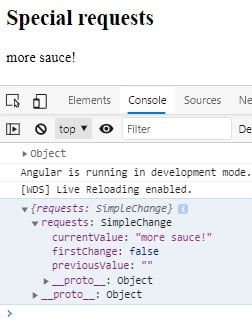
Now we need an @Input variable to respond to. I just happen to have one right here. Recall the requests variable from last week’s demo? It gets updated whenever the user clicks the Add button, so we should be able to intercept these in the ngOnChanges() method. Sure enough, there it is:
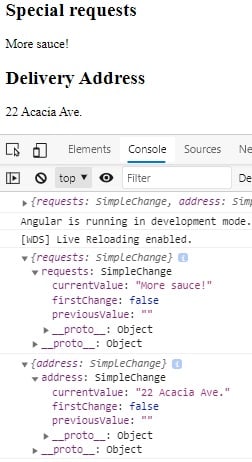
Right now, there’s no property mapping being done because we only have one @Input variable. To see what happens with multiple variables, let’s add a Delivery Address field. Now we can see that each SimpleChange is mapped to a property whose name matches that of the variable it tracks:
Building a List of Requests
The original Order page only accepted one special request at a time. Let’s modify it so that additional requests are appended to a list rather than replace the previous one.
In the child.component.ts file, we’ll convert the requests variable to the singular form so that it denotes that these are individual requests. The full requests list will now be stored in the plural requests variable:
@Input() request: string = '';
public requests: Array<string> = [];
In the ngOnChanges() method, we’ll:
- make sure that there are new requests
- verify that the value is not an empty string
- append the latestRequest to the requests array
Here is the ngOnChanges() code that performs the above three actions:
ngOnChanges(changes: SimpleChanges): void {
// check if there are requests
const latestRequest = changes['request'];
if (latestRequest) {
// don't accept empty values
// the first one will be empty as well, since the default value
// gets passed in when the child component is created.
if ((latestRequest.currentValue as string).trim() !== '') {
this.requests.push(
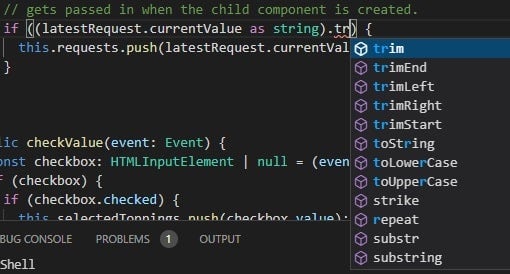
The currentValue property (as well as previousValue) has a type of any because the SimpleChanges object has no way of knowing in advance what type it will be storing. Hence, in order to treat the request as a string, we can cast it using the code (latestRequest.currentValue as string). That will inform the IDE which methods to bring up in the auto-complete list, thus allowing us to select the trim() method:
Besides avoiding blank values, checking for empty strings also avoids listing the default request value of ” due to ngOnChanges() firing before ngOnInit(). We could of also checked the firstChange attribute, but checking for an empty string works just as well for our purposes.
We’ll also update the template to display requests as an unordered list:
<h2>Special requests</h2>
<span *ngIf="requests.length === 0">None</span>
<ul>
  <li *ngFor="let request of requests">{{request}}</li>
</ul>
The Demo
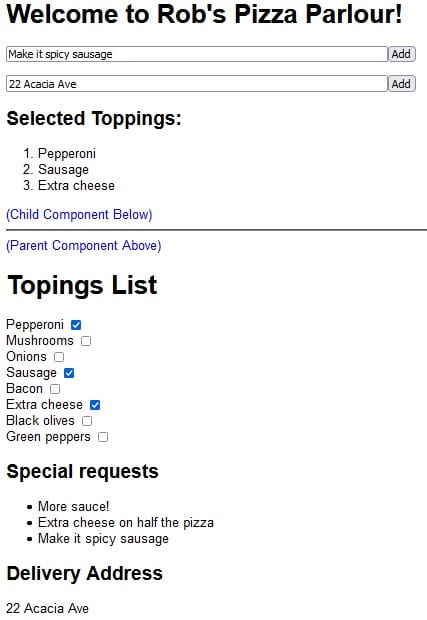
Here’s a screen capture that shows the updated demo, complete with the new Delivery Address and Special requests list:
Conclusion
In this tutorial we learned how to respond to @Input variable changes by implementing the OnChanges interface. One of the many Angular lifecycle hooks, the ngOnChanges() method allows us to conveniently manage all @Input variable updates in one place!


