
For newbies, Angular’s component-based architecture takes a bit of getting used to. Unlike the Object-oriented (OOP) design of programming languages like Java, Angular is not able to enforce encapsulation with quite the same voracity, mainly due to JavaScript’s unrestricted access to the DOM. But, as they say, just because you CAN do something, doesn’t mean that you SHOULD. So, rather than rely on the compiler to prevent you from breaking the rules, it’s best to learn how to do things the “Angular way” from the get-go so that you code your applications in such a way that enforces component encapsulation rather than undermines it. To that end, this tutorial will provide an overview of how to pass data between parent and child components – both from the parent to child and vice versa.
The Demo App
I usually post a link to the demo at the end of the article, but this time, I’m presenting it up-front, so that the stage is set for the coding to come. I hope you’re hungry, because this demo takes orders for pizza!
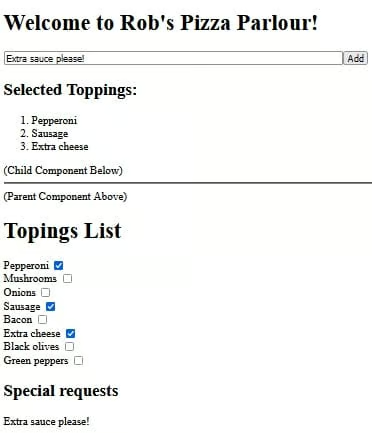
Above the horizontal line we’ve got the parent content, which includes a text input and button to submit special requests. Below it, there’s a list of toppings, selected from the child component below. Likewise, the special requests are displayed in the child underneath the toppings list. (I kept it to the top 10 toppings for the purposes of the demo)
Using that setup, the parent has to pass the special requests along to the child component, while the child has to send the selected toppings up to the parent.
You’ll find the demo on codesandbox.io.
Passing Data From the Parent Component to a Child
In the demo app, the child component, whose selector is “app-child“, can be seen at the bottom of the main app.component.html template file:
<h1>Welcome to Rob's Pizza Parlour!</h1>
<input size="80" #request type="text" placeholder="Enter any special requests here.">
<button (click)="requests = request.value">Add</button>

<h2>Selected Toppings:</h2>
<ol>
  <li *ngFor="let topping of toppings">{{topping}}</li>
</ol>

<span class="component-delineation">(Child Component Below)</span>
<hr>
<app-child [requests]="requests" (selectedToppingsEmitter)="setSelectedToppings($event)"></app-child>
There, you’ll notice that it has two special attributes:
- [requests]=”requests”
- (selectedToppingsEmitter)=”setSelectedToppings($event)”
For now, we’ll concentrate on the first (request) attribute. It’s a public variable that we’re passing along to the app-child component:
export class AppComponent {
  public requests = '';

  //...
}
In order to consume the request value, the ChildComponent needs to define an @Input decorator as follows:
export class ChildComponent {
  @Input() requests: string = '';

  //...
}
Although I assigned the same name to the variable in both the parent and child for the sake of consistency, there is absolutely no requirement to do so.
We can now treat the requests variable just like any other. Since we don’t need to do any massaging of the data, we can reference it directly in the template using double curly braces {{}}:
<h2>Special requests</h2>
{{requests}}Passing Data From a Child Component to the Parent
Just as an @Input decorator defines a variable that comes from the parent component, an @Output() decorator defines a variable to be passed to the parent. Or, rather, it defines an EventEmitter that will emit() data to the parent. The EventEmitter is parameterized so that it knows what type of data it will be handling. In our case, it will be the selectedToppings array of strings:
export class ChildComponent {

  @Input() requests: string = '';
  @Output() selectedToppingsEmitter = new EventEmitter<string[]>();

  private selectedToppings: string[] = [];
  //...
}
The next step is to actually emit the selectedToppings. We’ll do that in the checkValue() method. It’s invoked every time that a topping checkbox is checked or unchecked. First, we add or remove the item from the array. Then, we emit the entire updated array to the parent:
public checkValue(event: Event) {
  const checkbox: HTMLInputElement | null = (event.target as HTMLInputElement);
  if (checkbox) {
    if (checkbox.checked) {
      this.selectedToppings.push(checkbox.value);
    } else {
      const index = this.selectedToppings.indexOf(checkbox.value);
      this.selectedToppings.splice(index, 1);
    }
    this.selectedToppingsEmitter.emit(this.selectedToppings);
  }
}
To invoke the checkValue() method, we need to bind it to the checkbox’s change event like so:
<h1>Toppings List</h1>
<div>
<label> {{topping}}
<input type="checkbox">
</label>
</div>
Back in the parent template, the selectedToppingsEmitter is bound to a public component method. Note that, in this case, the name of the Emitter must exactly match that of the child. The bound method name can be anything we like however. You can see it here in the app-child element markup:
<app-child [requests]="requests" (selectedToppingsEmitter)="setSelectedToppings($event)"></app-child>In the setSelectedToppings() method, we will set our local toppings variable to the emitted selectedToppings. As such, it’s really nothing more than a setter:
export class AppComponent {
  public toppings: string[] = [];
  public requests = '';

  setSelectedToppings(selectedToppings: string[]) {
    this.toppings = selectedToppings;
  }
}
Finally, an *ngFor loop is employed to list all of the selected toppings within an ordered list:
<h2>Selected Toppings:</h2>
<ol>
  <li *ngFor="let topping of toppings">{{topping}}</li>
</ol>
Conclusion
In this tutorial, we learned how to pass data between parent and child components – both from the parent to child and vice versa. Next time, we’ll be answering the question of how to respond to @Input parameters updates as well as how to intercept them before outputting them in our template files.
