JQuery is arguably the best JavaScript library for generating HTML elements on the fly. WordPress capitalizes on jQuery’s ubiquity and practicality by making it instantly available via the wp_enqueue_script() function. In the Create a Dynamic Form in WordPress tutorial, we learned how jQuery’s excellent DOM append() and appendTo() functions make it the ideal library for creating dynamic forms. In today’s follow-up, we’ll bind event handlers to the form and child elements in order to to allow users to upload Excel spreadsheets to the server.
Hiding the Form
Recall that, in the Create a Dynamic Form in WordPress tutorial, we added a link to the post list page using the “page_row_actions” filter hook. We then added an event handler for the “import-menu-from-excel” link’s click event to generate the form:
  $('div.row-actions').on(
    'click',
    'span.import-menu-from-excel > a', function(evt) {
      //cancel the link navigation
      evt.preventDefault();

      //variable declarations

      //generate the form and controls…
  });
We can make the same link toggle the form between a visible and hidden state by adding a test that checks whether or not the form has already be generated. Invoking the jQuery selector with the “upload_form_” ID prefix should return a jQuery collection containing exactly the only element. A second test checks for form visibility using the jQuery DOMElement Collection is() method. It checks the current matched set of elements against a selector, element, or jQuery object and returns true if at least one of these elements matches the given arguments. We can pass in the jQuery :visible selector to determine whether or not the form is currently displayed. Elements are considered visible if they consume space in the document. Hence, uploadForm.is(':visible') would return true if the form has a width or height that is greater than zero (or false otherwise):
  $('div.row-actions').on(
  'click',
  'span.import-menu-from-excel > a', function(evt) {
    //cancel the link navigation
    evt.preventDefault();

    var $linkElt   = $(evt.target),
        parentRow  = $linkElt.closest('div.row-actions'),
        uploadForm = parentRow.find('form[id^=upload_form_]')
        menuId     = $linkElt.data('post-id');

    if (uploadForm.length > 0) {
      if( uploadForm.is(':visible') ) {
        uploadForm.hide('slow');
      }
      else {
        uploadForm.show('slow');
      }
    }
    else {
      //generate the form and controls…
      $('<form>')
      //...
Passing the ‘slow’ parameter to the show() and hide() methods animates these operations. It’s optional, but enhances the transition effect.
Coding the “Close upload form” Link Click Event
The “Close upload form” link handler is easier than that of the “import-menu-from-excel” link because the close form link can only be accessed when the form is visible. In fact, one line of code is all it takes! Within event handlers, the this pointer always references the original event source. The element must therefore be wrapped in the $() function to make jQuery methods available to it. Referencing the containing form using jQuery is easily achieved using the closest() method. For each element in the invoking DOMElement set, it returns the first element that matches the passed selector by testing the element itself and then traversing up through its ancestors in the DOM tree. Hence, a call to .closest('form') always does the trick:
  $('<p>')
    .append($('<a>')
      .attr('href', '#')
      .attr('id', 'hide_upload_form')
      .click(function(){
        $(this).closest('form').hide('slow');
      })
      .text('Close upload form')
    )
Form Validation
Although we can’t stop someone from submitting any type of file they want, we can at least check that the file extension matches our expectations. The onsubmit event is the place to perform form validation. In jQuery, we can cancel form submission by invoking the event’s preventDefault() method.
There are two steps to the validation: the first checks that a file has been selected; the second matches the file extension against our valid types. The latter is accomplished by testing the file extension against an array of valid file extensions. The Array.indexOf() method compares the passed string against every element in the array and returns its index, or -1 if no matches are found. A return value of -1 indicates the file type is invalid.
If either validation test fails, the error message is populated so that it may be appended to the iFrame. Here is the entire onsubmit event handler:
var validFileExtensions = ["xls", "xlsx", "csv"];

$('<form>')
  .on('submit', function(e) {
    var $form          = $(this),
        upload         = $form.find('#upload'),
        selectedFile   = upload.val().trim(),
        iFrame         = $form.find('#messages'),
        msg            = '',
        //this code both references and clears the iFrame contents
        iFrameContents = iFrame.contents()
                               .find('body')
                               .children()
                               .remove()
                               .end();

    if ( selectedFile.length == 0 ) {
      msg = "Please select a file to upload.";
    }
    else {
      var fileExt = selectedFile.split('.').pop();
      if( validFileExtensions.indexOf(fileExt) == -1 ) {
        msg = "Invalid file type.  Only "
            + validFileExtensions.join(', ')
            + " allowed.";
      }
    }

    if (msg) {
      e.preventDefault(); // Cancel the submit
      iFrameContents.append( $('<p>').text(msg) );
      upload.focus();
    }
  })
I submitted the form with a couple of files. Here are the results from an invalid type:
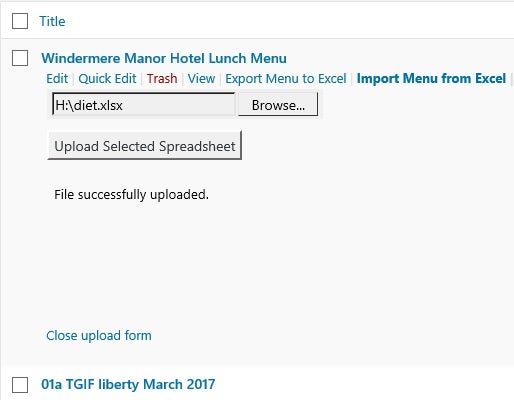
Here is the form again with a valid Excel file submitted:
You can try the page out for yourself on Codepen. Just bear in mind that the demo does not really submit the form because there is no hosted PHP to process the uploaded file. Instead, JavaScript is employed to simulate a successful result.
Conclusion
One final point: we didn’t cover how to reference jQuery from the page because the site I worked on already included it. The easiest way to go about it is to let WordPress automatically load jQuery for you using smart loading. All you need to do is specify jQuery as a dependency to your script when you enqueue it:
  wp_enqueue_script('my-custom-script',
                    get_template_directory_uri() .'/js/my-custom-script.js',
                    array('jquery') );
That’s all there is to it. WordPress will do the rest.


