


Before HTML5 introduced WebSockets, you had to rely on specialized technologies like Java applets (remember those?!) or, more recently, Flash. I covered some of the challenges of working with WebSockets in this early stage of development in my Making HTML5 WebSockets Work article.
In this article, we’ll be utilizing WebSockets to write a kind of automated web chat, where the other party is a machine of great intellect, called “Multivac”, named after the Chatbot demo of the Google phpwebsocket project.
As mentioned in the conclusion of my last article, we will be using the lemmingzshadow php-websocket library because it supports the newer draft-ietf-hybi-thewebsocketprotocol-10 (HyBi-10) WebSockets protocol. You’ll also need a web server that supports PHP, such as Wamp or Apache, and a fairly up-to-date browser; I would recommend google Chrome 14+ or Firefox 6+ as the best choices.
WebSocket Connections
When you see all of the files involved in managing the WebSocket connections, it quickly becomes apparent why it’s not advisable to write your won server-side code from scratch, unless socket communication protocols and other low level operations really float your boat. Nonetheless you should have some familiarity with the files that you’ll be working with; some of them, you’ll have to modify, others, are better left alone! Here’s a rundown of what’s contained in the lemmingzshadow php-websocket download:
- server.php: Creates the WebSocket server instance, sets server properties, and registers the application to be called by the client component.
- SplClassLoader.php: Implements the technical interoperability standards for PHP 5.3 namespaces and class names.
- Connection.php: Manages the WebSocket Connection. The hybi10Decode() and hybi10Encode() functions are located therein.
- Server.php (upper case ‘S’): It’s the “real” server which monitors the port for client requests.
- Socket.php: Creates and maintains references to sockets.
- Application.php: An abstract class that contains the getInstance() method, which ensures that applications are created as singletons, as well as the onConnect(), onDisconnect(), and onData() abstract methods which all applications must implement.
- ChatApplication.php: A fully functional simple webchat application.
- DemoApplication.php: A Websocket-Server demo and test application. It can either echo data back to the client or execute a user function.
- EchoApplication.php: Even simpler than the demo app, this class just parrots back whatever data is sent to it. This is the class upon which our Multivac app will be built.
- chat.html: The client component of the chat application.
- client.php: A basic WebSocket client that runs from a command line.
- echo.html: The client component for the echo application. This is the client-side component that we will be modifying today.
- index.html: An extremely basic WebSocket server test console.
- client.css: A stylesheet to spiffy up the browser UI.
- client.js: A JavaScript template with everything you need to create and communicate with a WebSocket.
- jquery.min.js: A local minified jQuery script – useful for local development.
- json2.js: A Douglas Crockford JSON parser from www.JSON.org.
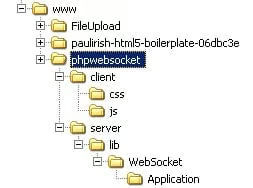
Here is how the folders should be structured under your server’s web document root:
The Client Page
Open the echo.html page in your favorite HTML editor and you’ll see that most of what we need is already done for us. As it stands, when you enter text in the Message textbox and click the Send button, the data travels to the server.php page, is decoded, re-encoded and sent back to the browser to display in the log
;
not very exciting to be sure, but it does demonstrate that all of the basic processes are functioning just as they should. What we
’
ll do is tweak the code so that the server sends back a response based on our request. The object of this exercise is to familiarize ourselves with what code to change to develop an application based on existing code.
With regards to the client page, the first thing we’ll do is rename it to something more instructive. Let’s call it “multivacClient.html”.
Next, we’ll add a couple of new CSS classes so that we can differentiate our requests from the server responses:
.human { color: blue; }.computer { color: green; }We can now update the log function to accept a class argument. It’s called clazz because class is a reserved word:
var log = function(msg, clazz){ $('#log').append('' + msg + '') };A second way to differentiate the client requests from the server responses is to prefix them with a direction arrow: hence, requests have a right facing arrow (>) while the responses have a left facing one (
log('> ' + msg, 'human');…and socket.onmessage():
log('< ' + msg.data, 'computer');Another change that I would make is to update the code that creates the WebSocket object. I am not a fan of browser sniffing, so I would replace the existing if statement with the following:
var Socket = window.WebSocket || window.MozWebSocket; if(!Socket){ $('#log, input, button, span').fadeOut("fast"); $('You need a browser that supports WebSockets such as Google Chrome.
').appendTo('#container'); } else {The Application File
Now it’s time to work on the EchoApplication.php file. Open it up and save it as “MultivacApplication.php”. Rather than take the received data and spit it right back, we’ll send it to our process() function:
public function onData($data, $client) { foreach($this->_clients as $sendto) { //$sendto->send($data); $this->process($sendto, $data); } }The process function evaluates the $action parameter and sends back the appropriate response. I will admit that the AI component of this app is a little weak, but IBM wouldn’t lend me the code for Watson:
private function process($sendto, $action) { switch($action){ case "hello" : $sendto->send("hello human"); break; case "hi" : $sendto->send("greetings human"); break; case "name" : $sendto->send("my name is Multivac, super-genius."); break; case "age" : $sendto->send("I am far too vain to say"); break; case "date" : $sendto->send("today is ".date("Y.m.d")); break; case "time" : $sendto->send("server time is ".date("H:i:s")); break; case "thanks": $sendto->send("you're welcome"); break; case "bye" : $sendto->send("bye"); break; default : $sendto->send($action." not understood"); break; } }The server.php File
This file is where you would set your basic initializing details such as the server name or IP, port number, as well as your application name and class. There’s also an added security feature to check the “Origin” header in WebSockets handshake. Though it could still be potentially spoofed, browsers always add the Origin of the page which initiated WebSockets connection:
$server = new \WebSocket\Server('localhost', 8000);// server settings:$server->setCheckOrigin(true);$server->setAllowedOrigin('localhost');$server->registerApplication('multivac', \WebSocket\Application\MultivacApplication::getInstance());$server->run();Note that the application name (‘multivac’) must match the Socket call in your JavaScript code:
var socket = new Socket('ws://localhost:8000/multivac');Running the Application
Open a command window and type the following to launch the WebSocket server process and register our application:
php.exeHere’s what I entered in my Windows DOS prompt:
C:\Program Files\wamp\bin\php\php5.3.8>php.exe "C:\Program Files\wamp\www\phpwebsocket\server\server.php"If all went well, you should see a confirmation message that says “Server created”.
Start up your web server and make sure that PHP is enabled and working.
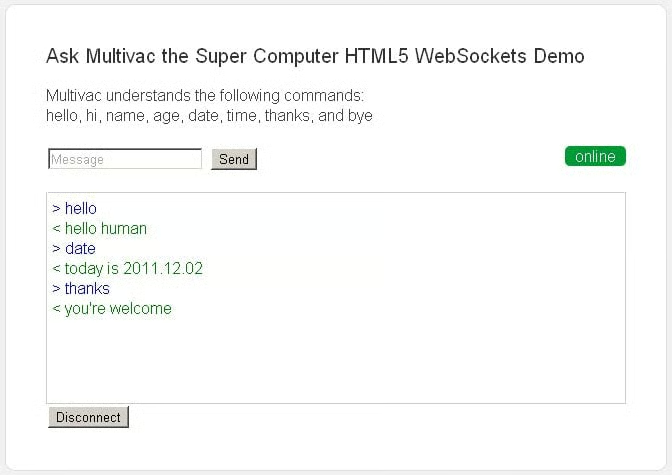
Launch your web browser and enter the URL of the multivacClient.html page:
http://localhost/phpwebsocket/client/multivacClient.htmlLook for the green online indicator in the top-right corner to confirm that you are connected to the WebSocket server.
Try some commands, then click the Disconnect button when you’re done.
Conclusion
There’s a lot that can go wrong when a technology is made up of so many interconnected parts, but hopefully you’ve learned enough here today to avoid the most common pitfalls. WebSockets is definitely something to watch to see where it leads. I for one can’t wait!
