I’ve recently discovered Adobe Edge, a developer’s tool for creating animations in HTML5, CSS3 and JavaScript. While the software is not perfect, it’s not really supposed to be in that it’s only in Preview mode and the final retail version is not available as of yet. In my first three articles on Adobe Edge, I discussed the tutorial video from Adobe Fellow Mark Anders.
From that series of articles, you can get your feet wet with Adobe Edge and can create your first animation. Here’s the first article in the series. Then, if you become motivated, you can move on and create your own first animation like I did. You can see the animation I created here. I made it for the consulting firm that I work for. Unfortunately, Edge animation does not work well in Internet Explorer 8 and below, so I’m restricted from placing it on my company’s site. However, Edge files do work perfectly well in IE 9, Firefox, Chrome, Safari and iOS and Android devices.
My experience with creating my own animation taught me a few tips, tricks and bugs to look out for, which I present to you in this tutorial.
Timeline Tips

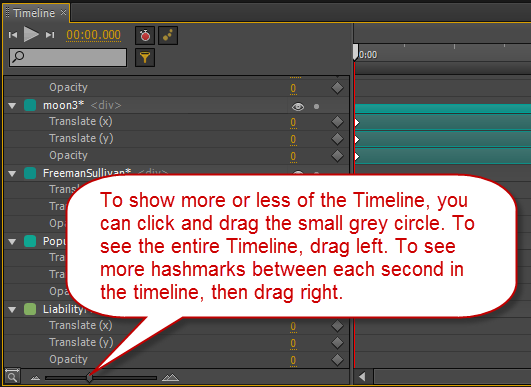
This leads us to describe how to speed up or slow down an animation effect. For more finesse and to gain better control, it is suggested to increase the size of your timeline so that you can see plenty of hashmarks between each second. To speed up an animation effect, for example, an object or text flying across the screen, you’ll need to decrease the length of the keyframe, i.e., decrease the length of time it takes to perform the animation.
To slow down an animation, increase the length of the keyframe in the timeline, i.e., increase the length of time it takes for the animation to unfold. To do this, drag the top bar to the right.
It is possible to select multiple objects in a timeline at once. You do this by clicking and dragging across many objects in the timeline. This comes in useful when you add or delete animations in the middle of a presentation. For example, let’s say you want to delete an animation effect and this causes a gap in time before the next animation starts. Instead of individually grabbing each element and sliding them over, you can click and drag with the mouse to select all of the elements that you want to drag over. When all of the elements are selected, you can grab just one of the elements and drag it down the timeline and the other selected elements will also move down the timeline.
CSS3 Elements and Object Names
I’ve discussed objects quite a bit. Did you know that you can name your objects? This is helpful so that not all of your text elements are labeled Text1, Text2, Text3, etc. Plus, if you need to tweak your CSS3 sheet, your specifically-named elements will show up there. Here’s an example:
#GroupDescription {
color: rgba(141,136,136,1.00);
opacity: 0;
font-size: 15px;
-webkit-transform: translateX(0) translateY(0);
-moz-transform: translateX(0) translateY(0);
-ms-transform: translateX(0) translateY(0);
-o-transform: translateX(0) translateY(0);
}
Speaking of the CSS3 file that Edge creates for you, it’s important to learn about all of the different files that Edge generates when you save your project. The program creates an edge_includes folder, which is populated with JavaScript files. It creates an images folder, which contains your imported images. Edge also creates an .edge file, which you can click to open and continue working on your project in Edge.
Adobe Edge Bugs and Issues
So far I’ve only discussed tips and tricks in working with Adobe Edge. Now for the bugs. Of course, I am discussing a preview release and not a final release, so bugs are expected. One bug that I kept tripping over was when I tried to select an object that was scaled down to 0%. If you scale an object down to 0%, you can’t click on it without getting an error message asking you to restart Edge. As a work around, I’ve been advancing the timeline to a point where the object starts to scale up and the object has more visibility than just a small blue square. By doing that, I could select the object and continue to work with it.
This next bug is a bit more serious. Edge will become corrupt and will not save your work at random times. You’ll be working along, making changes, adding, deleting, then you click Save to finish; but when you re-open your work the project is completely gone. The moderators in the Adobe Edge forums recommended to fix this bug by uninstalling Edge and installing it a second time. Reinstalling Edge did not solve this problem for me.
Overall, Adobe has a great product in development for web designers looking to sink their teeth into HTML5 and CSS3 animations. However, there are a couple of features that designers might miss with Edge. The software is currently missing the ability to add sound or links. But perhaps that will come with time.


