
In this article we’re going to look at how you can create Hotspots and Rollovers in Paintshop Photo Pro. Before we do, here’s a bit of background. Image maps are where the designer has created a special region or hotspot to act as a trigger to another web page. The hotspot could be a circle, triangle, rectangle or polygon.
In contrast, rollovers are an image or portion of an image which changes in appearance when the mouse cursor moves over it. An example would be the buttons in a navigation bar that change color when the cursor moves over it. When the button is clicked, a different button is displayed and the user is taken to a new page. Another variation is where the rollover doesn’t change when the cursor moves over it but after, when you click on the link. You can create rollovers from a sliced image or from two images that are different in some way.
How to Create Hotspots
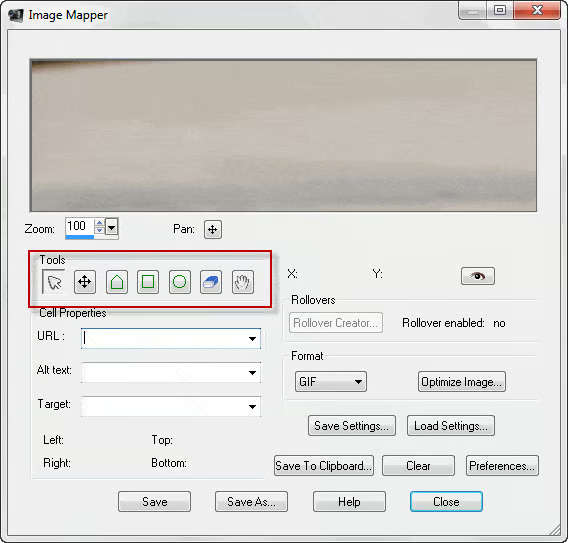
To get started, we’re going to look at hotspots. Assuming you have an image open that you would like to add hotspots to, go to File: Export: Image Mapper. You have several tools to choose from in the Image Mapper dialog box. These tools are: Arrow, Mover, Polygon, Rectangle, Circle, Delete and Pan. Once you create the image map, you can add URLs and targets.
Before you start to work on the image, check the size in the preview window. If it’s too large, reduce it using the zoom controls to the left of the preview window. Next, choose the Polygon, Rectangle or Circle to start drawing out a hotspot. For editing, use the Arrow tool to adjust the hotspot size or the Mover tool to change the position. If you don’t like what you’ve done and you want to start again, click on the Delete tool. Another option is to click on the Clear button, at the lower right of the dialog box.

In the screen shot above, I used the Polygon tool. Now you can assign a URL and a target, in this case https://www.htmlgoodies.com/ and Target: _blank, which will load the linked page in a new browser window. Note that you can preview the image map in a browser by clicking the eye icon at the far right of the dialog box.
Other Options
Rollover Creator: This allows you to create rollovers with map areas. We will cover rollovers later on in this article.
Format and Optimize Image: You also have the option of optimizing the image to make it smaller so it will load quickly in your browser, as well as saving it as a GIF, JPG or PNG. All these compression options were covered in another tutorial, so I won’t be revisiting that here.
Save Settings: When you click on this button, it brings up the Save Map Settings dialog box, which allows you to save the map in the .JMD format. If you want to load the map at a later date, go to Files: Export: Image Mapper and click on Load in the dialog box.
Save to Clipboard: When you click on this button, it takes you to the HTML Destination dialog box to save the file. You can also past the code into an HTML document. This is what it looks like from my process:
<img name=”IMG_09610″ src=”IMG_0961.gif” width=”2021″ height=”1506″ border=”0″ usemap=”#IMG_0961″ alt=”” />
<map name=”IMG_0961″>
<area shape=”circle” coords=”961,840,618″ href=”https://www.htmlgoodies.com/” target=”_blank” alt=”HTML Goodies”>
</map>
Save and Save As: When you click on Save, the HTML Save As dialog box appears. Save the file in the directory of your choice. Immediately after that, the Save As dialog box appears and allows you to save the file as a GIF, JPEG or PNG.
How to Create Image Rollovers
As mentioned earlier, rollovers are an image or portion which changes in appearance when the mouse cursor moves over it or afterwards, when the link is clicked on. We’re going to create a rollover using text, much like what you would see in a menu or drop down list.
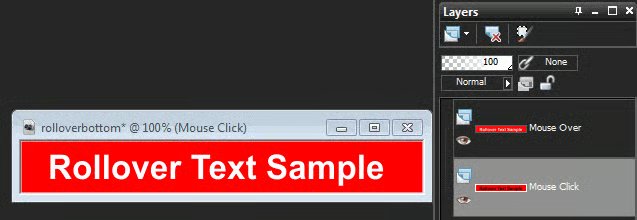
For this tutorial, I’ve created a document with two layers in it, one is the mouse click layer, the other is the mouse over layer.
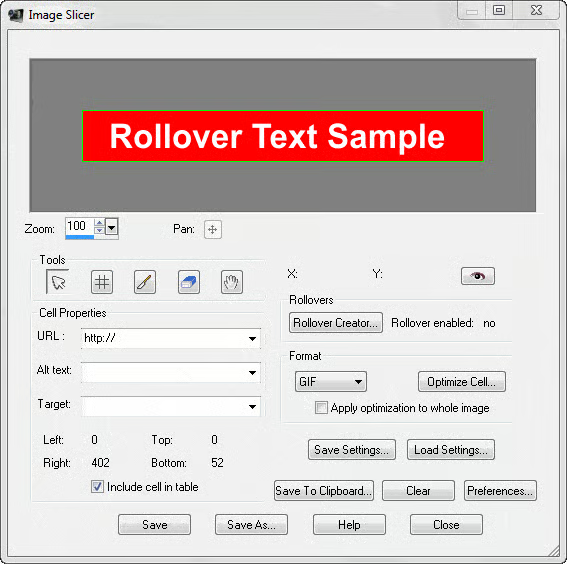
Next, go to File: Export: Image Slicer. In the dialog box, click on the Rollover Creator button.*
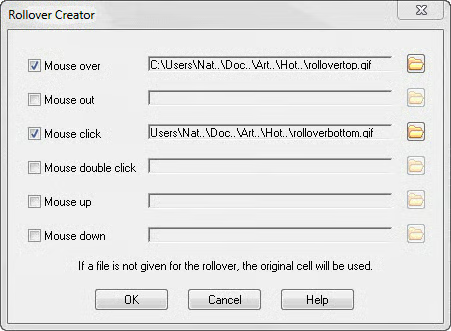
In the dialog box I enabled the Mouse over checkbox and upload the white text image. I’ve also enabled the Mouse click checkbox and loaded the black text image. As you can see, there are many other choices, though I decided to keep it simple. When you are satisfied with your changes, click on OK. You will be returned to the Image Slicer dialog box. To see what your finished rollover looks like, click on the Preview in Browser icon (the eye shape). To obtain the HTML code, either click on Save to Clipboard or click on the Preview in Browser icon. In the browser, click on View Source and copy the code from there.
Note: According to the manual, both the Image Slicer and Image Mapper contain the Rollover Creator button. Unfortunately, I was unable to access the Rollover Creator in the Image Mapper.
