


Navigation menus are one of the essential parts of any website. After all, they provide the user the proper guidance for exploring the site. Without it, the user might feel lost and would not be able to capture the true essence of what the site has to offer.
A navigation menu should be not only useful, but also look good. That’s why, in this guide, we are going to learn how to style the WordPress navigation menu using CSS. A navigation menu can be customized through two different methods. The easiest way is to use plugins. whereas advanced users can use CSS to style their website’s navigation menu. We will cover both the methods below. Let’s get started
How to Style WordPress Navigation Menus Using CSS
If you are not new to WordPress development, you will find it easy to add a WordPress menu to your website. The underlying code of a WordPress navigation menu should look like the sample below.
<?php
  // functions.php
  register_nav_menus( array(
    'main' => __( 'Main Menu', 'mywordpresstheme' ),
  ) );
?>

<?php // somewhere in header.php ?>
<header class="header">
  <nav class="nav">
    <?php
      if ( has_nav_menu( 'main' ) ) {
        wp_nav_menu( array(
          'theme_location' => 'main-menu',
          'container'      => '',
          'menu_class'     => 'navigation-main',
        ) );
      }
    ?>
  </nav>
</header>
Once done, you can modify the navigation menu by adding items to it from the back end.
Before we start with the tutorial, let’s define the structure of the menu that we are going to work on.
├── Home
├── Blog
|   ├── News
|   ├── Web
|   ├── VPN
|   |   ├── #1 Title
|   |   ├── #2 Title
|   ├── Security
├── About
└── Contact Us
Our menu has three levels of navigation and should be pretty easy to create. We have already created it using the following lines of code.
<header class="header">
  <nav class="nav">
    <ul class="navigation-main">
      <li class="current-menu-item">
        <a href="#">Home</a>
      </li>
      <li class="menu-item-has-children">
        <a href="#">Blog</a>
        <ul>
          <li><a href="#">News</a></li>
          <li><a href="#">Web</a></li>
          <li class="menu-item-has-children">
            <a href="#">VPN</a>
            <ul>
              <li><a href="#">Title #1</a></li>
              <li><a href="#">Title #2</a></li>
            </ul>
          </li>
          <li><a href="#">Security</a></li>
        </ul>
      </li>
      <li><a href="#">About Us</a></li>
      <li><a href="#">Contact Us</a></li>
    </ul>
  </nav>
</header>
WordPress is known to add ad-hoc code to the theme for easy access and modification. If you see a different menu code after adding it to your theme, then it could be WordPress who did it. The most common classes that WordPress adds to <li> element include the following.
- .menu-item-has-children: for sub-menu items
- .current-menu-item: for the currently viewed page
- .current-menu-ancestor- for the ancestor menu item
Adding the Code Manually
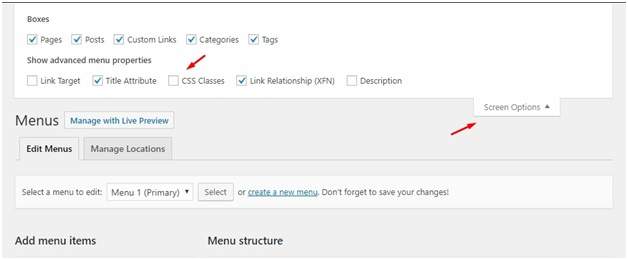
Now that you have understood the code behind a navigation menu, all you need to do is add custom CSS to your navigation menu. It can be done by adding CSS to the individual menu items manually. CSS classes enable you to add custom CSS. To do so, simply go from the WordPress dashboard to the Appearance > Menus. Once there, you will see the “screen option” button on the top-right. Simply click it and select “CSS Classes.”
Now, you need to use the drop-down option to the CSS class and then fill the CSS classes according to your needs.
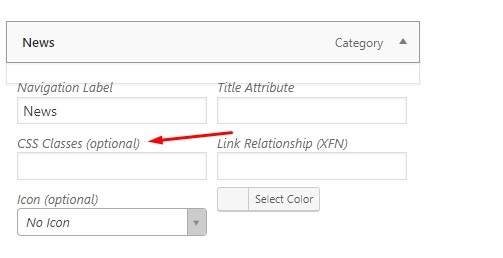
Once done, hit “Save Menu.” This way you can style your WordPress navigation menu using CSS.
Note: If you are using a big website that requires high bandwidth and scaling, then you should check out VPS hosting. VPS hosting is useful when it comes to solving scalability or performance issues, and also deliver the most optimal experience to your users.
Doing it the Full CSS Way
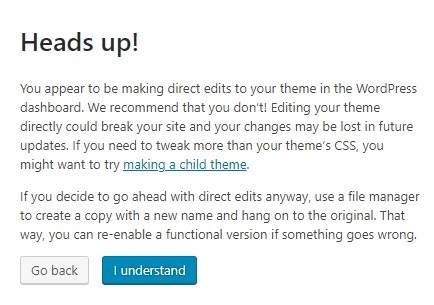
Another way to add navigation is to open up the CSS file of your WordPress theme and add the code there manually. You can do it by going to the Appearance > Theme Editor option. After clicking it, you will get a clear warning and would be requested to create a child theme before proceeding. We also recommend doing so. Once you click a child theme, proceed as before and select the child theme for editing purpose.
Now select style.css and start editing it. The above navigation code that we shared will help you understand which classes to edit or add. If you are still confused, you can also use the “Inspect element” option in the Google Chrome browser. This way, you would know which class or element you want to modify and you can simply add the CSS code in the style.css file.
Styling Navigation Menus Using Plugins
Not everyone is as PRO at coding. Being a blogger myself, I also find myself struggling when trying to set up a blog. If you are like me, then you would also want something simple to spice up your navigation menu. Do not worry as we will be listing the best plugins for styling your navigation menu. Let’s get started.
- Max Mega Menu: If you want to convert your menu to Mega menu, then you can use the Max Mega Menu plugin. It offers tons of features including multiple menu locations, different layouts and more.
- Superfly: Superfly is an amazing WordPress plugin that lets you design a vertical menu for your website. It offers various menu modes, works nicely with both desktop and mobile mode, have four menu levels support and much more! The plugin is not free, and you have to pay $22 to grab it.
- UberMenu: Just like the other two plugins, UberMenu is also a great plugin which lets you create an intuitive and beautiful navigation menu using a simple grid system. The plugin is also compatible with mobile displays and supports touch. The plugin’s key features include grid system, flyout and mega menu support and inclusion of 50 Font Awesome Icons.
- Responsive Menu: Responsive menu is a great plugin which offers an easy way to create a responsive menu for your website. With it, you can customize style, colors fonts and much more! The plugin is available for free but offers limited functionality. The key features of the plugin include background image option, five menu level support, and animation options.
Conclusion
This leads us to the end of our guide on how to style WordPress navigation menus using CSS. In addition to that, we also listed a few plugins that can help users who are not familiar with coding. So, did you find the guide useful? Comment below and let us know.
About the Author
Catherrine Garcia is an experienced Web Developer at WPCodingDev and a passionate blogger. She loves to share her knowledge through her articles on web development and WordPress.
