In this web development tutorial we take a look at CSS Matic, a web-based tool for developers.
This web development tool is broken down into four sections:
- Gradient Generator
- Border Radius
- Noise Texture
- Box Shadow
We will discuss each of the features of this CSS tool below.
Of these CSS tools, the most comprehensive is the Gradient Generator, so we will be spending quite a bit of time there.

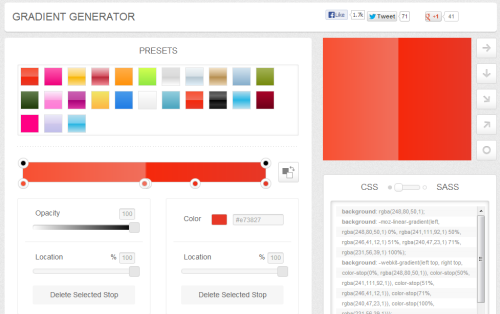
To begin, we are going to look at several major areas of the Gradient Generator. At the top left are all the presets available (note that you can create your own and store them here). Clicking on any preset will cause it to be displayed in the gradient slider directly underneath with all the necessary control stops to manipulate placement of the gradient color and opacity; it will also be displayed in the preview window. At the far right of the slider is a button which will flip the direction of the gradient, from right to left and back again.
At the far right is the Preview window and to the right of that are several icons which control the direction of the gradient, from left to right, right to left, angles, and circular. Below that is the code, which changes in real time as you manipulate the control points on the gradient slider.

This section is directly below the CSS and as you can see, it contains additional controls. I’ve chosen to turn on Comments and IE9 support for additional information in the code. Note at the far left is the popup for Color Formats. This gives you six different choices for how color is used within the CSS. Note that two of these: hsla and rgba make use of an alpha channel. This allows you to control transparency within the gradient, which can be really useful with your layouts.

In this section is the slider at the top and the various gradient controls. Here’s how they work:
You’ll notice two control stops at the top of the slider with a black dot in them. These control the opacity of the color and you can adjust the position, as well.

Here’s an example of that in progress. First off, I used the hsla color format. Next, I clicked on the left opacity stop (at top left on the slider) and changed the opacity. Using the Location slider, I moved it to a new position. You can also move the Opacity Stop by clicking on it and dragging it to the new position. You can also see the effect of the transparency effect on the preview panel at the above right.
Note: If you try to delete the stop at either end with the Delete Selected Stop link below the Opacity slider it won’t work. It will only work if you add additional opacity control points to the top end of the slider.

Now we’ll look at the color control points. These are at the bottom of the gradient slider. There will be a few or many depending on which preset you choose.
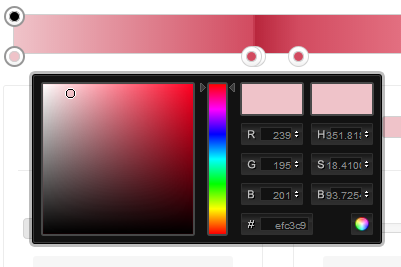
Clicking on any control point will bring up a color dialog box, which shows you the color of the control point. If you don’t want to use the color dialog box, click in the white space around it to close it. You can then drag the slider to a new position or use the location slider directly beneath the color swatch above it. You can change the color for each control point using the color dialog box or the color swatch at the far right below the slider.
Note: Despite the different color formats, the controls in the color dialog box remain the same.
To delete any color stop, click on it, then click on the Delete Selected Stop link on the far right below the location slider. Note that you also have quick control over the color using the Hue, Lightness and Saturation controls. Note that numeric entry is available for each control below the gradient slider.
You can also save each gradient you’re working on as a preset and once you’re satisfied with your changes you can copy the CSS for use in your projects. Note the support for webkits in the code, as well.
Border Radius
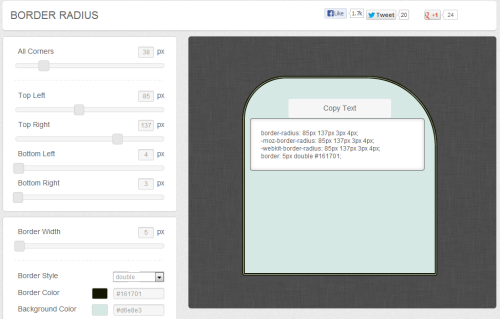
Next, we look at the Border Radius tool. As you can see, the use of this tool is straightforward. At the top is a control that simultaneously shapes all corners to the same size. This can be overridden by the four individual controls beneath it. Below that is the Border Width control and below that you have the Border Style, Border Color and Background Color. With the Border Style popup you have eleven options, which are: Solid, Dotted, Dashed, Double, Groove, Ridge, Inset, Outset, Inherit, Hidden and None.
Noise Texture

The noise texture tool offers a simple way of adding a noise pattern to your web layouts. The tools control the noise opacity, density, background and noise color, transparency and the ability to create different dimensions for output.
Box Shadow
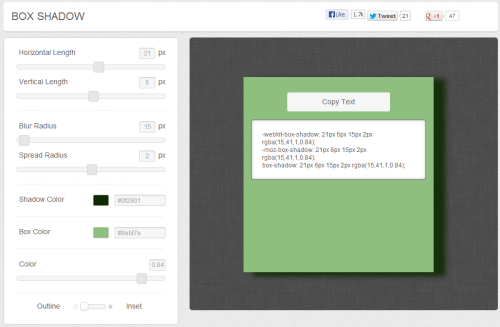
The box shadow tool is fast and easy to use. The top two sliders control the vertical and horizontal direction of the blur. The Blur and Spread Radius tools control the density and size of the blur. The Shadow color and Box color are self explanatory, but the Color slider is not. The Color slider controls the alpha channel or transparency of the shadow. The last control, Outline, controls whether this is an inset or outline (drop) shadow.
Conclusion
Overall, CSS Matic is relatively simple to use and gives you real-time results. The major down side is the lack of any instructions. In working with the Gradient Generator, it took a fair bit of time to figure out how some of the controls worked.
The Border Radius tool was simple and fast to use, much like other programs I’ve worked with.
The Noise Texture tool worked but was disappointing in its functionality. Among other things, I would have liked to see control over the size of the noise particles. In terms of creating textures, the best overall tool I’ve used is Corel PHOTO-PAINT. It offers a fantastic array of preset textures and easily allows you to make/customize your own using both fractals and real textures.
Read more CSS and web development tutorials.