In a perfect world, websites would make their content available via RSS, Atom feed, or some other easily digested format. Unfortunately, the reality is that most sites are meant to be read directly by a person via a browser. Not to be deterred, many companies harvest content from other sites using a process called Web Scraping. I recently wrote an article on Web Scraping JavaScript Rendered Content. Reading JavaScript output required the use of a browser automation engine called the Selenium WebDriver. It should be noted that similar tools, known as headless browsers, have opened up a world of possibilities that go far beyond Web Scraping. Having a browser engine at your disposal allows you to do just about anything that you can do yourself. This might include logging in and out of sites, saving session information between page navigations, and interacting with page elements such as links, buttons, and most other form controls.
In today’s article, we’ll be using the Puppeteer, which is a Node library of high-level APIs to control Chrome or Chromium over the DevTools Protocol, to search for the above article on HTMLGoodies.com and download a screenshot of it.
Setting up Puppeteer
You can install Puppeteer using Yarn or npm. We’ll be using the latter. Along with the Puppeteer API, you’ll get the most recent version of Chromium thrown in for free! Yes, it’s already free, but this particular installation is guaranteed to work with the API. Expect to download between 170MB and 282MB, depending on your O/S. If you like, you can opt for the API-only download called puppeteer-core. It will launch an existing browser installation. The npm commands are:
npm i puppeteer-core
OR
npm i puppeteer
Launching/Closing the Browser
To use Puppeteer, you’ll need to reference it in your script via the require() function. Then, call the launch() method to kick things off. It accepts an options object. In the code below, you’ll see two of them: the path to the Chrome executable and whether or not to run in headless mode. I would suggest that you run it in regular, i.e. non-headless, mode so that you can watch it go!
Launch(), like most Puppeteer methods, returns a Promise. That allows you to use the launch().then().catch(e) chain.
const puppeteer = require('puppeteer-core');
puppeteer.launch({
executablePath: 'C:\\Program Files (x86)\\Google\\Chrome\\Application\\chrome.exe',
headless: false
}).then(async browser => {
});
On the htmlgoodies home page, you’ll find the search box in the upper right-hand corner of the screen:
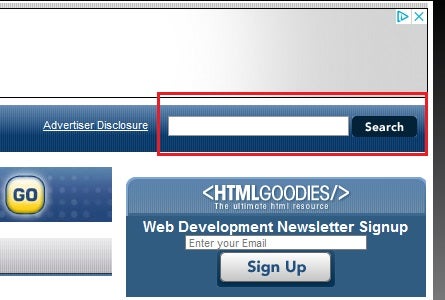
We’ll be programmatically entering our search query into the input box and then clicking the Search button. Rather than describe every step that we’ll be taking, I’ll just list them here and provide comments as we go:
}).then(async browser => {
//obtain a reference to the open tab
const page = (await browser.pages())[0];
await page.goto('https://www.htmlgoodies.com/');
await page.click('.zz_overlay_close');
await page.waitFor(1000);
await page.click('#search-input');
await page.keyboard.type('web scraping');
await page.click('#search-submit');
await page.waitForNavigation();
await page.click('.zz_overlay_close');
await page.waitFor(1000);
Referencing the New Tab
Links that possess the target="_blank" pose a bit of an automation challenge in that the browser doesn’t automatically switch over to the new tab — at least not with any degree of consistency. Joel Inbinder proposes the following solution, which intercepts the targetcreated event:
const articlePagePromise = new Promise(
    x => browser.once( 'targetcreated', target => x(target.page()) )
);
await clickByText(page, 'JavaScript Rendered Content');
const articlePage = await articlePagePromise;

await articlePage.waitFor(2000);
Clicking the Article Link
Selecting an element by its text is not the easiest thing in the world. Without the luxury of jQuery’s “:contains” pseudo-selector, we have to make use of the xpath contains() function. As it happens, puppeteer has a method for selecting elements using an xpath expression called $x. It returns a Promise that contains an Array of ElementHandles.
const clickByText = async (page, text) => {
const links = await page.$x(`//a[contains(@class,'gs-title')][contains(text(), '${text}')]`);
if (links.length > 0) {
await links[0].click();
} else {
console.log(`Link not found: ${text}`);
}
};
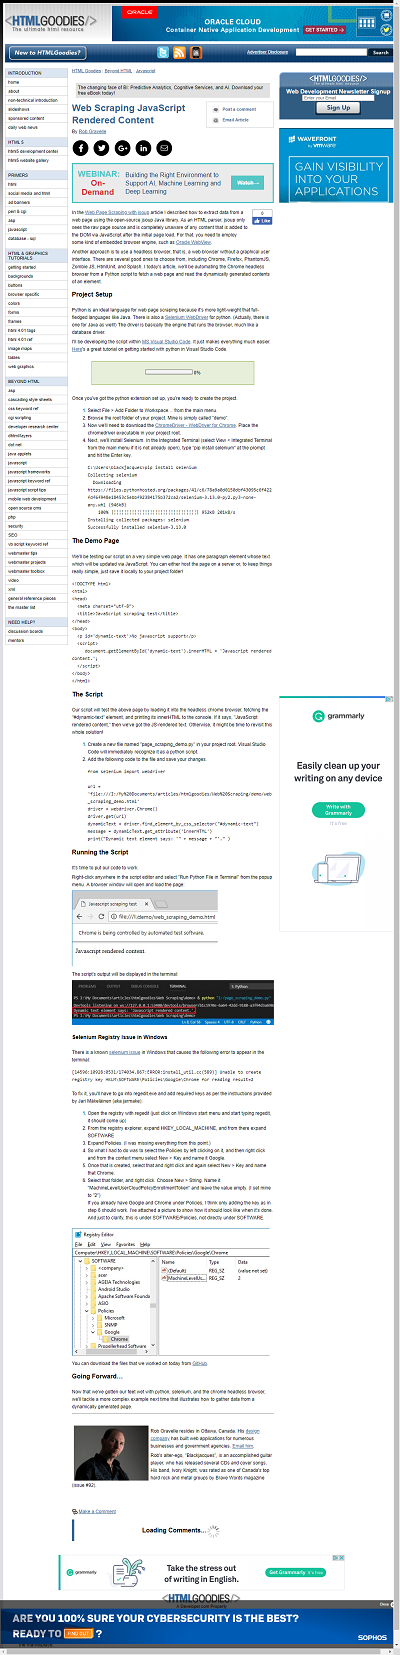
Saving a Screenshot of the Page
We’ve worked hard to get to this point, but we’ve made it to the easy part! The screenshot() method accepts an options object, of which we are passing two: the file path to save the image to and the fullPage flag to include the entire scrollable page:
await articlePage.screenshot({ path: 'myscreenshot.png', fullPage: true });
Here’s the resulting image. Since we didn’t include a full path, it is saved to the current working directory:
And finally, here is the full source code for the index.js file:
https://gist.github.com/blackjacques/b83fecc6471a0b527b8a48d45ccc214c.js


