As the Web transitions from a mere presentation medium to an application platform, developers are now encountering many of the same challenges that they faced while building desktop apps – along with a few new wrinkles. One such challenge was how best to structure the various components of a system. This eventually gave rise to architectural design patterns like MVC. Now, several commercial and open source web frameworks have emerged that enforce that pattern. One of the more ubiquitous frameworks is called EmberJS (or just “Ember” for short). In today’s tutorial, we’ll learn what distinguishes a framework from a library, as well as how to get up-and-running with Ember.
If you were to say that a framework may have several libraries, but a library would not have several frameworks, you would be correct, but that would be an oversimplification. The explanation for the previous statement is that, while both a library and a framework makes development easier and more consistent, a library tends to focus on things like:
language abstraction
smoothing over browser differences and/or compliance levels
simplifying the development of complex components such as file uploaders, slideshows, etc…
providing access to new or experimental technologies and/or features as to allow for graceful degradation where not supported
A framework, on the other hand, is responsible for an application’s overall architecture, and orchestrates the various components and tiers to work as a cohesive unit. This includes calling library functions as well as your own.
Hence, the main difference between the two is that the latter calls our code, whereas a library is functionality which gets invoked by us.
Sherif Ramadan offers an excellent explanation on YouTube:
Advertisement
The Ember Stack
Don’t let the Ember.js name fool you. There’s a lot more to Ember that a JS file! In fact, the framework is comprised of several components:
Ember CLI
Replacing the deprecated Ember App Kit, Ember CLI is a command line utility based on broccoliJS, whose main purpose is to generate new Ember apps. It provides a few perks, such as:
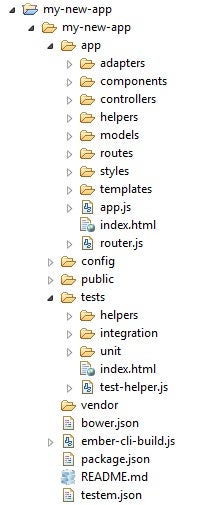
A standard file and directory structure.
Development server with live reload. Out of the box this will automatically rebuild apps incrementally whenever files are changed, and then reload the app in any open browser tabs.
A complete testing framework – QUnit.
Dependency management using bower and npm.
ECMAScript 6/ECMAScript 7+ syntax support (using Babel).
Asset management including combining, minifying, and versioning.
Ember Data
Ember Data is a data-persistence library that performs object-relational mapping (ORM). It is also possible to use Ember without Ember Data. Ember Data maps client-side models to server-side data. It can then load and save records and their relationships without any configuration via a RESTful JSON API. JSON API has server library implementations for PHP, Node.js, Ruby, Python, Go, .NET and Java.
Ember Inspector
The Ember Inspector is an browser extension for Mozilla Firefox and Google Chrome for debugging Ember applications. Features include:
the ability to see which templates, components, and views are currently rendered
see the properties of any Ember object with a UI that computes bindings and computed properties
access your application’s objects from the console
if Ember Data is used, one can also see the records loaded for each model
Advertisement
Fastboot
Fastboot is an Ember CLI addon created by the Ember core team that gives Ember developers the ability to run their apps in Node.js. It presents HTML (with CSS styling) right away, and downloads JavaScript in the background so that it takes over after page content is displayed.
Liquid Fire
Liquid Fire provides animation support for Ember applications. Features include:
template helpers: The library provides helpers like {{liquid-outlet}}, {{liquid-if}}, etc, that are different from normal Ember helpers in that they don’t update instantly when bound data changes. Instead they consult your application’s transition map (see below), and if they discover a matching transition, they give the transition control over both the old and new content simultaneously.
transition map: The transition map is analogous to the Ember router map. It declares rules about how the pieces of your application relate to each other.
transitions: The transition map above includes two predefined transitions: toLeft and toRight. You can compose new transitions as well.
Installing Ember
We will be using Ember 2.6.0 throughout this tutorial series, along with the Ember CLI build tool that comes with it.
Dependencies
Ember CLI is a JavaScript library; it expects the Node.js runtime. If you’re not sure whether you have Node.js or the right version, run this on your command line:
node--version
npm --version
It also requires dependencies fetched via npm, but since npm is packaged with Node.js, as long as you have Node.js installed, you’re good to go.
Ember requires Node.js 0.12 or higher and npm 2.7 or higher, so after installing node, I strongly recommend that you run npm install -g npm to make sure you’ve got the latest version.
Ember uses Git to manage many of its dependencies. Git comes with Mac OS X and most Linux distributions. Windows users can download and run the Git installer.
Other optional dependencies include:
Watchman: Improves file watching performance on Mac and Linux.
PhantomJS: Allows you to run tests from the command line, without the need for a browser to be open. You can download it here.
Advertisement
Installing Ember using npm
Once you’ve installed node.js and updated npm, run the following install command:
npm install -g ember-cli@2.6
To verify that your installation was successful, run this command that echoes the version number:
ember -v
Building an ember App
The process to build an Ember app is as follows:
First, run the following command, where “my-new-app” is the name of your app:
ember new my-new-app
That will create a new my-new-app directory with your new Ember app inside.
Once the process finishes, launch the Ember development server:
Type “cd my-new-app” at the command line, followed by “ember server”.
Navigate to “http://localhost:4200” to see the default app welcome message.
The Ember CLI development server provides features like rebuilding your app every time a file changes, and a mock server for setting up fake data when testing your app.
Coding your App
Take a look at the following three files and note their contents and how they relate to each other:
app/templates/application.hbs – the main application template
app/routes/index.js – the file containing the code that Ember will run when the default route is loaded.
app/templates/index.hbs The template for the index route. This will render within the {{outlet}} handlebars in the application.hbs template
We can change the structure of our application layout in the app/templates/application.hbs file to see what happens.
<header><h1>Ember Demo</h1><p>This is our simple Ember 2.6 demo</p></header>{{outlet}}
Open the app again in the browser and you should see the updated markup.
Advertisement
Conclusion
Now that we’ve gone over the basics of Ember 2.6 we are ready to start building up our app. In the next installment, we’ll learn how to work with data models and routes.
Rob Gravelle resides in Ottawa, Canada, and has been an IT guru for over 20 years. In that time, Rob has built systems for intelligence-related organizations such as Canada Border Services and various commercial businesses. In his spare time, Rob has become an accomplished music artist with several CDs and digital releases to his credit.
The original home of HTML tutorials. HTMLGoodies is a website dedicated to publishing tutorials that cover every aspect of being a web developer. We cover programming and web development tutorials on languages and technologies such as HTML, JavaScript, and CSS. In addition, our articles cover web frameworks like Angular and React.JS, as well as popular Content Management Systems (CMS) that include WordPress, Drupal, and Joomla. Website development platforms like Shopify, Squarespace, and Wix are also featured. Topics related to solid web design and Internet Marketing also find a home on HTMLGoodies, as we discuss UX/UI Design, Search Engine Optimization (SEO), and web dev best practices.
Advertiser Disclosure: Some of the products that appear on this site are from companies from which TechnologyAdvice receives compensation. This compensation may impact how and where products appear on this site including, for example, the order in which they appear. TechnologyAdvice does not include all companies or all types of products available in the marketplace.