Building an email list is one of the highest priorities for a business owner. You can build an email manually through meeting people and obtaining their permission to add their names to an autoresponder, you can build the list using squeeze pages, subscription forms on a website or through a lightbox popup.
Essentially, a lightbox popup is an option form which appears on a web page once the site has loaded. They come in many forms. Some function as a standalone plugin which you install in WordPress while others are created in autoresponder programs like AWeber. In this article we look at a WordPress plugin and the type of lightbox you can create with AWeber.
WordPress Lightbox Hover
When doing a search, you will find there are many lightbox options and they all have their own characteristics. Some are simple; others are complex and you might have to test out several of them to find one which will work for you.
In this section we will install the Sticky Email Opt-in Widget. Simply download the plug-in and go to the plug-ins page in the Dashboard. Click on Add New then Upload. After that, click on Browse, find the downloaded plug-in and click on the Install Now button to install it. Once the plug-in is installed, activate it.
Next, click on the Sticky Email heading in the Dashboard.
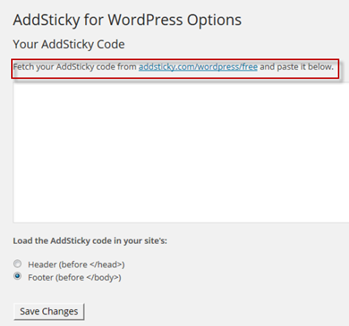
On the AddSticky page, click on the link at the top and you will be directed to a signup page.

Add the name of your site, your email address and a password. After that the following screen will appear:

Here, choose Collect Emails and middle of the page then click on the blue Get Started! button.

In Step 1, you write out the message and the call to Action. You can also activate the Advanced Options and upload your own button.

In this section you choose the appearance. You can stay with the default or enable the Advanced Options and change the text color, background, etc.

In Step 3 you choose whether you want to have the popup show on every page or specific pages (which you designate by URL). You can also set it to appear when the user arrives at your page or when they try to leave.
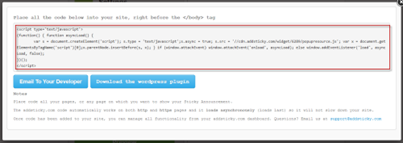
When you click on the Save, Get Code and Preview button at the bottom, you are taken to this page, which gives you the code for the popup to be inserted before the closing </body> tag on your WordPress site.

Here’s what the final popup looks like. And that’s it.
Create a Lightbox Hover with Aweber
In this section we will create a lightbox hover using AWeber, a popular autoresponder program.

Here is a simple lightbox hover form which I created for my travel site. When the site loads, the lightbox slides down from the top 5 seconds later.

When you create a lightbox hover you can customize it or make use of the many templates in Aweber. When you create a list in Aweber you have the ability to design forms for your site. These can be optin forms which can look like the screen shot above….

…or you can add code from a form into a squeeze page or sales page.

Once you build a list in AWeber you can make use of the signup forms and there are different options you can choose. As you can see in the screen shot above, I have two forms for my travel site, one of which is the lightbox hover. To build a lightbox hover, click on the green Create Sign Up Form button.

This brings you to the Sign Up Forms page. Here, you design the form, choose the settings then publish it. In the middle are different templates designs. At the bottom left is the Show More heading and at the bottom of this section is the Type heading. When you click on the Show More heading…

… the next page brings up a list of template and the one we are looking for is Hover Forms. Also, the Lighbox option has been selected and this option darkens your web page when the lightbox appears. It can be set to always appear or only appear once. It can fade in or slide from the top, bottom, left or right. You can also set how long you want to wait before lightbox appears. This can be set in seconds.

There are many options to choose from and all the fields in a template can be customized.

This is how I built my lightbox. The design was created using a combination of Photoshop and CorelDRAW then assembled into a final bitmap, which was loaded to a website. After that, the URL of the bitmap was inserted into the lightbox template. After that, it was a simple matter to finish the form and use the code for WordPress.

On the Publish page you have three options: To install the form yourself, to have your Web designer install it or to have AWeber host the form. Here, I always choose option one.

On the next page, you have the option of using a line of JavaScript or if you know you will be adjusting the form after the fact, use the HTML instead. To make things simple, I will use the JavaScript code, which looks like this:
<div class=”AW-Form-428823785″></div>
<script type=”text/javascript”>(function(d, s, id) {
var js, fjs = d.getElementsByTagName(s)[0];
if (d.getElementById(id)) return;
js = d.createElement(s); js.id = id;
js.src = “http://forms.aweber.com/form/85/428823785.js”;
fjs.parentNode.insertBefore(js, fjs);
}(document, “script”, “aweber-wjs-xrrlkkdxa”));
</script>
The task is to place the code between the <body> tags of your WordPress site. To add the code, go to the Dashboard and click on Appearance: Edit Themes.
Here is a snippet of what that looks like on my site in the index.php file:
<!DOCTYPE html PUBLIC “-//W3C//DTD XHTML 1.0 Strict//EN” “http://www.w3.org/TR/xhtml1/DTD/xhtml1-strict.dtd”>
<html xml_lang=”EN” lang=”EN”>
<head>
<?php get_header(); ?>
</head>
<body>
<div class=”AW-Form-428823785″></div>
<script type=”text/javascript”>(function(d, s, id) {
var js, fjs = d.getElementsByTagName(s)[0];
if (d.getElementById(id)) return;
js = d.createElement(s); js.id = id;
js.src = “http://forms.aweber.com/form/85/428823785.js”;
fjs.parentNode.insertBefore(js, fjs);
}(document, “script”, “aweber-wjs-xrrlkkdxa”));
</script>
<div id=”fb-root”></div>
<script>(function(d, s, id) {
Once the script has been installed your lightbox hover should work. One caveat, the lightbox hover doesn’t work in all browsers. If you find the lightbox doesn’t work with a particular browser this is probably the reason why.
Conclusion
A lightbox popup is a great alternative to a squeeze page. With a squeeze page users might close the browser instead of going further. With the lightbox, they have the opportunity of signing up or closing the lightbox and entering your site. Either way, there is a good chance your visitor will enter your site, one way or the other.