Whether you are testing your own web site or surfing the web, and noting what others have done on their sites, there are times when you might want to capture what you see in the moment. The easiest way to capture the moment is to take a snapshot of the screen. Better is to take a capture of the browser window, or even just part of the web page. Even better is to be able to also highlight or annotate on the capture.
There are numerous screen capture programs that can be downloaded or bought; however, if you are using Microsoft Windows, there is a simple screen capture program that has been available for your use for the last several versions called the “Snipping Tool.” If you are using Microsoft Windows 10, then the Snipping Tool is being replaced with a new tool called Snip & Sketch.
Both, the Snipping Tool and Snip & Sketch provide you with the ability to capture all or part of the screen as well as do markup and more. You can also save your captures directly from the tool. In fact, the images in this article were all captured using these tools!
Using the Snip & Sketch Tool Key Combination
If you are running an updated version of Windows 10, then you should already have the Snip & Sketch tool installed! You can type Snip & Sketch into the Start search box on your task bar, or you can scroll down the list of apps on the Start menu until you get to Snip & Sketch.
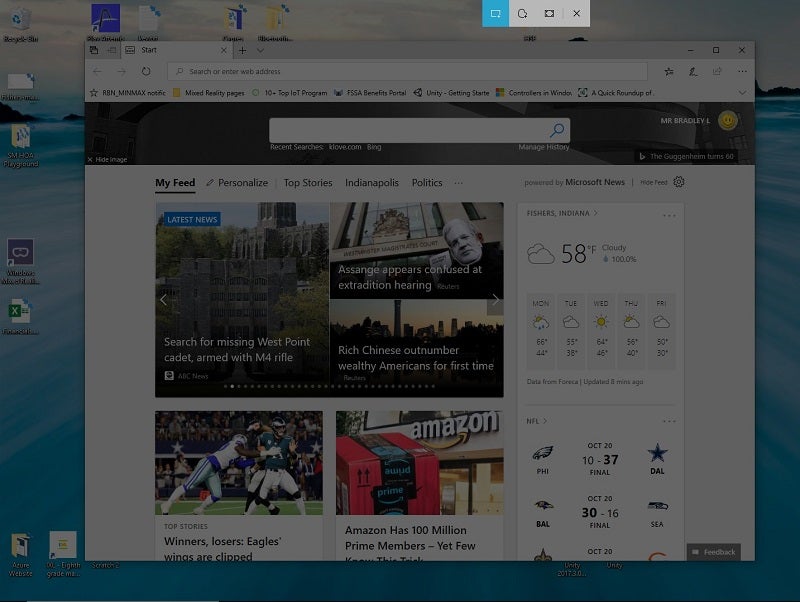
There is, however, an easier way to run to the application! To capture from the current screen, you can press the Windows Key + the Shift Key + S. If you have Snip & Sketch, then pressing this three-key combination will run the app to capture all or part of your screen. When you press this, the screen will be changed to be grayed and a small icon bar will be added to the top of the page as shown in Figure 1. You can either select from the icon bar or simply use your mouse to select a rectangular part of your screen.
Figure 1: Snipping using the key combination
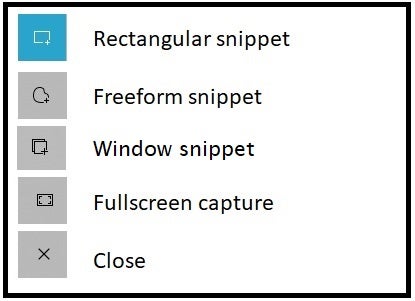
The icon tool bar contains four or five buttons. The first allows you to select a rectangular section of the page. The second allows you to capture a free-form shaped snippet of the screen. The icon that is two squares on top of each other with a plus sign allows you to capture a window with a single click. The icon that looks like a picture frame allows you to capture the full screen. The final icon of an X is the standard close button that will shut down the screen capture. Figure 2 shows these icons.
Figure 2: Screen capture tool icons
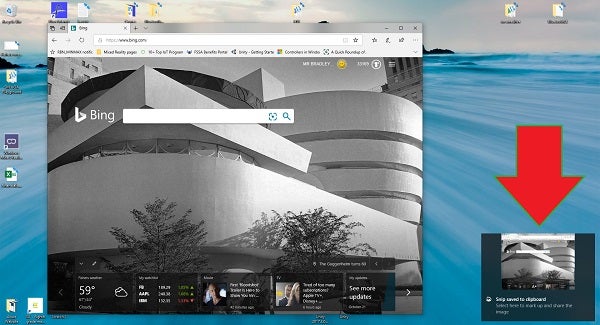
After selecting an icon for how you want to snip, then if you selected the rectangular or freeform options, you can use your mouse to select the part of the screen you want to capture. If you selected th window capture, then you simply need to click on the window or dialog you want copied. Once you release the mouse, a notification will be shown in the bottom right of the screen stating that your snip has been saved to the clipboard. You can then open and paste the snippet into your favorite drawing program (such as Microsoft Paint, which is included with Windows as well), or you can click the notification to open the capture in the Snip & Sketch program.
Figure 3: Notification for a new snippet
Using the Snip & Sketch App
If you run the Snip & Sketch App directly, you will also be given the ability to capture the same areas mentioned earlier. You can do this by clicking on the “New” button in the upper right corner of the app as shown in Figure 4.
Figure 4: The Snip & Sketch App
One advantage of using the app is that you can delay the start of the capture. Clicking the down arrow next to “New” will allow you to select to start the snip in 3 or 10 seconds. This gives you time to click on a menu or other pop-up that might normally go away when you select the snipping program. Clicking on the Snip in 3 seconds option will clear the Snip & Sketch program from the screen. Three seconds later, the screen will freeze and gray so you can capture the section you want.
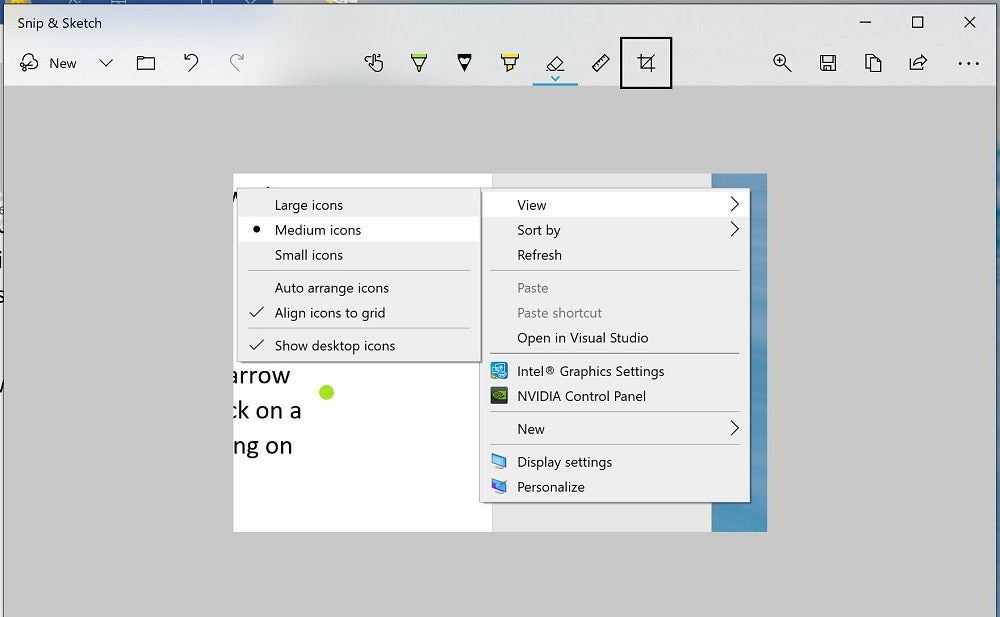
Your capture will be loaded into Snip & Sketch. Figure 5 shows a rectangular capture of a pop-up menu that was captured using the snipping delay.
Figure 5: A captured snippet in Snip & Sketch
Once captured, you have several icons you can use. As seen in figure 4, the icons on the upper right of Snip & Sketch should be familiar. You can zoom, save, copy, and share the snippet. The more interesting icons controls are the ones in the upper middle. These allow you to write on the screen with pens, highlighters, and your finger (if you have touch) or mouse. There is also an eraser so you can remove annotations you’ve added as well.
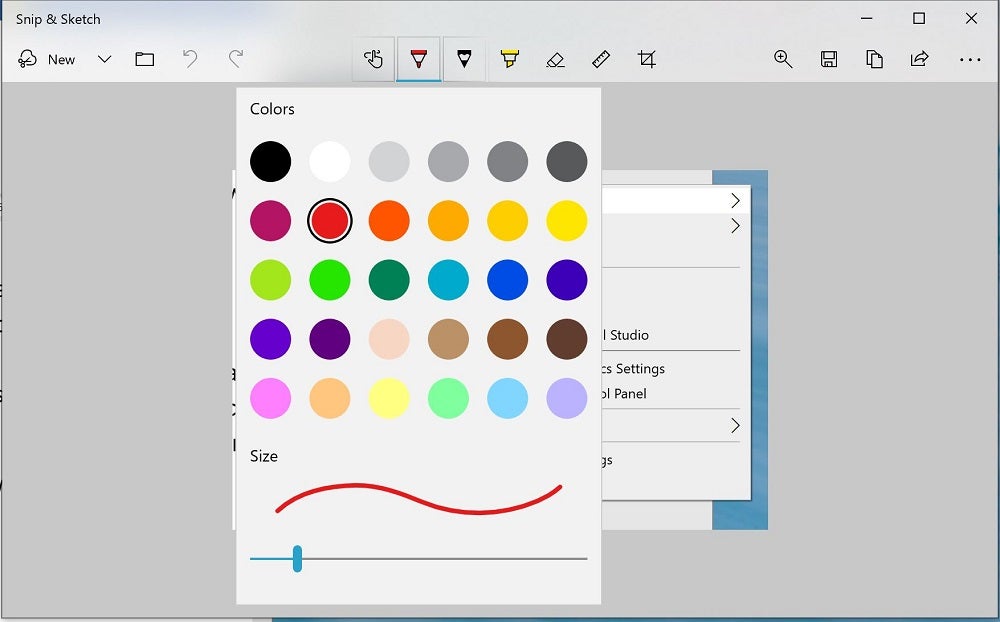
Clicking on an icon selects it. To change color or width of a pen, you can click the down arrows below them to get a color choice. Figure 6 shows selecting a color from the ballpoint pen.
Figure 6: Setting color for ballpoint pen
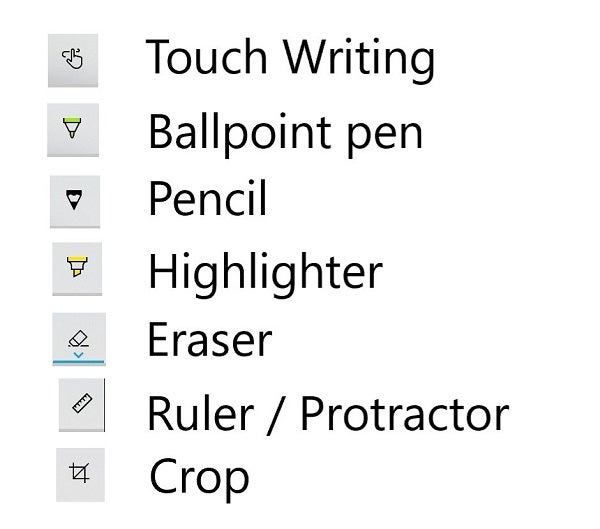
The icons you can select are shown in Figure 7. If you select a writing tool, then you can use your mouse or finger (on a touch screen) to do the writing.
Figure 7: The annotation icons
Conclusion
The Snip & Sketch tool is a relatively simple, but powerful tool if you need to capture screen shots or portions of a screen. When a web page renders oddly or displays an error, being able to quickly capture and save the screen makes it much easier to show others what needs to be fixed. Knowing that the tool is just a key combination away means you can capture and save the snippet quickly without losing the flow of what you were doing. While this article presented the tool quickly, the best way to see its power is to either load the app or press the Windows Key + Shift + S and start playing around!
If you are running an older version of Windows, you will have the Snipping Tool. It operates similarly to Snip & Sketch.


