Learn about the free Microsoft tools you can use to build a website, as well as see how to step-by-step deploy such a website to the free version of Azure Web Sites. This activity reveals how you can build and host a site at no cost.
Getting started with building Web Apps for couldn’t be easier, and this tutorial will walk you through the entire process including how to host the site in the cloud on Microsoft Azure. We’ll start assuming no prior accounts or experience with Azure and show you how to sign up for a free 30-day trial. After that we’ll look at the different options available for building and deploying Apps to Azure using Visual Studio 2015 Community (Community) edition, which is also free. If you don’t already have Visual Studio 2015 Community Edition, then check out part one of this series, “Getting a Free, Yet Powerful Web Dev Tool: Visual Studio 2015 Community Edition,” which will walk you through obtaining and configuring the tool.
Azure App Service
Before building a and deploying your web app, you should first set up an account on the cloud. To do this, you can work with Microsoft Azure. If you have an MSDN subscription you automatically have a free Azure account with up to $150 per month in usage credit. If you’re just looking to take Azure out for a test drive, you can sign up for a one-month trial. Just head over to the main Azure web page and click on “Try from free”. This will bring up the screen shown in Figure 1.
Figure 1 – Azure free trial page
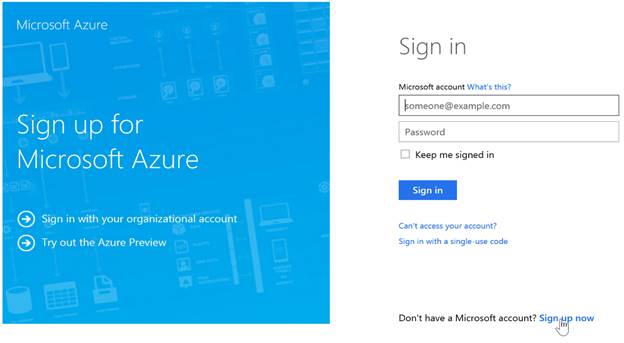
You’ll need a Microsoft account before you will be able to create a free trial account. If you don’t already have a Microsoft account, simply click on the Sign up now link as shown in Figure 2.
Figure 2 – Azure account creation page
The other thing you need to know is that Microsoft requires a credit card to create your trial account. As the signup page states, your credit card is used for verification purposes and you won’t be charged unless you actually remove the spending limit that is defaulted to $0. You get a $200 Azure credit with the 30-day trial. Once you complete the sign-up steps you should see a page like the one in Figure 3.
Figure 3 – Summary page from newly created Azure trial account
Options for Building a Web App
Once you have your Azure account established you’re ready to begin exploring the variety of options for building Web Apps. The easiest way to get started is by using one of the templates from the gallery. To get to the gallery click on the New button at the bottom of the Dashboard page. This will bring up a screen like the one in Figure 4.
Figure 4 – New options from Azure Dashboard
Selecting Web App will display three options allowing you to build from scratch or choose an existing template from the gallery. We’ll use the From Gallery option for this tutorial to show how easy it is to provision a Web App and then customize it for your use.
After selecting From Gallery you should see a list of available options including the Templates option as shown in Figure 5.
Figure 5 – Templates for Web Apps from the Azure App Gallery
Options include a wide range of application templates like Apache Tomcat 7, APS.NET, Node.js, and the PHP Starter Kit. We’ll use the Express Web App template shown selected in Figure 5 a little later on to build out our demo.
App Services provides a way to build an API for use by any application to deliver content or status programmatically. To build a custom API you must use the same New process as before but choose App Services and API Management. Clicking on the Create button will launch a wizard which will lead you through the process.
Figure 6 – API Management wizard
Many web applications require some type of database management system to store information for any number of different purposes. Azure provides cloud-provisioned instances of Microsoft SQL Server along with a more generic Storage service if you simply need the ability to store data in blobs, tables or queues. Using the same New process with Data Services and either SQL Database or Storage selected will again lead you through a wizard to create the necessary service.
Connecting Visual Studio 2015 Community Edition to Azure
The first thing you’ll need to do to connect Visual Studio 2015 Community edition to your Azure account is to install the Azure SDK for .NET. Do this by opening Visual Studio and selecting File then New Project. This will open the New Project wizard where you need to expand the Visual Basic option and select Cloud. This should show a list of templates including one named “Get Microsoft Azure SDK for .NET” as shown in Figure 7.
This template will only display if the Azure SDK has not been installed. Clicking on the OK button will open a web page within Visual Studio displaying a button labeled “Download Microsoft Azure SDK for .NET”. Clicking on this button will launch the web installer and allow you to either save it to disk or run it directly. Version 5.0 of the Web Platform Installer should eventually run and give you the option to install the Microsoft Azure SDK for .NET (VS 2013) version 2.5.1. You will need to close Visual Studio for the process to run.
Figure 7 Azure SDK Installer
Once you have the Azure SDK installed you’ll have the option to connect to your Microsoft Azure Subscription from the Visual Studio Server Explorer pane. If you don’t see the Server Explorer pane, simply click on View then choose Server Explorer or use the Ctrl Alt S key combination. From this pane you must then right-click on the Azure item and choose Connect to Microsoft Azure Subscription as shown in Figure 8.
Figure 8 Connect to Microsoft Azure Subscription from the Server Explorer tab
From here Visual Studio will present you with a login screen where you must present your Microsoft Azure credentials. Once you login you should see any existing websites and also be able to create a new web project right from the Visual Studio New Project wizard.
Building a Demo App
Creating a new app for deploying to Azure is no different than targeting a local web server. The only difference will be where you will deploy the app. Figure 9 shows the New Project wizard with an ASP.NET Web Application as the target.
Figure 9 ASP.NET Web Application
In addition to the default settings you have the option at this point to add your project to source control. Visual Studio supports Git as a source control provider. Check the Add to source control box and then click OK to see another dialog where you can choose either Team Foundation Version Control or Git (see Figure 10).
Visual Studio will create a local Git repository using the path specified for the project directory. You can choose to later push this repository to a cloud-based repository like GitHub should you want that option.
Figure 10 Source Control selection dialog
At this point we have a bare bones ASP.NET application ready to be adapted for any specific need.
Other Website Choices
Visual Studio Community 2015Edition supports a wide range of languages and frameworks to meet just about any need. These include Python, PHP and any number of JavaScript frameworks including Apache Cordova. Visual Studio now fully supports Node.js development with the Node.js Tools for Visual Studio (NTVS). You’ll need to download and run the installer from the codeplex site to enable this feature.
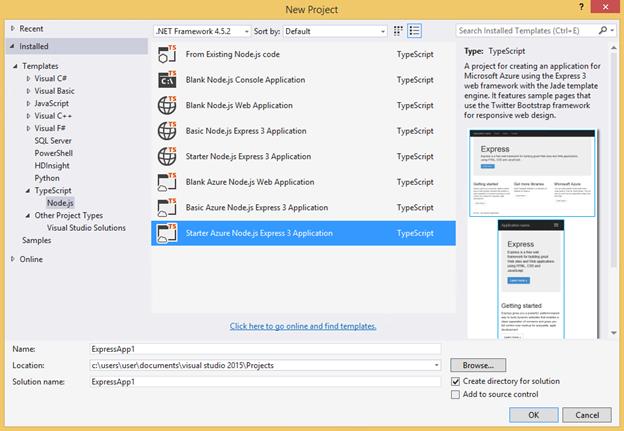
Once you have the tools installed you should see a new option from the New Project wizard. Figure 11 shows what this should look like.
Figure 11 Node.js New Project wizard
Choosing the Starter Azure Node.js Express 3 Application option will create a new local project which you can easily deploy to Azure. You must install Node.js in order to test your application locally. This requires a separate download from the nodejs.org site. Figure 12 shows the download page.
Figure 12 Node.js download page
Once the basic Node package has been installed you’ll have a few more steps to complete to get everything working. The first step requires the command line and installs the basic Node.js Express package. Figure 13 shows this step. The command is simply npm install express.
Figure 13 Node.js Express installation
With the express package installed you have one last step to get the basic ExpressApp template app to work. From Visual Studio with your Node.js project open, right-click on the npm node and choose Install Missing npm Packages as shown in Figure 14.
Figure 14 Install Missing npm Packages
Once this process completes you should be able to run your project and see a screen in Internet Explorer like the one in Figure 15.
Figure 15 Express Web template project running locally
Visual Studio makes it really easy to move your Node.js Express project to Microsoft Azure. First you right-click on the project name (ExpressApp1) from the Solution Explorer and select the Publish as shown in Figure 16.
Figure 16 Publish Project to Azure
The next screen allows you to pick a publish target which includes Microsoft Azure Web Apps as the first option. Selecting this option and clicking Next will allow you to choose either an existing project in your Azure account or allow you to create a new one. For this demo we choose New and then give it the name PFNodeJSTest. This needs to be a unique web address and the wizard will let you know by putting a green check box next to the name if your choice is OK. Finally you must choose a region to deploy your project as shown in Figure 17.
Figure 17 Create Web App
One final page will display your Azure credentials and allow you to view the final settings for your project. Once that finishes you should be able to navigate to the URL from any browser and see the same results as seen locally.
Wrap Up
Visual Studio Community 2015 Edition provides a great environment for building and testing Web apps locally and then quickly and easily deploying them to Azure. The best part is its free!
This article was sponsored by Microsoft Corporation.


