
Inline event handling, it’s very mention brings shivers up developers’ backs! We’ve all heard the reasons that you should NEVER – and I mean NEVER – use them. I won’t reiterate them yet again here, but I’d like to point out that someone (likely Charles Dickens) also once said to “never say never!” Where ever there are perfectly good reasons not to do something, there are times when doing that very thing is exactly what’s called for! Now, I’m not here to tell you to start using inline event handlers in your Web pages, but I will venture to say that is that there is a distinct possibility that you will have to deal with them at some point. When that time comes, you should be aware of inline event handlers’ numerous caveats. In today’s article, we’ll learn how to add, modify, and remove inline event handlers using jQuery-assisted JavaScript.
Proof of Inline Event Handlers in the Real World
I had heard that Google’s main page contains many inline event handlers. I was skeptical at first, but one look at the source code confirmed it.
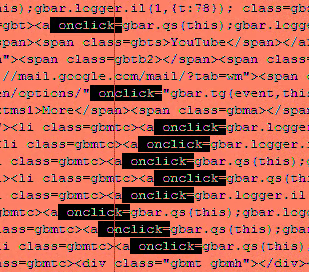
Google chose to use inline event handlers because they save server calls. They also place their JavaScript block at the bottom of their HTML code so that there is no external script loading. It’s all part of their strategy to improve performance at any cost, much like exotic sports car manufacturers who remove air conditioners and radios to make their vehicles faster.
Inline Event Handlers in Action
Inline events are bound to an element by their attribute name, which starts with the “on” prefix. Not all event types may be bound to all elements. For instance, onchange is usually associated with text input fields. Here is a list of some common HTML events:
- onchange: An HTML element has been changed
- onclick: The user clicks an HTML element
- onmouseover: The user hovers the mouse over an HTML element
- onmouseout: The user moves the mouse away from an HTML element
- onkeydown: The user pushes a keyboard key down
- onload: The browser has finished loading the page
The following elements feature a number of inline event handlers. Notice that the attribute value may contain a JS code string or function name. The link elements also use the ancient “javascript:” href value prefix. It harks way back to the early days of the Web when tags did not support the onclick event. That was the only way to execute javascript from a link click.
  <a id="a link" href="javascript: doSomething(this);">click me</a><br>
	<a id="a link" href="javascript: function() { return false; };" onclick="console.log(this.id);">click me</a><br>
<input id="a button" type="button" onmousedown="mouseDown();" onmouseup="mouseUp();" onclick="doSomething(this);" value="Click Me" />The New Event Registration Model
jQuery made it even easier to attach event handlers to an element using the bind() or on() function:
$(document).ready( function() {
  //the id attribute selector works with multi-word IDs
  //$('#a button') does not
  $("[id='a button']").on( "click", function() {
    console.log( 'You clicked ' + this.id + '.' );
  });
});
A Clash of Styles
function removeInlineHandler(elt, eventType) {
  var $elt = $("[id='" + elt + "']");
  $elt.removeAttr(eventType);
  //this also works
  //$elt.attr(eventType, '');
}
Listing Registered Event Handlers
$("[id='a button']").on( "click", function() {
  console.log( $._data(this, "events") );
});function getInlineEventHandlers($elt) {
return $.grep($elt.get(0).attributes, function(attrib) {
return /^on/i.test(attrib.name) && attrib.value.length;
});
}Removing All Event Handlers from an Element
function removeAllHandlers(eltID) {
  //wrap with jQuery
  var $elt = $("[id='" + eltID + "']");

	//turn off all registered event handlers
	$elt.off();

	//filter out event handlers from attributes
	var i = 0, attrib, attribName;
	while (attrib = $elt.get(0).attributes[i++]) {
		attribName = attrib.name;
		if (/^on/i.test(attribName)) {
		  $elt.removeAttr(attribName);
		}
	}
}