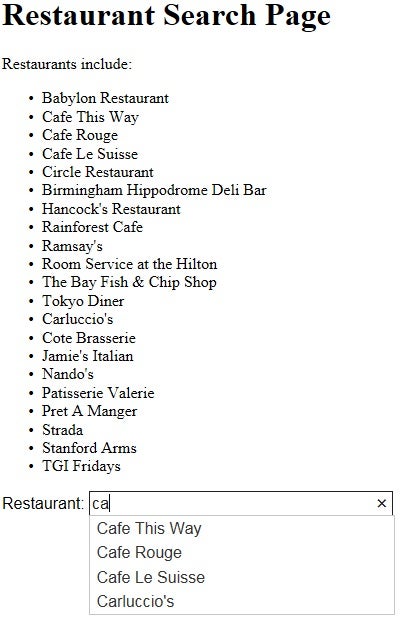
Autocomplete text fields have been a mainstay of desktop applications for a long time now. They are commonly found in programs such as Microsoft Outlook, development IDEs, and any other app where the user might benefit from having the program suggest possible values for an input field.
It wasn’t long before autocomplete widgets for the Web began to make their way onto pages and apps all over, for instance, in Facebook’s messaging system. So much so, that choosing one to use in your own apps can be a tall order. There are dozens of jQuery-based autocomplete widgets alone. Speaking for myself, my go-to is jQuery’s own implementation: the jQuery UI Autocomplete widget. Available since jQuery UI 1.8, it’s easy to set up and provides a highly versatile set of functionality, including support for remote data sources, caching, scrollable results, categories, and more. In today’s tutorial, we’ll employ the jQuery UI Autocomplete widget to choose from a list of restaurants, fetched from the server at runtime.
The Setup
Any field that can receive input and have the contenteditable attribute can be converted into an Autocomplete, but <input> and <textarea> elements are most commonly employed.
In addition to jQuery, you’ll also want to reference the jQuery UI library. It also comes with its own stylesheet. All resources are hosted so there’s no need to download them (unless you really want to!). Just include the following in your document HEAD:
	<link rel="stylesheet" href="//code.jquery.com/ui/1.12.1/themes/base/jquery-ui.css">
	<script src="https://code.jquery.com/jquery-1.12.4.js"></script>
	<script src="https://code.jquery.com/ui/1.12.1/jquery-ui.js"></script>
To convert an input field into an autocomplete widget:
-
Just include your input field where ever you want it in the page:
	<label for="restaurant_name">Restaurant: </label>
	<input id="restaurant_name" />
-
Then, in your JS code, select the input that you want to convert and invoke the autocomplete() constructor on it. Although it accepts many option parameters, the only one you need is the source array:
	$( "#restaurant_name" ).autocomplete({
	source: array( 'Restaurant1, 'Restaurant2', 'Restaurant3' )
	});
JQuery appends the following extra elements directly below your input field:
	<ul tabindex="0"
	class="ui-menu ui-widget ui-widget-content ui-autocomplete ui-front"
	id="ui-id-1"
	style="display: none;">
	</ul>
	<div class="ui-helper-hidden-accessible"
	role="status"
	aria-live="assertive"
	aria-relevant="additions">
	</div>
As you start typing into the field, jQuery generates the list component with relevant suggestions as well as an invisible element to assist with screen readers. As you can see by all the markup below, letting jQuery manage the autocomplete widget sure beats doing it yourself!
	<ul tabindex="0"
	class="ui-menu ui-widget ui-widget-content ui-autocomplete ui-front"
	id="ui-id-1"
	style="left: 52.46px; top: 32px; width: 181px; display: none;">
	<li class="ui-menu-item">
	<div tabindex="-1"
	class="ui-menu-item-wrapper"
	id="ui-id-18">
	Restaurant1
	</div>
	</li>
	<li class="ui-menu-item">
	<div tabindex="-1"
	class="ui-menu-item-wrapper"
	id="ui-id-19">
	Restaurant2
	</div>
	</li>
	<li class="ui-menu-item">
	<div tabindex="-1"
	class="ui-menu-item-wrapper"
	id="ui-id-20">
	Restaurant3
	</div>
	</li>
	</ul>
	<div class="ui-helper-hidden-accessible"
	role="status"
	aria-live="assertive"
	aria-relevant="additions">
	<div style="display: none;">
	3 results are available, use up and down arrow keys to navigate.
	</div>
	<div style="display: none;">Restaurant1</div>
	<div style="display: none;">Restaurant2</div>
	<div style="display: none;">Restaurant3</div>
	</div>
Fetching Values from the Server
One of the best features of the jQuery UI Autocomplete widget is its ability to fetch data from the server. I find it very useful for matching search values against database fields.
For our demo, we’ll call a PHP script that returns matches against a list of restaurants as a JSON object. By setting the source option to a string instead of an array, the widget knows to call that resource using Ajax. A query string is added with a term field, which the server-side script can use for filtering the results. For example, if the user types “Ca”, a GET request would be made to http://myserver.com?term=Ca. The source attribute then expects the returned matches to be encoded as JSON data.
	$( "#restaurant_names" ).autocomplete({
	source: "process_search.php",
	minLength: 2,
	select: function( event, ui ) {
	console.log( "Selected: " + ui.item.value + " aka " + ui.item.id );
	}
	});
When employing a server-side search, it’s a good idea to include the minLength option, in order to minimize server calls. In our case, the widget won’t call process_search.php until we’ve typed in two characters.
The process_search.php Code
	$restaurant_locations = array(
	"Babylon Restaurant",
	"Cafe This Way",
	"Cafe Rouge",
	"Cafe Le Suisse",
	"Circle Restaurant",
	"Birmingham Hippodrome Deli Bar",
	"Hancock's Restaurant",
	"Rainforest Cafe",
	"Ramsay's",
	"Room Service at the Hilton",
	"The Bay Fish & Chip Shop",
	"Tokyo Diner",
	"Carluccio's",
	"Cote Brasserie",
	"Jamie's Italian",
	"Jamie Oliver's",
	"Nando's",
	"Patisserie Valerie",
	"Pret A Manger",
	"Strada",
	"Stanford Arms",
	"TGI Fridays"
	);

	$pattern = '/^' . preg_quote($_GET['term']) . '/i';
	$matches = preg_grep($pattern, $restaurant_locations);

	echo json_encode( $matches );

	//prevents server from returning a zero
	die();
Our search works a little differently from the default behavior in that it matches against the start of the restaurant values rather than any part of them.
Here’s a zip archive containing the restaurant_search_page.html and process_search.php files. Just place them in your web server’s www directory and call the search page from your browser, i.e. “http://localhost/restaurant_search_page.html”.
Conclusion
The jQuery UI Autocomplete widget really does provide some useful functionality. Although today’s demo is a little simplistic, we’ll really get the Autocomplete widget to strut its stuff for us next time, when we put together a more complex example.


