


This is the sixth in a series that will introduce you to the JavaScript language. If you’ve read the previous 5 articles, you should have a good grasp on JavaScript by now. In this article we will be talking about the Document Object Model or DOM for short. The DOM is just a fancy term for “everything on your website”. It includes every table, image, link, form field, etc. on your page. JavaScript allows us to manipulate any element on the page in real time. We can hide or completely remove any element, add elements, copy them, change properties such as color, width, height, etc. and with some creative JavaScript, we can even implement drag/drop functionality, animation, or just about anything else you can think of.
The first thing that you must understand is that as far as your browser is concerned, your HTML page is exactly the same thing as an XML document. If you have ever worked with XML you should understand DOM manipulation fairly easily. If you haven’t, it’s really not that complicated. There is an excellent reference over at Dev Guru that covers every method of DOM manipulation in detail, but by the end of this article you hopefully will mostly understand how it works.
XML
For those of you that know what an XML document is, you can skip this part. For those that don’t, keep reading.
You are hopefully at least somewhat familiar with HTML. It’s what (almost) every webpage out there is made of. Every Image, Link, Table, Form Field, Box, etc. has its own tag. Here is an example of a simple HTML page:
<HTML>
<BODY>
<table border="0" cellspacing="2" cellpadding="5">
   <tr>
      <td colspan="2"><img src="Greetings.jpg" id="greetingImg" /></td>
   </tr>
   <tr>
      <td>
         Welcome to my sample HTML page!
         <br />
         <a href="somelink.html" id="myLink" >Click Here!</a>
      </td>
      <td><img src="hello.jpg" id="helloImg" /></td>
   </tr>
</table>
</BODY>
</HTML>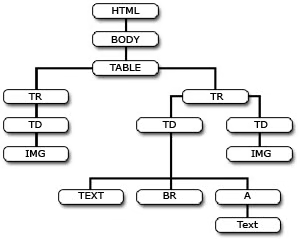
This is just a normal HTML page. What you probably weren’t aware of is that it is also an example of an XML document. What we care about here is that every element is the child and/or parent of another element. Our first image is inside of a TD tag which is inside of a TR, TABLE, BODY and HTML tag. Going the other way we notice that our BODY tag has one “child”, a TABLE tag. This TABLE tag then has 2 TR tags as children, and so-on. This is basically how we traverse an XML document or the HTML DOM–by moving from child to parent or from parent to child.
The image to the left might help you to better understand the parent-child relationship in this code.
The other things to note are the attributes on some of these tags. The TABLE tag for instance (
) has 3 attributes set: border, cellspacing and cellpadding. When we are changing the DOM we are often interested in changing these attributes. We might change the SRC attribute of an IMG tag, for instance, to change what image is displayed. This is very often done when creating a rollover effect, for instance.Creating a Rollover
Now that you understand how the page is laid out, we can start to manipulate it. We will start by creating a simple image rollover:
<img src="button_off.gif"
   onmouseover="this.src='button_over.gif';"
   onmousedown="this.src='button_down.gif';"
   onmouseout ="this.src='button_off.gif';"
   onmouseup  ="this.src='button_over.gif';">
If you take a look at the code you will see 4 events on our image: onmouseover, onmousedown, onmouseout and onmouseup. Each of these events has a simple piece of JavaScript attached to it that changes the src attribute of the image. By creating three different images we can quickly and easily create an image with a three-state rollover.
Adding and Removing Elements
One task that is becoming more and more common in modern JavaScript apps is the ability to add or remove elements from the page. Let’s say we have a form that allows you to send a link to your friends. Normally we would be restricted to using one input box for an e-mail address and another for their name. If you wanted to send the link to multiple people you would either have to submit the form multiple times or you could put more than one set of name/email boxes on the page. But we are still limited to a set number of contacts. If you had spaces for 5 contacts and wanted to send the link to 20 people you would have to fill out the form 4 times.
JavaScript allows us to get around this by making it possible to dynamically add and remove content from our page:
| var inputs = 0; function addContact(){ var table = document.getElementById('contacts'); var tr = document.createElement('TR'); var td1 = document.createElement('TD'); var td2 = document.createElement('TD'); var td3 = document.createElement('TD'); var inp1 = document.createElement('INPUT'); var inp2 = document.createElement('INPUT'); if(inputs>0){ var img = document.createElement('IMG'); img.setAttribute('src', 'delete.gif'); img.onclick = function(){ removeContact(tr); } td1.appendChild(img); } inp1.setAttribute("Name", "Name" +inputs); inp2.setAttribute("Name", "Email"+inputs); table.appendChild(tr); tr.appendChild(td1); tr.appendChild(td2); tr.appendChild(td3); td2.appendChild(inp1); td3.appendChild(inp2); inputs++; } function removeContact(tr){ tr.parentNode.removeChild(tr); }
| |||||||
|---|---|---|---|---|---|---|---|
Demo
| Add a Contact | ||
|---|---|---|
| Name | ||
You have probably never used the TBODY tag before. Many browsers automatically add this tag to the DOM without telling you about it. If you want to change the content of a table, you need to actually change the content of the TBODY. To prevent confusion here, we just added the TBODY tag so that everyone could see it.
All of this might look fairly complicated, but there is very little new material here.
To begin with, we have a new function: document.createElement. createElement does exactly what it sounds like: You tell it what type of element you want and it creates one for you. If you take a look at lines 5-10 of our script you will see that we are creating several elements. What we are actually creating is a new TR row to go into our table on lines 37-46. When we are done our new TR will look like this:
<tr>
   <td>
      <img src="delete.gif">
   </td>
   <td>
      <input name="Name1">
   </td>
   <td>
      <input name="Email1">
   </td>
</tr>
Breaking this all down, we have 1 TR, 3 TDs, 2 INPUTs and 1 IMG. So we create these 7 elements. The IMG tag is going to be used as a “Delete” image. Since we want our user to always see at least 1 input, we don’t allow them to delete the first row. So on line 12 of our script we check to see if this is the first row we are creating. If it isn’t then we add the image.
After we create all of these elements, all that is really left to do is add them to the document. Every element on your page has a built in “appendChild” function that can be used to add a child to that element. When you add a child, it is added as the last child, so if our table already had 10 TR tags as children and we added another, it would be added as the 11th TR. We start by getting a reference to our table (line 3). We then append our TR to this table (line 24) and append our 3 TDs to this (lines 25-27). Our 2nd and 3rd TD each contain an input box so we add these input boxes (28-29).
That’s it! We now have our new TR and it is in our page. There are a couple of things left to clean up though. In order for our form to be processed properly, each of the input boxes needs to have a different name. So we set the name of the two input boxes based on a counter (21-22) and then increment the counter (31). We do this by using another new function: setAttribute. setAttribute simply takes two parameters: the attribute name and the attribute value. There is a complimentary function to setAttribute which is getAttribute. getAttribute takes only one argument: the name of the attribute you would like the value of.
element.setAttribute(
“
name
”
,
“
elementName
”
)
is effectively the same as
element.name=
”
elementName
”
Setting the attribute directly however, as in the latter example, can occasionally cause some problems with different browsers or with some specific attributes. Therefore although either method will usually work, the first method, using setAttribute, is preferred.
We also have our delete button to worry about. We already know that we are not creating the delete button on the first row, but we need to make it work on all the others. Lines 15-16 in our code help to take care of this bit of functionality. We add an onclick function to our image that calls the removeContact function, passing our new TR element as the only argument.
Taking a look at our removeContact function we see that we first get “tr.parentNode”. parentNode is another function that is used for working with the DOM. It simply returns the parent element of your current element. If you look at our tree image earlier in the article, parentNode will return the element directly above any item you call it on. So if you called .parentNode on the single A element in that tree, you would get a reference to the TD element above it.
So tr.parentNode returns a reference to the TABLE element above the TR. We then call removeChild on this TABLE element. removeChild simply removes a specified child from the parent.
Looking at line 34 again, we can now see that it says “Remove the element, TR, from its parent”, or simply “Delete the element TR”.
Child Elements
You can access all of the children of an element using the childNodes attribute. childNodes returns an array containing each node that is a child of the current element. You can also use the firstChild and lastChild attributes on any element to get those references.
To see this in action, let’s write a script to color alternate TR rows in a table:
function setColors(tbody, color1, color2){
	var colors  = [color1, color2];
	var counter = 0;
	var tr      = tbody.firstChild;

	while(tr){
		tr.style.backgroundColor = colors[counter++ % 2];
		tr = tr.nextSibling;
	}
}
Demo
| Row 1 |
|---|
| Row 2 |
| Row 3 |
| Row 4 |
| Row 5 |
| Row 6 |
Color #1:Color #2:Color The Table
Looking at this short piece of code, there’s not much to explain for such an interesting little effect. We start by getting a reference to the first TR element in our table using the firstChild method. We then color each TR an alternating color using tr.style. The background color is set to one of the two colors in our colors array. If counter is even, the background color is set to color1. Otherwise it is set to color2. This is accomplished with the modulus operator (%). For those that don’t know what this is, modulus is the remainder left over when you do division. 5 / 2 = 2 with a remainder of 1. So 5 % 2 (5 modulus 2) = 1.
We aren
’
t going to get into the discussion of changing styles at the moment, but suffice to say that element.style gives you access to everything that can be set with a stylesheet. If you are interested in setting a style on an element, you can read/write the entire style using element.style.cssText.
After we set the background color we continue by getting the next TR in the table. We do this by using nextSibling. nextSibling returns the next element in the DOM with the same parent as the current element. So looking at a TABLE tag, all of the children are TR elements so nextSibling will loop through all of the TR elements. If you were looking at a TR element with children consisting of TD elements, nextSibling would loop through all the TD elements. When there are no TR elements left, our loop will exit automatically because TR will be undefined which, in JavaScript, evaluates to false.
For the sake of explaining the childNodes operator and the getElementsByTagName function, we are going to re-write the above example a little differently:
function setColors(tbody, color1, color2){
	var colors  = [color1, color2];

	for(var i=0; i<tbody.childNodes.length; i++){
		tbody.childNodes[i].style.backgroundColor = colors[i % 2];
	}
}

function setColors(tbody, color1, color2){
	var colors  = [color1, color2];
	var trs     = tbody.getElementsByTagName('TR');

	for(var i=0; i<trs.length; i++){
		trs[i].style.backgroundColor = colors[i % 2];
	}
}
Both of these functions do exactly the same thing as our first setColors function, but are written a bit differently. The first function uses the childNodes attribute. As previously stated, childNodes contains an array with each child as an element in that array. So we loop through the tbody.childNodes and change the color of each child, all of which should be TR elements.
Our next function uses a new function, getElementsByTagName. getElementsByTagName is another function that does exactly what it sounds like: it gives you an array of all elements with a specified tag name. Since we want all of our TR elements, we simply pass ‘TR’ to the function and we have a list of all the TR elements in our table. After that, our code is nearly identical to our previous function.
Working with Text
Working with text is a bit different than working with the rest of the DOM. First, every piece of text on your page is encapsulated in an invisible #TEXT node. So the following HTML:
<div id="ourTest">this is <a href="link.html">a link</a> and an image: <img src="img.jpg"></div>has 4 root elements: a text node with the value “this is “, an A element, another text node with the value ” and an image: ” and finally an IMG element. The A element has a final text node as its child with the value “a link”.
When we want to change text, we first need to get this “invisible” node. If we wanted to change the text ” and an image: ” we would write:
document.getElementById('ourTest').childNodes[2].nodeValue = 'our new text';document.getElementById(‘ourTest’) gives us our div tag. childNodes[2] gives us the ” and an image: ” text node and finally nodeValue changes the value of that text node.
What if we want to add some more text to this, but instead of adding it at the end we want to add it before our link:
var newText = document.createTextNode('our new text');
var ourDiv  = document.getElementsById('ourTest');
ourDiv.insertBefore(newText, ourDiv.childNodes[1]);
Our first line shows us how to create text: by using document.createTextNode. This is similiar to the document.createElement function that we saw before. Our third line has another new function, insertBefore. insertBefore is similiar to appendChild except that it takes two arguments: the element to add and the existing element you would like to add it before. Since we want to add our new text before the A element, and we know that the A element is the 2nd element in our div, we use ourDiv.childNodes[1] as the 2nd argument to insertBefore.
For the most part, that’s all there is to DOM manipulation. If you wanted to create a resizeable box, for instance, you would use some mouse functions along with getAttribute and setAttribute to change the width and height of your box. Very similiar to this, if we change the top and left position of an element’s style, we can move elements around the page either in response to mouse input (dragging and dropping) or a timer (animation).
As a final note for this article: From personal experience one of the most useful things you can have, when trying to test or debug JavaScript code that changes the DOM, is a DOM traversal script. Put simply this is a script that shows every element and every attribute on a DOM object. I have included such a script with this article. It will show you all attributes and child objects of any object you pass it. Describing the code itself is a bit beyond the scope of this article, but if you are interested in seeing how it works, or using it for yourself, view the source of this page and look for the tut4, tut5 and tut6 functions.
View the DOM of this Article or View the DOM of document.body or View the DOM of this window.
You can let your imagination run wild here, as there is almost no limit to what you can do with an HTML page once you know how to manipulate the DOM. In our next article, we will cover some of the last of the basic functionality in JavaScript: the window and document objects.
