In the Developing Angular 2 Apps In Eclipse tutorial, we learned how to set up our Eclipse IDE for Angular 2 development. Now the time has come to put our environment to good use and code our first Angular 2 app. Although this first exercise won’t produce much more than the ubiquitous Hello World app, it will give us a chance to become acquainted with all of the parts and steps required to get an Angular 2 application up-and-running.
The Application Code
At the end of the last tutorial, we had created our project named “MyFirstAngular2App”. The next step is to create our application folder and files. I will describe what each of them does as we go through each step.
- Add a folder named “app” in the project root. It will hold our application files.
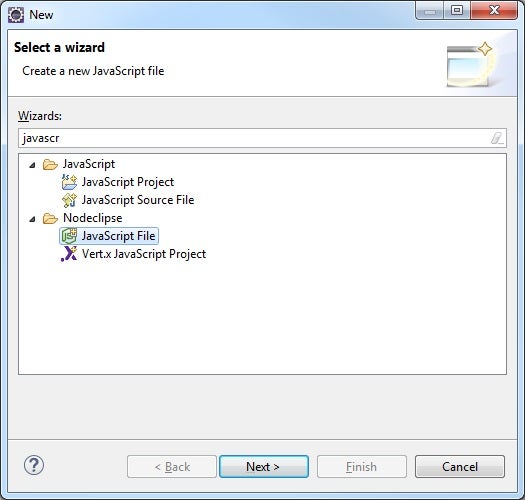
- Inside the app folder, create two JS files: one named “app.component.js” and another named “main.js”. You can find the .js file type under Nodeclipse in the “New” wizard:
A component is a class that manages a view template, which is a piece of the web page where we display information to the user and respond to feedback. This view is quite simple and only displays a heading. It’s the template property in step three below. The selector stores the name of the custom tag into which the template will be inserted.
- Paste the following code into the files and save them:
app.component.js
(function(app) {
  app.AppComponent =
    ng.core.Component({
      selector: 'my-app',
      template: '<h1>My First Angular 2 App!</h1>'
    })
    .Class({
      constructor: function() {}
    });
})(window.app || (window.app = {}));
main.js
This script loads the above application view on the DOMContentLoaded event. You can see that it refers to our app.AppComponent:
(function(app) { document.addEventListener('DOMContentLoaded', function() { ng.platform.browser.bootstrap(app.AppComponent); }); })(window.app || (window.app = {})); - Create a new file named “index.html” in the project root. It loads all of the required script files and acts as the application container.
- Copy and paste the following code into the file:
<!DOCTYPE html> <html> <head> <title>My First Angular 2 App</title> <!-- 1. Load libraries --> <!-- IE required polyfill --> <script src="node_modules/es6-shim/es6-shim.min.js"></script> <script src="node_modules/angular2/bundles/angular2-polyfills.js"></script> <script src="node_modules/rxjs/bundles/Rx.umd.js"></script> <script src="node_modules/angular2/bundles/angular2-all.umd.js"></script> <!-- 2. Load our 'modules' --> <script src='app/app.component.js'></script> <script src='app/main.js'></script> </head> <!-- 3. Display the application --> <body> <my-app>Loading...</my-app> </body> </html> - We need one more file before running our application. In the root of your project, create a file named “server.js”. In it, include the following one line to use the lite-server that comes packaged with nodeclipse:
require('lite-server');
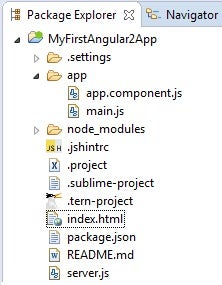
Here is what our project file structure looks like at this point:
Running our Application
Upon launching, the server knows to load the index.html file along with the contents of the /app/ directory. Therefore, all you have to do is right-click the server.js file in the Package Explorer and select Run As > Node Application from the popup menu. You should then see the following output in the console as the server picks up our project files:
[BS] Access URLs:
 ----------------------------
 Local: http://localhost:3000
 ----------------------------
    UI: http://localhost:3001
 ----------------------------
[BS] Serving files from: ./
[BS] Watching files...
.[90m16.12.06 11:49:46.[0m .[32m200.[0m .[35mGET.[0m .[90m/./index.html.[0m (.[90m.[31mUnknown.[0m - .[90m225ms.[0m)
.[90m16.12.06 11:49:50.[0m .[32m200.[0m .[35mGET.[0m .[90m/app/app.component.js.[0m (.[90m.[31mUnknown.[0m - .[90m3ms.[0m)
.[90m16.12.06 11:49:50.[0m .[32m200.[0m .[35mGET.[0m .[90m/app/main.js.[0m (.[90m.[31mUnknown.[0m - .[90m4ms.[0m)
.[90m16.12.06 11:49:50.[0m .[32m200.[0m .[35mGET.[0m .[90m/node_modules/es6-shim/es6-shim.min.js.[0m (.[90m.[31mUnknown.[0m - .[90m31ms.[0m)
.[90m16.12.06 11:49:50.[0m .[32m200.[0m .[35mGET.[0m .[90m/node_modules/angular2/bundles/angular2-polyfills.js.[0m (.[90m.[31mUnknown.[0m - .[90m83ms.[0m)
.[90m16.12.06 11:49:50.[0m .[32m200.[0m .[35mGET.[0m .[90m/node_modules/rxjs/bundles/Rx.umd.js.[0m (.[90m.[31mUnknown.[0m - .[90m226ms.[0m)
.[90m16.12.06 11:49:51.[0m .[32m200.[0m .[35mGET.[0m .[90m/node_modules/angular2/bundles/angular2-all.umd.js.[0m (.[90m.[31mUnknown.[0m - .[90m402ms.[0m)
.[90m16.12.06 11:49:57.[0m .[33m404.[0m .[35mGET.[0m .[90m/favicon.ico.[0m (.[90m.[31mUnknown.[0m - .[90m5ms.[0m)
Amazingly, our app will launch in the default browser. It’s not magic; nodeclipse is using browser-sync (a.k.a. Browsersync). It’s a tool that keeps multiple browsers and devices synchronized when building websites. That’s what the “[BS]” prefixes in the console output are referring to. (And you thought it stood for a different kind of BS”!)
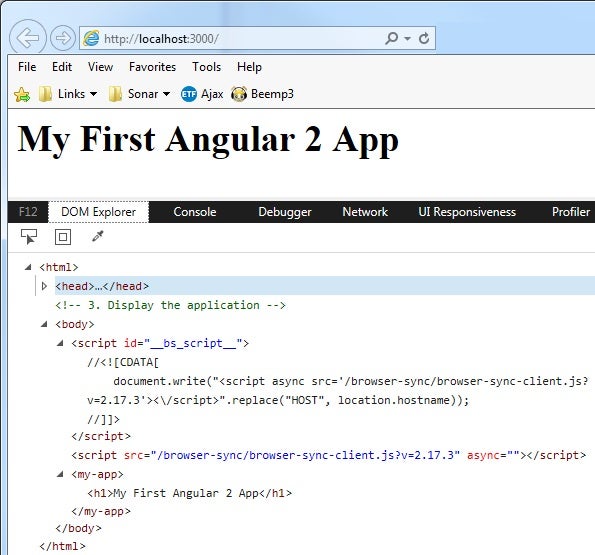
Here is a screenshot of the app in Internet Explorer 11:
I included the DOM Explorer tab so that you can see that Browsersync inserts its own script and that the my-app element contains our template.
Conclusion
That covers the basics to building and launching an Angular 2 app in Eclipse using the Nodeclipse plugin. Aching for something a little more substantial? We’ll get to that soon enough…


