
Are you familiar with Universal (or Isomorphic) JavaScript? It’s a term that has been buzzing around the JavaScript community for some time now. It’s a type of JavaScript code that can execute both on the client and the server. It has come about to support modern Single Page Applications (SPAs). Server-side JavaScript can preload an application on the web server and send the rendered HTML as the response to a browser request. The problem with server-side JavaScript is that coding can be a bit tedious, as a lot of configuration needs to be done before you even begin writing your app. Nuxt.js solves this issue. It’s a framework that complements Vue.js to help you build server-rendered applications easily. It abstracts most of the complex configuration involved in managing things like asynchronous data, middleware, and routing. As such, it accomplishes much of the same goals as Angular Universal for Angular and Next.js for React.
In today’s article, we’ll generate a Universal Vue.js app using the Nuxt.js starter template.
Running the Starter Template
Nuxt.js is really easy to get started with. All you need for a basic project is the nuxt dependency. The Nuxt.js team has even created a starter template to make it easier still. You can either download the .zip starter template or install it with vue-cli via the following command:
$ vue init nuxt-community/starter-template <project-name>There, you can provide a project name (if you didn’t supply it with the original command), description, and author:
$ vue init nuxt-community/starter-template <project-name>

? Project name my-first-nuxt-project
? Project description Nuxt.js project
? Author Rob Gravelle

   vue-cli · Generated "my-first-nuxt-project".

   To get started:

     cd my-first-nuxt-project
     npm install # Or yarn
     npm run dev
Note that you need to have vue-cli installed globally on your system in order to run it. Enter the following command in your terminal in administrator mode to install it:
npm install -g @vue/cli @vue/cli-initYou have npm, right? If not, you can get it here.
As the instructions state under “To get started:” above, the next step is to install the dependencies:
$ cd <project-name>
$ npm install
Npm will output some details such as warnings and what-have-you. Usually these are not a problem.
C:\Users\blackjacques\my-first-nuxt-project>npm install
npm WARN deprecated postcss-cssnext@3.1.0: 'postcss-cssnext' has been deprecated in favor of 'postcss-preset-env'. Read more at https://moox.io/blog/deprecating-cssnext/

> uglifyjs-webpack-plugin@0.4.6 postinstall C:\Users\blackjacques\my-first-nuxt-project\node_modules\webpack\node_modules\uglifyjs-webpack-plugin
> node lib/post_install.js


> nuxt@1.4.1 postinstall C:\Users\blackjacques\my-first-nuxt-project\node_modules\nuxt
> opencollective postinstall || exit 0


     *** Thank you for using nuxt! ***

Please consider donating to our open collective
     to help us maintain this package.

  https://opencollective.com/nuxtjs/donate

                    ***

npm notice created a lockfile as package-lock.json. You should commit this file.
npm WARN ajv-keywords@3.2.0 requires a peer of ajv@^6.0.0 but none is installed. You must install peer dependencies yourself.
npm WARN optional SKIPPING OPTIONAL DEPENDENCY: fsevents@1.2.4 (node_modules\fsevents):
npm WARN notsup SKIPPING OPTIONAL DEPENDENCY: Unsupported platform for fsevents@1.2.4: wanted {"os":"darwin","arch":"any"} (current: {"os":"win32","arch":"x64"})
Finally, launch the project with:
$ npm run devNpm will keep you appraised of its progress:
C:\Users\blackjacques\my-first-nuxt-project>npm run dev
> my-first-nuxt-project@1.0.0 dev C:\Users\blackjacques\my-first-nuxt-project
> nuxt
nuxt:build App root: C:\Users\blackjacques\my-first-nuxt-project +0ms
nuxt:build Generating C:\Users\blackjacques\my-first-nuxt-project\.nuxt files… +0ms
nuxt:build Generating files… +20ms
nuxt:build Generating routes… +10ms
nuxt:build Building files… +20ms
nuxt:build Adding webpack middleware… +692ms
¦¦¦¦¦¦¦¦¦¦¦¦¦¦¦¦¦¦¦¦ 100%
Build completed in 3.134s
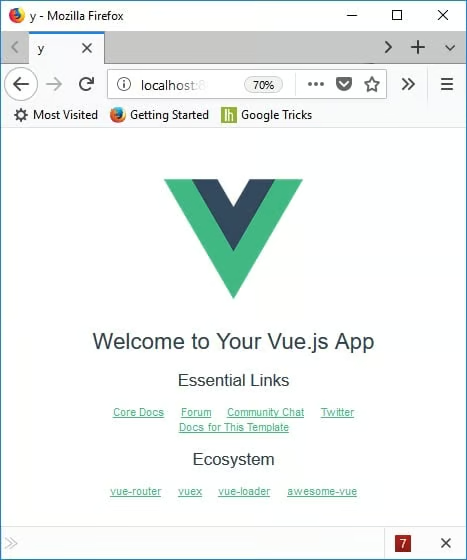
DONE Compiled successfully in -7863msYou can now view the application in the browser at http://localhost:3000. It looks like this:
Now that you’ve got the app running, Nuxt.js will listen for file changes inside the pages directory, so there is no need to restart the application when modifying existing pages or adding new ones.
Project Structure
Looking at the generated folders and files under the app directory, you’ll notice that there are quite a lot of them:
Most were put there by npm. To create your own project from scratch, all you need to create is the project directory and a package.json file. It specifies how to start nuxt:
{
  "name": "my-app",
  "scripts": {
    "dev": "nuxt"
  }
}
Going Forward
Now that we’ve got the basics covered, we’ll move on to some fun stuff like routing, views, fetching data asynchronously, and plenty more!
