A major enhancement in EJB 3.0 is the addition of the new Java Persistence API (JPA), which simplifies entity persistence and adds new capabilities to EJB 2.1. The Java Persistence API deals with the way relational data is mapped to Java objects called “persistent entities”, as well as the way that these objects are stored so as to make them available across multiple application sessions. Best of all, EJB 3.0 is much easier to learn and use than EJB 2.1. In today’s follow-up to the Create a Java EE Web Application using the Glassfish Server tutorial, we’ll be creating an Entity class that conforms to the JPA.
Technologies that Implement JPA
After the Java Persistence API was released, it quickly gained popularity. JPA is an interface that leaves the implementation to persistence providers. Therefore, when you use a tool like Hibernate with JPA you are actually using the Hibernate JPA implementation. As we’ll see throughout these tutorials, JPA typically defines property mappings via annotations in the Java class, XML or a combination of both.
He are just a few popular JPA implementations:
- Hibernate: The most widely used.
- Toplink: Oracle’s free version of the JPA implementation only supports the basic JPA specs.
- EclipseLink: An alternative to TopLink that provides persistence for Oracle.
- Apache OpenJPA: An open source implementation for JPA.
- ObjectDB: ObjectDB is an easy to use pure Java Object Database.
Note that ObjectDB 2.3.7_04 or later is required if Glassfish 3.1.2 (or later) is used. - DataNucleaus: Standards-compliant open source Java persistence.
Creating the Entity Class
Entity classes represent a real-life “thing” or person that is stored in your database. It basically performs the same function as the model in MVC architecture. In our case, the entity will be a fitness exercise.
Let’s start by creating a package for our entity class. As you probably already know, you should never use the default package. Instead, you should use your domain parts, in reverse order, followed by the application name, and component. I went with “com.robgravelle.exercises.entities”. To create the package:
- Right-click on the Java Resources > src folder in the Project Explorer and select New > Package from the popup menu.
- On the New Java Package dialog, enter the name of your package and click Finish to close the dialog and create the package.
Now we’ll create the entity class inside the new package.
- Locate your new package within the Java Resources > src folder in the Project Explorer and select New > Class from the popup menu.
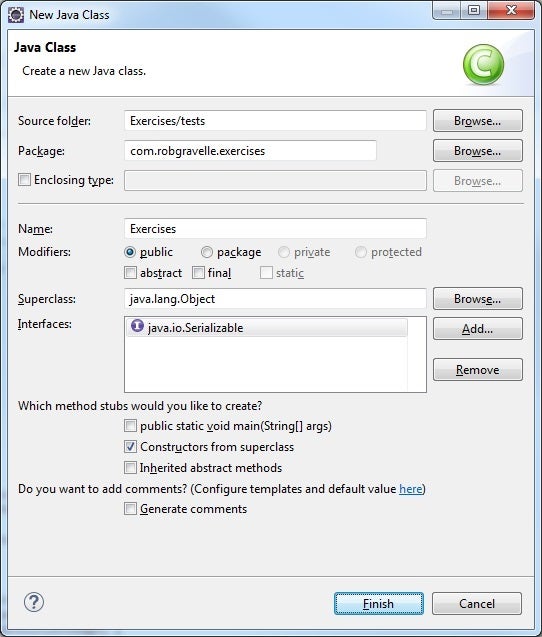
- On the New Java Class dialog, enter “Exercise” in the Name field.
- Click the Add button beside the Interfaces box.
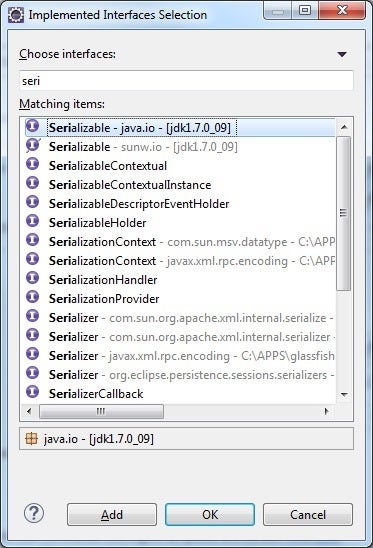
- On the Implemented Interfaces Selection dialog, start typing the word “serializable” until “Serializable – java.io” comes up in the list below. Once you see it, select it and click OK to close the dialog while adding the interface.
- Back on the New Java Class dialog, make sure that the Constructors from superclass checkbox is selected. That will put in a no-argument constructor.
- Click Finish to close the dialog and create the package.
The Exercise class should look as follows:
package com.robgravelle.exercises;

import java.io.Serializable;

public class Exercises implements Serializable {

        public Exercises() {
                // TODO Auto-generated constructor stub
        }

}
Coding the Entity Class
The first item of business is to add a serialVersionUID, which all serializable classes require. To do that,
- Hover the mousepointer over the class name until the suggestion popup appears and select “Add default serial version ID” from the popup menu.
Entity classes, like models, tend to be heavy on properties and short on methods. That makes sense when you think about it because it represents stored data and not behaviors. Here are a few properties that I came up with for my exercises. Obviously, there could be many more.
// Persistent Fields:
@Id @GeneratedValue
Long id;
private String name; //ie, Bench Press
private String mainMuscleWorked; //ie, Chest
private String otherMuscles; //ie, Shoulders, Triceps
private String equipment; //ie, Barbell
private String mechanicsType; //ie, Compound
private String force; //ie, Push
private byte[] startPositionImage;
private byte[] endPositionImage;
Note that you’ll have to import the javax.persistence.GeneratedValue and javax.persistence.Id classes by pressing Ctrl+Shift+O.
The @Id field is marked with the @GeneratedValue annotation so that the primary key is generated automatically for us.
We don’t need to create getters and setters for each property, but we will need to add a constructor that includes all of the properties. To do that,
- Right-click anywhere in the source code and select Source > Generate Constructor using Fields… from the popup menu.
- On the Generate Constructor using Fields dialog, click Select All to choose all the properties, but be sure to deselect the Id afterwards.
- Check the box beside Omit call to default constructor super().
- Click OK to close the dialog and create the new constructor.
The last thing we’ll do is override the toString() method. This is a must for most classes, but especially entities, since you’ll want to be able to easily identify them. Which is clearer: Exercise@1234ABCD or Bench Press?
- Right-click anywhere in the source code and select Source > Override/Implement Methods… from the popup menu.
- On the Override/Implement Methods dialog, check the box for toString() and click OK to close the dialog and add the new method.
- Locate the toString() method in your source code and replace the method body with “return name;”.
Here is the complete code for our Exercise class:
package com.robgravelle.exercises;

import java.io.Serializable;

import javax.persistence.GeneratedValue;
import javax.persistence.Id;

public class Exercises implements Serializable {

        private static final long serialVersionUID = 1L;

        // Persistent Fields:
  @Id @GeneratedValue
        Long id;
        private String name; //ie, Bench Press
        private String mainMuscleWorked; //ie, Chest
        private String otherMuscles; //ie, Shoulders, Triceps
        private String equipment; //ie, Barbell
        private String mechanicsType; //ie, Compound
        private String force; //ie, Push
        private byte[] startPositionImage;
        private byte[] endPositionImage;

        public Exercises() {}

        public Exercises(String name, String mainMuscleWorked, String otherMuscles,
                        String equipment, String mechanicsType, String force,
                        byte[] startPositionImage, byte[] endPositionImage) {
                this.name = name;
                this.mainMuscleWorked = mainMuscleWorked;
                this.otherMuscles = otherMuscles;
                this.equipment = equipment;
                this.mechanicsType = mechanicsType;
                this.force = force;
                this.startPositionImage = startPositionImage;
                this.endPositionImage = endPositionImage;
        }

        @Override
        public String toString() {
                return name;
        }
}
Conclusion
Now wasn’t that easy? In the next instalment, we’ll be creating our persistence.xml file and testing the database connection.
Rob Gravelle resides in Ottawa, Canada, and is the founder of GravelleWebDesign.com. Rob has built systems for Intelligence-related organizations such as Canada Border Services, CSIS as well as for numerous commercial businesses.
In his spare time, Rob has become an accomplished guitar player, and has released several CDs. His band, Ivory Knight, was rated as one Canada’s top hard rock and metal groups by Brave Words magazine (issue #92) and reached the #1 spot in the National Heavy Metal charts on Reverb Nation.


