When you’re working on video projects, Camtasia Studio allows you to create videos that are perfect for teaching someone what to do. Before you begin, you need to consider how the video will be used. If it’s for DVD or CD, you can use a larger format, but if your ultimate destination is the web, you need to think about the display size of the video and its complexity.
While Camtasia gives you many options for video creation, you are best off to write a script that covers everything you want to do, then record the audio track. Later, you add the video, and make it match the audio track. This is how it is done in the animation industry, where the characters are drawn to the voice.
Audio/Visual Options
For audio, you want a microphone that offers good voice quality, while avoiding distortion. A standard headset microphone will do the trick, so long as the microphone isn’t directly in front of your mouth. Another method is to use a directional microphone with a pop filter. The latter is preferred for the best sound. One good option (with pop filter) is the iRig Mic HD.
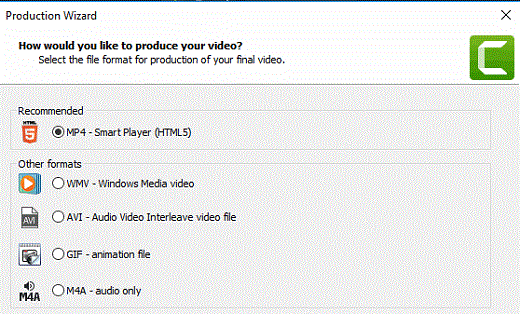
In terms of output, here are your options: MP4, WMV, AVI, GIF and M4A (audio only). Of these, the formats you would use for web production are MP4 and GIF. In a Camtasia 8 you were able to use MOV and M4V, but those options have been removed.
WMV is another option for compression and it’s good for hard drive storage or to email your videos. Unfortunately, it suffers from poor compatibility on non-Windows devices such those made by Apple. In this article, we will only use one format; MP4.
Default Settings
When creating videos in Camtasia, there are several default settings that you can leave as is or change as necessary for your production.
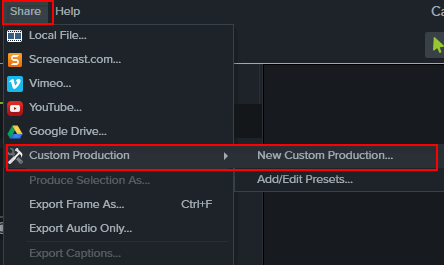
When you want to output a video, go to Share: Custom Production: New Custom Production.
In the Production Wizard dialog box, accept the recommended setting of MP4 and click Next.
In the Smart Player Size options section, note the default settings for the resolution. By reducing these settings, this will reduce the file size.
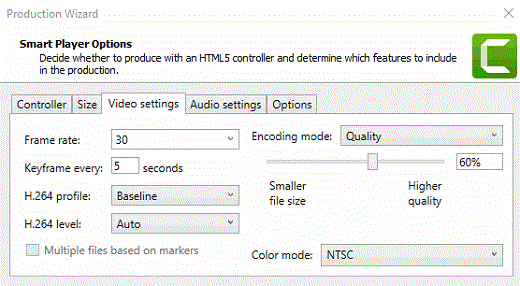
In the Video Settings section, you can experiment with the Frame rate and the Quality. Only when you output the file will you know if the quality is good enough — or not. The default audio setting is 128 kbps. You can use a lower setting, but the quality might suffer. Again, the only way to know is to test it.
Rendering Problems
One problem you may run into is when you output a large project. Sometimes, Camtasia will crash, and it could force your computer to shut down. The reasons for this happening are many and one could be due to overheating. If that’s the case, your computer needs a good cleaning. If you have a laptop, buying a can of Dust-Off, or similar product should do the trick. Another option is to buy a laptop fan to keep your laptop cool
Here are two more options: Reboot your computer and DO NOT open any browsers to conserve resources. If the problem happens again, go to File: Batch Production. In the dialog box, add the projects you want to render, choose the production preset and render the project. You will find that the output is more stable and unlikely to crash.
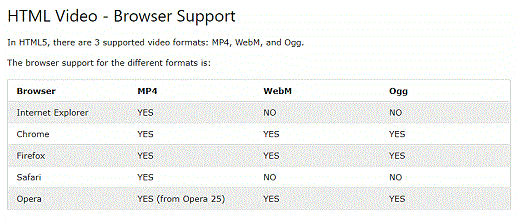
When you have the completed MP4 file, you will need to set up the code for it to play in web browsers.
Above are the browsers, and what video formats they support. In general, setting up the video element can be quite straightforward and could be as simple as the following:
<video width="640" height="480">
<source src="movie.mp4" type="video/mp4">
<source src="movie.ogg" type="video/ogg">
Your browser does not support the video tag.
</video>
Since Camtasia only outputs MP4, you will need to create the other formats in another program. For example, Handbrake is a free video conversion program.
In practice, there are many ways to style the video element.
- autoplay: This can be both beneficial and annoying, depending on how it’s used. Some developers might use it for sales pages or opt-in forms. Note that the autoplay attribute is ignored on mobile, so if you want to watch a video, you will have to push the play button manually.
- Loop: As expected, this attribute makes the video play over and over, which may be useful in some situations.
- poster; This attribute takes a single frame of the video that is used as preview of its content. You can use this attribute to designate a frame of your choice.
We have only scratched the surface of what you can do with Camtasia Studio and HTML5 videos. There are more HTML5 videos tutorials here on HTMLGoodies, as well as the Camtasia site.


