In this article, we’re going to look at the process of embedding audio and video files in an HTML5 page.
With the audio element, you can add audio directly to a web page. The audio element can be controlled with HTML or Javascript and styled with CSS. Note that while the HTML5 specification covers audio, it doesn’t cover which codecs are supported, meaning that codecs and support for them varies with browsers and platforms.
HTML5 allows you to embed the video element directly onto a web page. Like the audio element, the video element can be controlled with HTML or Javascript and styled with CSS. While the video element has been standardized, the codecs vary, so support will vary, as well. In this section, we’ll look at an issue with Firefox.
Setting up a video is fairly straightforward. One thing to make sure of before using the video is that when you create it, that’s HTML5 compliant. To do so, I’m going to use Adobe Dreamweaver CS6. In the example below, I’ve created an HTML5 page with no content. To do so, go to: File: New.

In the dialog box above, choose the following settings:
• Blank page
• HTML
• None
• HTML5
Click on the Create button to create your page.

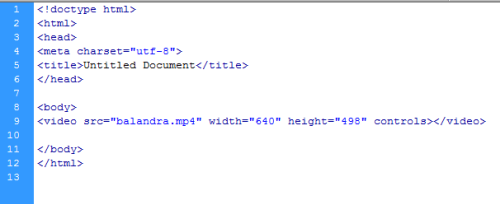
To insert a straight video into your page, the code would look like the above.

Here’s what the video will look like in Google Chrome. Note that the controls tag will create a control bar underneath the video.

All’s well until we try to use Firefox. In the preview above, we see the error message: Video Format or MIME type not supported. This is because Firefox is using the OGG format, which is different from other browsers.
Here’s how to fix the problem. First off, we need to convert the video into the OGV format. There are multiple conversion programs available to do that, such as Miro or Media Converter.
Next, here’s the code that one would use to play back the video in multiple browsers, including Firefox:
<video width="640" height="498" controls>
<source src="balandra.mp4" type="video/mp4" />
<source src="balandra.ogv" type="video/ogg" />
</video>
There was only one problem. It didn’t work in the Dreamweaver CS6 preview, so I uploaded it to my server to test it within Firefox online and when I did so, it worked. This was a valuable lesson in not trusting the preview in web design software. The acid test is ALWAYS testing the code live.
The Audio Element
The process for embedding audio is very similar. Using the HTML5 page creation process above, I’m going to set up the code for the audio element. In basic form here’s the code:

And this is what it looks like in Google Chrome.

In testing the audio in Firefox, much to my surprise, I found that it worked perfectly with the WAV file that I created.
If it doesn’t work, you’ll need to set up a section of code much like this:
<audio controls >
<source src="voicetest.theora.ogg" type="audio/ogg" />
<source src="voicetest.wav" type="audio/wav" />
</audio>
and convert the WAV file to the OGV format.
Extra Controls
Video Attributes
Here are some extra controls for video:
• autoplay: If this attribute is used, the video will play back automatically as soon as possible without stopping to load the rest of the data.
• autobuffer: With this attribute, the video will begin to automatically buffer, even if it’s not set to play automatically.
• controls: This attribute allows the user to control video playback, volume and pause or resume.
• loop: With this attribute, the video will automatically loop back to the beginning after reaching the end.
• preload; With this attribure, the video will loaded at page load and will be ready to play. This is ignored if autoplay is used.
Audio Attributes
Audio Attribute Specification:
• autoplay: If you use this attribute, the audio will begin to play back automatically as soon as possible without stopping to load the rest of the data. .
• autobuffer: If this attribute is used, the audio will begin buffering automtically, even if the playback isn’t automatic.
• controls: This attribute allows the user to control audio playback, volume, seeking and pause or resume playback.
• loop: If you select this attribute, the audio will loop back to the beginning, once it reaches the end.
• preload: With this attribute, the audio will load at page load and will be ready to run. If the autoplay attribute is selected, this attribute will be ignored.
In addition to the above controls, you can control various aspects of the tags using JavaScript.
That completes this article on the audio and video elements. We also took a brief look at some of the additional controls available.


