Layout is a very important aspect for any web site because a properly developed structure gives you a good and airy look and it’s intuitive and user-friendly with mobile devices (the site must be responsive, so it can be viewed correctly on all devices). Layout is important because it offers a specific look to the site we’ve created and it takes a lot of attention and time to achieve a reasonable and effective layout.
You can make websites using HTML tables or splitting tags combined with other formatting labels, but modern sites use CSS-based and JavaScript-based frameworks to make dynamic and responsive websites. Most web sites nowadays consist of a main content area, a header, a navbar, a basement and often a sidebar (left or right).
HTML Layout Using Tables
We will give an example in the following lines, using an HTML code and its attributes.
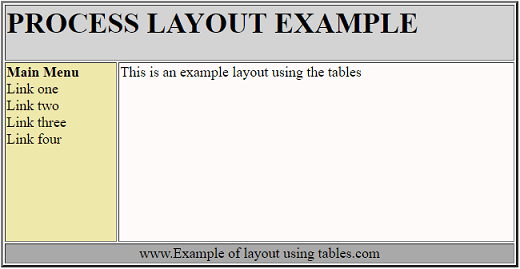
The most commonly used method for creating layouts uses the <table> tag. The tables used are organized in columns and rows. We can use these columns and rows in any way we want. In the example below, we will use a table with 2 columns and 3 rows, mentioning that the header and footer columns wrap both columns. This is possible with the colspan attribute.
<html>
   <head>
      <title>HTML Layout using tables</title>
   </head>
   <body>
      <table width = "70%" border = "3">
         <tr>
            <td colspan = "2" bgcolor = lightgrey >
               <h1>PROCESS LAYOUT EXAMPLE</h1>
            </td>
         </tr>
         <tr valign = "top">
            <td bgcolor = PaleGoldenRod width = "30">
               <b>Main Menu</b><br />
               Link one<br />
               Link two<br />
               Link three<br />
               Link four
            </td>
            <td bgcolor = snow width = "150" height = "200">
               This is an example layout using the tables
            </td>
         </tr>
         <tr>
            <td colspan = "2" bgcolor = darkgrey >
               <center>
                  www.Example of layout using tables.com
               </center>
            </td>
         </tr>
      </table>
   </body>
</html>
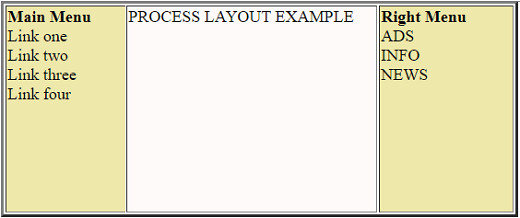
Just like in the example above, we can create a web page using multiple columns and tables. Thus, the detailed content will be located in the middle, in the left we will insert the menu, and in the right column we will place various information, ads and so on.
<html>
   <head>
      <title>Three Column HTML Layout</title>
   </head>
   <body>
      <table width = "100%" border = "3">
         <tr valign = "top">
            <td bgcolor = PaleGoldenRod width = "20%">
               <b>Main Menu</b><br />
               Link one<br />
               Link two<br />
               Link three<br />
               Link four
            </td>
            <td bgcolor = snow height = "200" width = "40%">
               PROCESS LAYOUT EXAMPLE
            </td>
            <td bgcolor = PaleGoldenRod width = "30%">
               <b>Right Menu</b><br />
               ADS<br />
               INFO<br />
               NEWS
            </td>
         </tr>
      <table>
   </body>
</html>
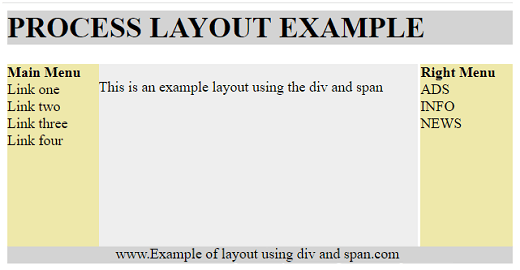
Another way to create layouts is to use the <div> element, which is a block layer element that is used in grouping HTML elements used in the page layout. Here, we will also use the <span> HTML element, this element is used to group existing elements at the inline level.
HTML Layout Using <div> and <span>
The example we will give will be similar to the one above, where <table> was used. Also, the example also uses CSS. Before you get started with that you need to know how CSS works.
<html>
   <head>
      <title>HTML Layouts using div and span </title>
   </head>
   <body>
      <div style = "width:80%">
         <div style = "background-color:lightgrey; width:100%">
            <h1>PROCESS LAYOUT EXAMPLE</h1>
         </div>
         <div style = "background-color:PaleGoldenRod; height:200px; width:100px; float:left;">
            <div><b>Main Menu</b></div>
            Link one<br />
               Link two<br />
               Link three<br />
               Link four
         </div>
         <div style = "background-color:#eee; height:200px; width:350px; float:left;" >
            <p>This is an example layout using the div and span</p>
         </div>
         <div style = "background-color:PaleGoldenRod; height:200px; width:205px; float:right;">
            <div><b>Right Menu</b></div>
            ADS<br />
            INFO<br />
            NEWS
         </div>
         <div style = "background-color:lightgrey; clear:both">
            <center>
               www.Example of layout using div and span.com
            </center>
         </div>
      </div>
   </body>
</html>
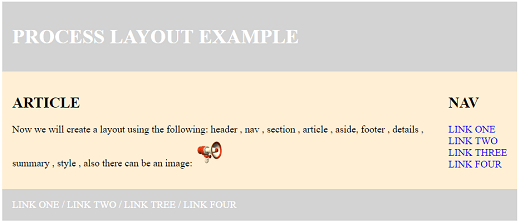
Now we will create a layout using the following: <header>, <nav>, <section>, <article>, <aside>, <footer>, <details>, <summary>, <style>. Before we begin creating the layout using the above-mentioned elements, we need to explain each one:
- <header> = this <header> tag defines the header space of the site. <header> has a function similar to the <h1> tag, it only defines the title of the entire site, not a separate item
- <nav> = this <nav> element expands the navigation bar for our web site. Using this feature, the navigation bar gives site users a quick page navigation, plus this bar can be customized as you like
- <section> = this <section> tag can be used to define a separate section on our website This <section> element can be customized and can contain text, images, videos and so on because it does not define what type of content needs to be inside
- <article> = this <article> tag allows us to write a large article, able to separate a large piece of our site, allowing us to easily place the content
- <aside> = this <aside> tag defines the lateral space of our web site and can function as a sidebar where we can enter content; it is quite similar to <nav>
- <footer> = this <footer> element compose space for the footnotes on our webpage, allowing us to include contact details or other references
- <details> = this <details> tag, somehow defines the space in which we can insert additional information into our web site
- <summary> = The <summary> tag defines a visible heading for the <details> element. The heading can be clicked to view/hide the details.
- <style> = the <style> tag allows us to create any HTML container, it is necessary to create a very nice design for our web page.
Example:
<html>
<head>
<style>
div.container {
 width: 100%;
 border:none;
 margin:auto;
}
header, footer {
 padding: 1em;
 color: white;
 background-color: lightgrey;
 clear: left;
 text-align: left;
}
nav {
 float: right;
 max-width: 160px;
 height: 134px;
 padding: 1em;
 border: lightgrey
}
nav ul {
 list-style-type: none;
 padding: 0;
}
nav ul a {
 text-decoration: none;
}
article {
 padding: 1em;
 background-color: PapayaWhip;
}
</style>
</head>
<body>
<div class="container">
<header>
 <h1>PROCESS LAYOUT EXAMPLE</h1>
</header>
<nav>
<h1>NAV</h1>
<ul>
 <li><a href="#">LINK ONE</a></li>
 <li><a href="#">LINK TWO</a></li>
 <li><a href="#">LINK THREE</a></li>
 <li><a href="#">LINK FOUR</a></li>
</ul>
</nav>
<article>
 <h1>ARTICLE</h1>
 <p>Now we will create a layout using the following:  header, nav, section, article, aside, footer, details, summary, style, also there can be an image:<img src="http://gifimage.net/wp-content/uploads/2017/11/gif-info-9.gif" style="height: 50px;"></p>
</article>
<footer>LINK ONE / LINK TWO / LINK TREE / LINK FOUR</footer>
</div>
</body>
</html>
Conclusion
HTML layouts are a great way to create order in any web site. These elements allow us to arrange the content of the site as smoothly as possible and add style to any desired HTML container with specific HTML contacts for headers, articles and footers. Now that you know all these elements, we wish you success in creating the site you want.


