


This article will show you a complete example of how to create a photo collage in HTML5 using CSS3 — from dragging and dropping images to saving the resulting photo collage image on your file. You will find all the needed files types are listed here, so can improve your photo collage skills.
In the figures below, you will see the structure of the files needed to create this application:
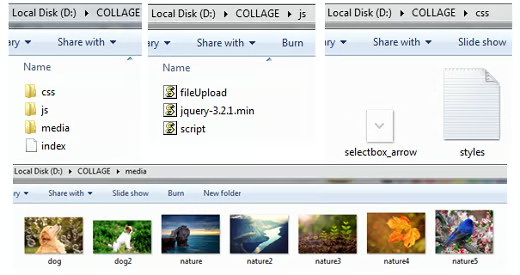
Getting Started
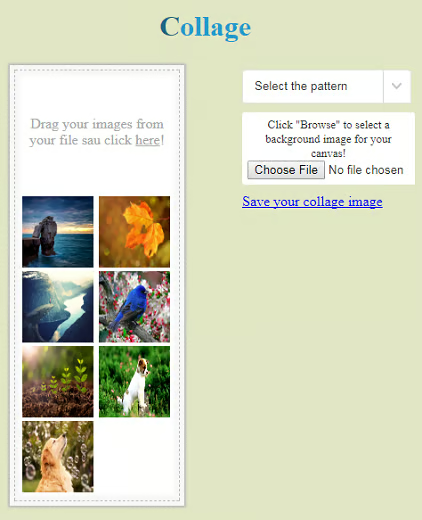
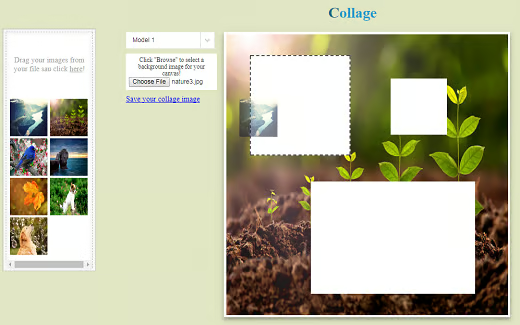
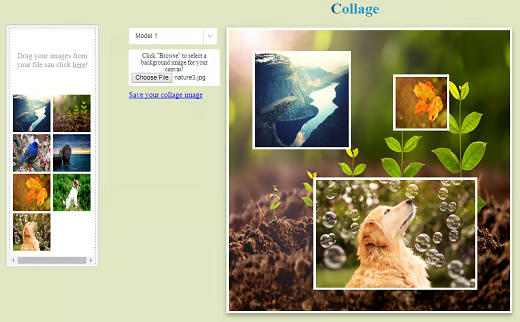
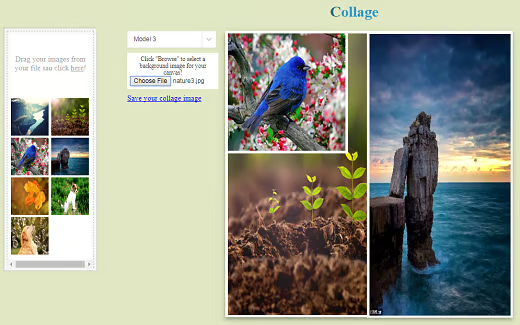
The index.html file contains the divs corresponding uploaded images that were created by dragging and dropping. You can also click in that area and an Open window will appear in which you can select your photo collage pattern. In our example, there are three patterns from which to choose, as you will see next. Another one will let you choose a background for your collage via browsing on your computer and the last option is to save your photo collage image, by pressing the link Save your collage image.
The index.html listing
<!DOCTYPE html>
<html>
    <head>
        <title>Collage photo's</title>
        <meta charset="UTF-8">
        <meta name="viewport" content="width=device-width, initial-scale=1.0">
        <link href="css/styles.css" rel="stylesheet" type="text/css"/>
    </head>
    <body id="body">

        <h1>Collage</h1>

        <div class="row">
            <div class="column">

                <div id="leftSide">
                    <div id="dropZone">
                        <p>Drag your images from your file  sau click <u>here</u>!</p>
                    </div>

                    <div id="images_preview"></div>
                </div>

            </div>
            <div class="column">

                <div id="buttonsArea">
                    <select id="modelSelect" onchange="modelSelect()">
                        <option value="">Select the pattern</option>
                        <option value="model1">Model 1</option>
                        <option value="model2">Model 2</option>
                        <option value="model3">Model 3</option>
                    </select>

                    <div id="singleUploadSection">
                        Click "Browse" to select a background image for your canvas!
                        <input id="singleUpload" type="file" onchange="setBackground()"/>
                    </div>

                    <a href="#" class="button" id="btn-download">Save your collage image</a>
                </div>

            </div>

            <div id="photo">

                <canvas id="background" width="600" height="600"></canvas>

            </div>

            <div id="images"></div>
        </div>

        <script src="js/jquery-3.2.1.min.js"></script>
        <script src="js/fileUpload.js"></script>
        <script src="js/script.js"></script>
    </body>
</html>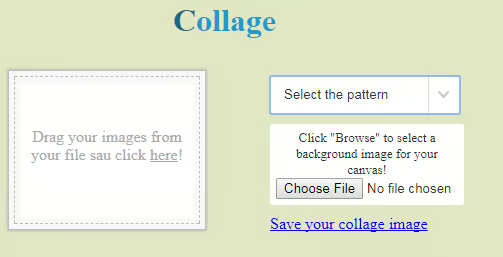
The styles.css file
styles.css

/**************
* Page Layout *
**************/
body {
    margin: 0;
    background-color: #e1e6c4;
}

* {
    box-sizing: border-box;
}

/* Create columns that floats next to each other */
.column {
    float: left;
}

/* Clear floats after the columns */
.row:after {
    content: "";
    display: table;
    clear: both;
}

/******************
* Style for title *
******************/
h1 {
    color: #239aca;
    text-align: center;
}

h1:first-letter{
    color:#1B6685;
}

/******************************
* Style for left side content *
******************************/
#leftSide {
    color: #aaa;
    width: 186px;
    padding: 5px;
    margin: 0 20px;
    overflow: auto;
    background-color: #fff;
    border: dashed 1px #bbb;
    box-shadow: 0px 0px 0px 5px #f7f7f7, 0px 0px 2px 7px #bbb, 0px 0px 5px 5px #f7f7f7 inset;
}

/***************************
* Style for drop zone area *
***************************/
#dropZone {
    padding: 30px 0;
    margin-bottom: 8px;
    text-align: center;
}

#dropZone.dragover {
    background: #DCDCDC;
}

/**************************
* Style for image preview *
**************************/
img {
    margin: 0 3px;
}
img:hover {
    cursor: grab;
}

/*********************************************
* Style for model selection drop-down button *
*********************************************/
#buttonsArea {
    margin: 0 15px 0 50px;
}

select {
    color: #333;
    display: block;
    max-width: 100%;
    border-radius: 3px;
    height: auto !important;
    border: 1px solid #e3e3e3;
    line-height: 16px !important;
    padding: 10px 70px 10px 13px !important;
    background: #fff url("selectbox_arrow.png") right center no-repeat;
    appearance: none; /* this is must */
    -webkit-appearance: none;
    -moz-appearance: none;
}

/*****************************************************************
* Style for single upload section that changes canvas background *
*****************************************************************/
#singleUploadSection {
    color: #333;
    width: 194px;
    padding: 6px;
    margin: 10px 0;
    font-size: 13px;
    text-align: center;
    border-radius: 3px;
    background-color: #fff;
}

/*******************
* Style for canvas *
*******************/
#background {
	padding: 5px;
    position: absolute;
    background-color: #fff;
	box-shadow: 0 4px 8px 0 rgba(0, 0, 0, 0.2), 0 6px 20px 0 rgba(0, 0, 0, 0.19);
}

.layer {
	padding: 5px;
    position: absolute;
    background-color: #fff;
}
The fileUpload.js listing
/*
 * This file is used for drag & drop file upload and image preview
 */

/************************************************************
 * Add the JavaScript support for drag & drop/browse upload *
 ***********************************************************/
function makeDroppable(element, callback) {
    var input = document.createElement('input');
    input.setAttribute('type', 'file');
    input.setAttribute('multiple', true);
    input.style.display = 'none';
    input.addEventListener('change', function (e) {
        triggerCallback(e, callback);
    });
    element.appendChild(input);

    element.addEventListener('dragover', function (e) {
        e.preventDefault();
        e.stopPropagation();
        element.classList.add('dragover');
    });

    element.addEventListener('dragleave', function (e) {
        e.preventDefault();
        e.stopPropagation();
        element.classList.remove('dragover');
    });

    element.addEventListener('drop', function (e) {
        e.preventDefault();
        e.stopPropagation();
        element.classList.remove('dragover');
        triggerCallback(e, callback);
    });

    element.addEventListener('click', function () {
        input.value = null;
        input.click();
    });
}

function triggerCallback(e, callback) {
    if (!callback || typeof callback !== 'function') {
        return;
    }
    var files;
    if (e.dataTransfer) {
        files = e.dataTransfer.files;
    } else if (e.target) {
        files = e.target.files;
    }
    callback.call(null, files);
}

/*************************************************************************
 * After drag & drop upload, create image elements and add image preview *
 * Make images draggable to canvas and register mouse & drag events      *
 ************************************************************************/
makeDroppable(document.querySelector('#dropZone'), function (files) {
    var output = document.querySelector('#images_preview');
    output.innerHTML = '';

    for (var i = 0; i < files.length; i++) {
        if (files[i].type.indexOf('image/') === 0) {

            var reader = new FileReader();
            reader.addEventListener("load", function () {
                var image = new Image();
                image.id = Math.random().toString(36).substr(2, 9);    // Generate image ID
                image.height = 80;
                image.width = 80;
                image.src = this.result;

		    image.ondragstart = function (e) {  // Register drag event
		    e.dataTransfer.setData("text", e.target.id);
                };

                output.appendChild(image);      // Add image preview to page

            }, false);
            reader.readAsDataURL(files[i]);
        }
    }
});
The script.js file
/*
* This file is used for interaction with the canvas element and initializations
*/
/*******************************************************
* Change canvas 1 background after image was selected *
******************************************************/
function setBackground() {
var file = $("#singleUpload")[0].files[0];
var canvas = document.getElementById("background");
var context = canvas.getContext("2d");
var reader = new FileReader();
reader.addEventListener("load", function () {
var backgroundImage = new Image();
backgroundImage.src = this.result;
backgroundImage.onload = function () {
context.drawImage(backgroundImage, 0, 0, 600, 600); // Draw and stretch
image to fill canvas
};
}, false);
reader.readAsDataURL(file);
}
/*************************************
* Global variables, initialisations *
************************************/
$("#singleUpload").val(""); // Reset background selection on page refresh
$("#modelSelect").val(""); // Reset model selection on page refresh
document.getElementById("background").style.visibility = "hidden"; // Hide canvas until model is selected
/**************************************
* Export canvas and download as imag *
*************************************/
var link = document.getElementById('btn-download');
link.addEventListener('click', function (e) {
var canvas = document.createElement('canvas');
var context = canvas.getContext("2d");
canvas.width = 605;
canvas.height = 605;
// We need to get all images droped on all canvases and combine them on above canvas
$('#photo').children('canvas').each(function () {
var image = this;
context.beginPath(); // Simulate CSS padding around images by drawing white
rectangles behind images on export
context.rect((image.offsetLeft - 480), (image.offsetTop - 76), image.width,
image.height);
context.fillStyle = "white";
context.fill();
context.drawImage(image, (image.offsetLeft - 480 + 5), (image.offsetTop - 76 + 5),
(image.width - 10), (image.height - 10)); // Draw image
});
link.href = canvas.toDataURL(); // Save all combined images to one image
link.download = "photo.png"; // Download the image
}, false);
/***************************************
* Change model after drop-down select *
**************************************/
function modelSelect() {
var background = document.getElementById("background"); // Keep background canvas
var photo = document.getElementById("photo");
while (photo.firstChild) { // Remove all child canvases
photo.removeChild(photo.firstChild);
}
photo.appendChild(background); // Attach background canvas back
var selectedModel = document.getElementById("modelSelect").value; // Get the selected
model value
switch (selectedModel) {
case "model1": // If model1 was selected, draw pattern using 3 new
canvas elements as layers on top of background canvas
document.getElementById("background").style.visibility = "visible"; // Make
background canvas visible
var layer1 = document.createElement('canvas'); // Create first square canvas
programmatically
layer1.className = "layer";
layer1.width = 200; // Set square canvas width
layer1.height = 200; // Set square canvas height
layer1.style.top = "130px"; // Position square canvas 130px from top
layer1.style.left = "540px"; // Position square canvas 540px from left
layer1.style.visibility = "visible";
var body = document.getElementById("photo");
body.appendChild(layer1); // Add first square canvas to photo element on page
registerEvents(layer1); // Add event listeners that help drag & drop on canvas
var layer2 = document.createElement('canvas'); // Same as above ... create
second square canvas.. etc
layer2.className = "layer";
layer2.width = 110;
layer2.height = 110;
layer2.style.top = "180px";
layer2.style.left = "840px";
layer2.style.visibility = "visible";
var body = document.getElementById("photo");
body.appendChild(layer2);
registerEvents(layer2);
var layer3 = document.createElement('canvas');
layer3.className = "layer";
layer3.width = 340;
layer3.height = 230;
layer3.style.top = "400px";
layer3.style.left = "670px";
layer3.style.visibility = "visible";
var body = document.getElementById("photo");
body.appendChild(layer3);
registerEvents(layer3);
break;
case "model2": // If model2 was selected, draw pattern using 2 new canvas elements
as layers on top of background canvas
document.getElementById("background").style.visibility = "visible";
var layer1 = document.createElement('canvas');
layer1.className = "layer";
layer1.width = 250;
layer1.height = 250;
layer1.style.top = "81px";
layer1.style.left = "485px";
layer1.style.visibility = "visible";
var body = document.getElementById("photo");
body.appendChild(layer1);
registerEvents(layer1);
var layer2 = document.createElement('canvas');
layer2.className = "layer";
layer2.width = 150;
layer2.height = 600;
layer2.style.top = "81px";
layer2.style.left = "785px";
layer2.style.visibility = "visible";
var body = document.getElementById("photo");
body.appendChild(layer2);
registerEvents(layer2);
break;
case "model3": // If model3 was selected, draw pattern using 2 new canvas elements
as layers on top of background canvas
document.getElementById("background").style.visibility = "visible";
var layer1 = document.createElement('canvas');
layer1.className = "layer";
layer1.width = 250;
layer1.height = 250;
layer1.style.top = "81px";
layer1.style.left = "485px";
layer1.style.visibility = "visible";
var body = document.getElementById("photo");
body.appendChild(layer1);
registerEvents(layer1);
var layer2 = document.createElement('canvas');
layer2.className = "layer";
layer2.width = 300;
layer2.height = 600;
layer2.style.top = "81px";
layer2.style.left = "785px";
layer2.style.visibility = "visible";
var body = document.getElementById("photo");
body.appendChild(layer2);
registerEvents(layer2);
break;
default:
document.getElementById("background").style.visibility = "hidden"; // Hide
canvas until model is selected
}
}
/**********************************************************
* Register drag & drop event listeners to canvas element *
*********************************************************/
function registerEvents(canvas) {
canvas.ondragenter = function () {
canvas.style.border = "dashed 2px #555"; // Change the canvas borders when hovering
};
canvas.ondragleave = function () {
canvas.style.border = "none"; // Reset canvas borders when hovering is not active
};
canvas.ondragover = function (e) {
e.preventDefault();
};
canvas.ondrop = function (e) {
e.preventDefault();
var id = e.dataTransfer.getData("text");
var dropImage = document.getElementById(id);
canvas.style.border = "none"; // Reset canvas borders after image drop
var context = canvas.getContext("2d");
context.drawImage(dropImage, 0, 0, canvas.width, canvas.height); // Draw and stretch image to fill canvas
};
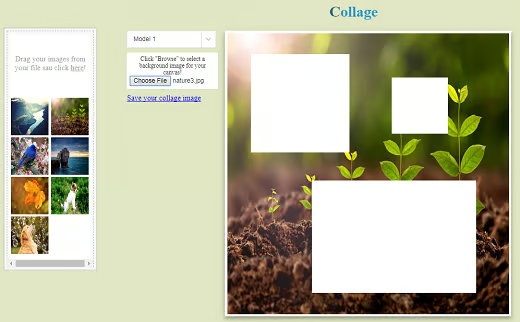
}Next, are some screenshots of different photo collage options that are available using the three patterns:

Conclusion
This article has shown you how to create a photo collage with your own images using HTML5 and CSS3.
