In the last article, we discussed form layouts. In this article, we will discuss how to enhance our forms with jQuery and various jQuery plugins. jQuery is a JavaScript library that allows for easier HTML DOM support, animations, event handling, and Ajax support. You can find out more about jQuery here: http://jquery.com/. jQuery also supports plugins. plugins allow for developers to write jQuery helper objects like form validation, picture viewers, GUI enhancements, etc. Let’s look into a few plugins to enhance our forms.
Getting Started
The first thing we need to do is reference jQuery in our HTML page. There are several ways to do this. The first is to go to the jQuery web site and download a copy of the library, place it on your web server, and add the reference to your page. Another (better) way is to use a content delivery network (CDN). Both Google (http://code.google.com/apis/ajaxlibs/documentation/) and Microsoft (http://www.asp.net/ajaxlibrary/cdn.ashx) offer CDNs for jQuery. We will use the one for Microsoft because they also host the jQuery Validation library.
In the head tag of the HTML form we will put this:
	<script type="text/javascript" src="https://ajax.microsoft.com/ajax/jQuery/jquery-1.4.2.min.js"></script>

	<script>
	$(document).ready(function () {

	});
	</script>
Remember Our Form?
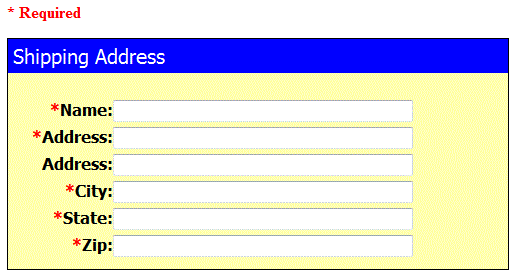
Here is the form that was created in the last article (figure 1)
Figure 1
This is a simple form asking for the shipping address. It has a few required fields. How do we insure that the fields are filled in? If this form is going into a database, how do we insure that the length of the form fields match the length of the database fields? How do we insure that the "Zip" is only numbers? That is where form validation comes in.
NOTE: this form is not "internationalized" as it asks for information that is clearly for the United States. You will want to make your form more internationally friendly if you plan on shipping to other countries.
Form Validation
Figure 2
Fortunately for us, jQuery has a plugin for form validation. The jQuery Validation plugin by Jorn Zafferer (http://bassistance.de/jquery-plugins/jquery-plugin-validation/) is very powerful form validation library. We will only scratch the surface of what you can do with this plugin for form validation. The first thing we need to do is add another reference to the library in our head tag of the HTML page.
<script type="text/javascript" src="http://ajax.microsoft.com/ajax/jquery.validate/1.7/jquery.validate.min.js"></script>
Now our head tag looks like this:
	<script type="text/javascript" src="https://ajax.microsoft.com/ajax/jQuery/jquery-1.4.2.min.js"></script>
	<script type="text/javascript" src="http://ajax.microsoft.com/ajax/jquery.validate/1.7/jquery.validate.min.js"></script>

	<script>
	$(document).ready(function () {

	});
	</script>
As you can see, we are using Microsoft’s CDN again to get the library. What we want to do next is to call the validation library in the jQuery function above to "attach" it to the form.
	<script>
	$(document).ready(function () {
			$("#frm").validate({

			});
	});
	</script>
This attaches the validation library to the form with the ID of "frm". It tells the library to validate the form when the submit button is pressed. The next thing we need to do is tell the library what fields are required.
	<script>
		$(document).ready(function () {
			$("#frm").validate({
				rules: {
					Name: {
						required: true,
						maxlength: 50
					},
					Address: {
						required: true,
						maxlength: 50
					},
					Address2: {
						maxlength: 50
					},
					City: {
						required: true,
						maxlength: 50
					},
					State: {
						required: true,
						maxlength: 2
					},
					Zip: {
						required: true,
						maxlength: 5,
						digits: true
					}
				}
			});
		});
	</script>
As you can see we have added "required" attributes to the required fields. The "maxlength" attribute tells it that we only want to allow X number of characters. On the "Zip" field, we have limited the data to digits (numbers).
NOTE: This validation is client side only and is using JavaScript. If the user has JavaScript disabled or somehow by-passes this validation, you will want to have validation in the form processor so it does not cause an errors.
Masking to Control Input
Figure 3
Using the validation plugin allows you to control the data that is entered in the form fields, but what if you want greater control? You can use the Masked Input plugin by Josh Bush (http://digitalbush.com/projects/masked-input-plugin/) to accomplish this. This allows you to not only control what information is entered, but how it is entered. If you want a phone number entered as "(312) 555-4455", you can specify this with the Masked Input plugin. For our example, we want to the "Zip" field to allow for the four digit postal code extension and place a dash in between the first 5 digits and the last 4. We also want to limit the input to just numbers. The Validation plugin validates the input as digits, but it cannot limit the actual input as you type.
First, we need to download the plugin from the link above and place it on our web server. Unfortunately, there is not a CDN for this one. Next, we need to add it to the head tag of the HTML page.
<script type="text/javascript" src="jquery.maskedinput.js"></script>
Next, we need to "attach" this plugin to the form field and add the input mask.
	<script>
		$(document).ready(function () {
			$("#Zip").mask("99999-?9999");
		});
	</script>
Using the Masked Input plugin, we can now control how the zip field looks and what data is entered as the user types.
Tooltips to Provide More Information
Figure 4
Sometimes just asking for information using one word is not very user friendly. It would be nice to be able to provide a little more information to the user. Say you have a field on the web site that asks for the user’s credit card CVV2 code. Well, what is a CVV2 code? The user may or may not know what this is and it would be nice if we could provide a tip on it. By the way, the CVV2 code is the security code on the back of most credit cards (on the front on some).
The clueTip plugin (http://plugins.learningjquery.com/cluetip/) provides this functionality. The clueTip plugin creates a tooltip or popup when a user’s mouse hovers over an element.
Just like the Masked Input plugin, we need to download this from the link above and place it on our web server. Next, we need to add it to the head tag of the HTML page.
<script type="text/javascript" src="jquery.cluetip.min.js"></script>
We also need to reference the CSS file.
<link rel="stylesheet" href="jquery.cluetip.css" type="text/css" />
Next, we need to "attach" this plugin to the form field and add the input mask.
	<script>
		$(document).ready(function () {
			$("#NameTip").cluetip();
		});
	</script>
And last, we need to create a hyperlink to show the tip.
<a id="aCVV2" target="_blank" href="#" rel="Enter your name.">What's This?</a>
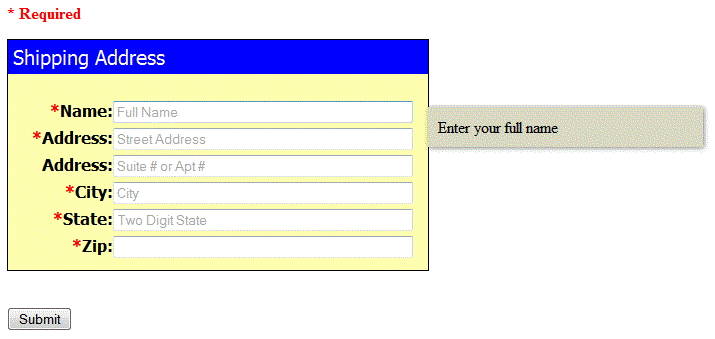
This will "popup" a tooltip telling the user to enter their name.
Watermark as an Alternative
Figure 5
Another way to provide more information is to use a watermark. The Watermark plugin by Josh Bush (http://digitalbush.com/projects/watermark-input-plugin/) provides this.
Again, we need to download this from the link above and place it on the web server. Next, we need to add it to the head tag of the HTML page.
<script type="text/javascript" src=" jquery.watermarkinput.js"></script>
Next, we need to "attach" this plugin to the form field and add the input mask.
	<script>
		$(document).ready(function () {
			$("#Name").Watermark("Full Name");
		});
	</script>
That is all there is to adding a watermark.
NOTE: Using a watermark can cause some issues with the Validation plugin. You will need to add an event to remove the watermark before checking the form. That is currently out of the scope of this article.
Conclusion
Figure 6
As you can see, there are a few jQuery plugins to help add more functionality to your form. There are several other plugins available to even further enhance your form. The plugins shown here are just a few examples and there are many variations on the same plugins shown in this article. Experiment with the plugins to find the ones you like the best.


