
Prior to the creation of this plugin, a designer would have to build the layout, and then once they received approval, they would have to cut the layout apart into individual components. The bottom line is that would be incredibly time intensive.
Using the Generator plugin offers a different (and more streamlined) approach.
To get started, download and install the latest version of Photoshop and then after that, install Edge Reflow CC.
In getting this system to work, I found that Reflow initially didn’t connect properly with Photoshop. To fix that, I downloaded the Generator plugin, installed it and after that, the connection functioned properly.
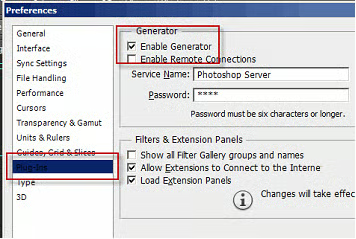
Still, there are some steps you should observe to make sure the plugin functions correctly. First, type Ctrl+K on your keyboard. This brings up the Preferences dialog box. To enable the plugin, go to the plugins section on the left and in the resulting pane, click on Enable Generator and OK to save the settings.
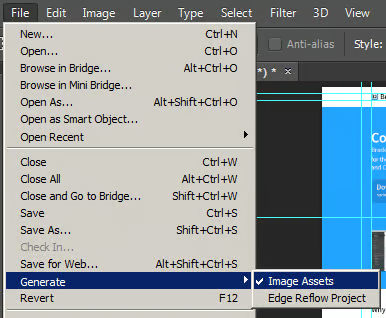
The next thing to realize is that the Generator function is file specific and needs to be turned on for each file. To enable Generator for a specific file, go to: File: Generate: Image Assets.
Note: One thing you may encounter is your computer beeping after turning the setting on. It doesn’t seem to cause a problem, but I don’t know what causes it.
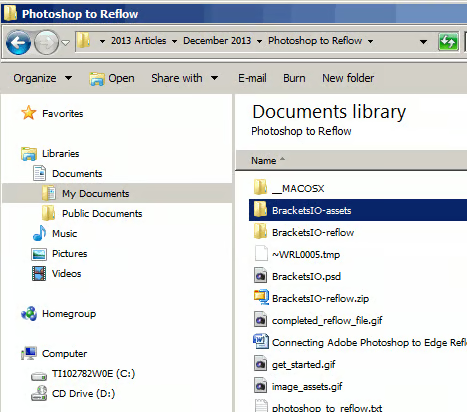
Once you enable Image Assets, there’s an important change that takes place. In my documents folder, you’ll see all the files I have for this particular project. Note the BracketsIO-assets folder.
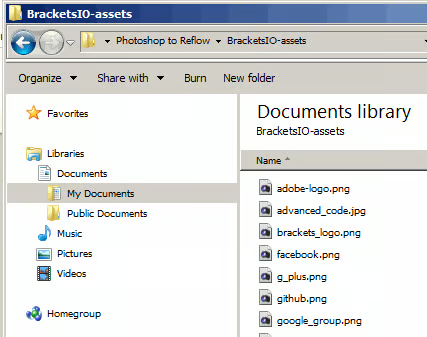
When we open that, we see all the image assets for this project that have been automatically generated for our project.
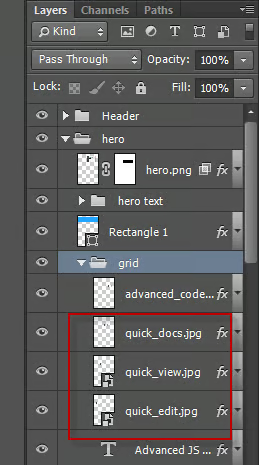
How these files come into being is the next thing to look at. The answer is on the Layers panel. In the highlighted area, you’ll notice that several of the layers have been named with file extensions, which is an integral part of the process. Once you do this, the assets will be created using Generator. One cool thing about this plugin is if you decide to make a change to a layer in Photoshop, it will automatically be updated in the assets folder. This is something we’ll explore in depth in the next tutorial.
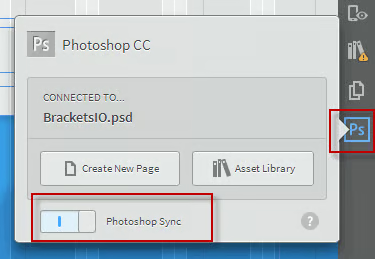
Once you’re satisfied with the changes in Photoshop, you can create an Edge Reflow project. To do that, go to: File: Generate: Edge Reflow Project. This creates a folder with the Edge Reflow project, which you can now access through Reflow. To do so, open Edge Reflow, and click on the Photoshop CC Connect icon at the top right of your screen. This will bring up the dialog box you see above. Click on the Photoshop Sync button at the bottom left corner to sync Reflow to Photoshop.
Using the Photoshop CC Connect panel, you can import the layout into Reflow, complete with all the CSS for your project. Also, note that if you need to return to Photoshop to make changes to the original file, those changes will be updated on the Reflow side.
Some things to note: All of the text in the Reflow file is editable HTML text. Once the file is imported, you can experiment with building a responsive layout and add breakpoints as necessary.
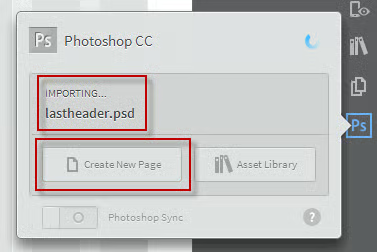
Let’s say you’re building a site with multiple pages. You would go back to Photoshop and open that new page. Back in Reflow, you can see what page you’re connected to in the Photoshop CSS Connect panel. To import that new page, click on the Create New Page button and the and the new file will be imported into your project.
Another useful feature of Photoshop CC Connect is if you’re working on a file which only contains image components. Using the naming process, you can name the layers accordingly then import the file into Edge Reflow.
Conclusion
In the next article, we’re going to build a simple file from scratch in Photoshop, import it into Reflow and add some breakpoints for desktop, table and mobile devices.
Resources
While you can build your own layout and import that into Reflow, a better idea is to download this PSD template file, open it in Photoshop to see how the process works. You can also download a completed Reflow file and see the finished result
Photoshop CC Workflow
Reflow Photoshop plugin tutorial (Youtube video)
Import Photoshop Assets into Reflow and use them for responsive design
Edge Reflow Preview forums
How to use Photoshop CC to Automatically Generate Web Graphics
