


Many Web developers would rather store data on the server, where they can retain more control over it, rather than on the client’s computer. However, most would also like to avoid the additional overhead of uploading a database server or learn to use one that comes with a hosting package. Depending on your needs, you may be able to use a flat file database, which is nothing more than a plain text file with one row of data per line.
Within each record, each field may be separated by a delimiter, such as a comma, or have a fixed length. Many Web languages have facilities for working directly with text files. Moreover, Microsoft has an ODBC text driver that allows you to interface with it just as you would any ODBC database. This provides the advantage that it scales quite well. In today’s article, we will learn more about flat file formatting and how to create a CSV Data File from an MS Access table.
Creating a Data File the Easy Way: Using a Wizard
There are a myriad of ways to create a data file; basically any tool that supports text file creation will work. Nonetheless, there are some shortcuts that can be of benefit – especially if your data is already stored in a relational database.
For the sake of this tutorial, we’ll use MS Access to create a Comma-Separated Values (CSV) file. The specific tool is not what’s most important here; what is key is that you understand the different ways to format your file. Firstly, the CSV label is a bit of a misnomer, because, in reality, any symbol can be used as a delimiter. In fact, we’re going to see how to assign your own. The other format that I mentioned earlier is fixed length formatting. It originates back to the days of mainframes and is not as commonly used any more. One of the reasons might be that fields require padding to fill out the entire column width. That takes some coding logic for both the padding and the trimming on the import side. It also takes a lot of extra space in the file.
Many programs, including MS Access and Excel support the CSV file format. In fact, Excel is the default file in Windows to view them.
In Access, you can launch the Export Wizard via File => Export… from the menu when you have a table or query object selected:
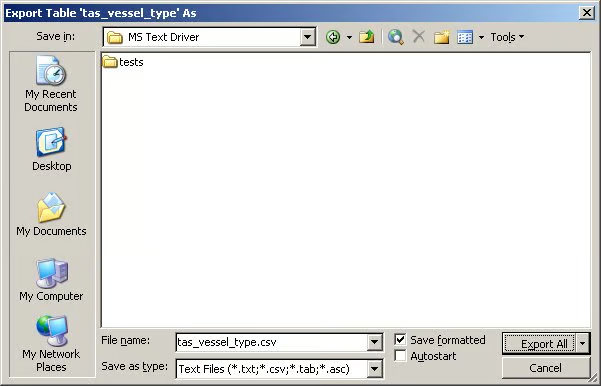
Select “Text Files” to generate a flat file. By convention, there are several accepted extension types for flat files, including .csv, .txt, .tab, and .asc. Each of these has a specific meaning:
- .csv: Comma-Delimited Values
- .txt: Generic text file
- .tab: Tab-delimited values
- .asc: Ascii text file
You can always use your own extension if you wish, but you may have to do a bit of additional setup work down the road.
Checking the “Save formatted” checkbox will produce a tabular formatted output that is easier on the eye. It is however, useless for most anything else! The “Autostart” checkbox tells the wizard to launch the generated file in the associated application. This is one area where using a non-standard file extension could cause you a little extra work, as you’ll have to create a file association to your type…
The easy-to-read formatted output:
-------------------------------------------------------------------------------------------------------------------------
| code_value_id | code_value_nme | short_english_des | short_french_desc | english_desc | french_desc |
-------------------------------------------------------------------------------------------------------------------------
| 10016697 | vessel_type_barge | Barge | Barge | Barge | Barge |
-------------------------------------------------------------------------------------------------------------------------
| 10016699 | vessel_type_canoe | Canoe | Canoë | Canoe | Canoë |
-------------------------------------------------------------------------------------------------------------------------
| 10016701 | vessel_type_dredg | Dredger | Dragueur | Dredger | Dragueur |
-------------------------------------------------------------------------------------------------------------------------
| 10016703 | vessel_type_ferry | Ferry | Traversier | Ferry | Traversier |
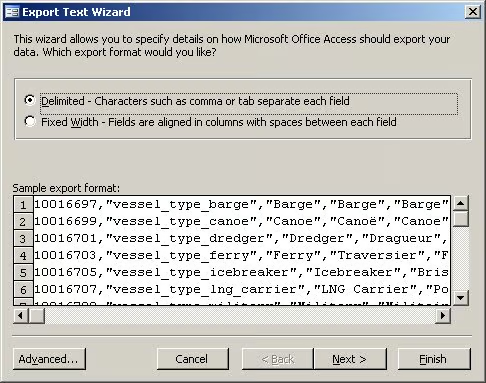
-------------------------------------------------------------------------------------------------------------------------The next dialog gives you the option of using delimited or fixed width columns. A sample pane below shows some of the resulting output. Checking each radio button back and forth will help to highlight the differences:
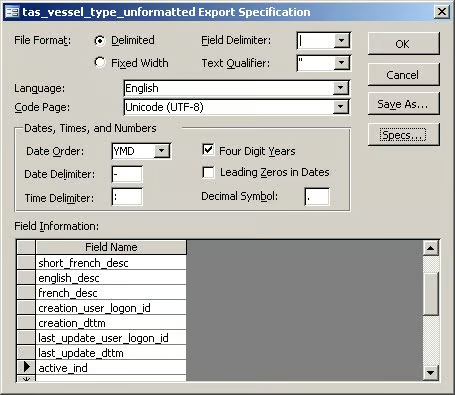
Clicking the “Advanced…” button will provide you with some additional options. Whatever tool you use to create your file, you should be familiar with each of these.
- The File format: Fixed width or delimited columns. If you go with the latter, you can assign your own delimiter and text qualifier.
- The Language and Code Page: You can tailor your character set to a specific language if you wish. The other option is to use UTF-8 Unicode, which supports any language. Take care to match up the character set to your language or you’ll wind up with weird characters in the import database.
- Date and Number formats: These two data types can present some interesting problems. The ordering of date parts can wreck havoc in certain situations. Therefore, it’s best to avoid ambiguous date formats such as dd-mm-yyyy and mm-dd-yyyy, where 6-5-2011 could mean either June 5, 2001 or May 6, 2011. The best format to use is the universal yyyy-mm-dd format. Likewise, number formatting can be a burden because some nationalities use commas as a thousands separator, whereas others use periods. For best results, try to leave out all number formatting except the decimal symbol, which should be the standard period.
- Field Names: You aren’t bound to the existing field names and can change them.
The Schema.ini File
All of these advanced features make up information that is stored in the Schema.ini file. If your particular database product does not create one for you, it’s easy enough to do yourself. Just be sure to place it in the same directory as the data file that it pertains to. That will help loading the data into your program or database later. Here’s part of the Schema.ini file for my CSV file:
ColNameHeader = True
Format = CSVDelimited
CharacterSet = UTF-8
Col1=code_value_id int
Col2=code_value_nme char width 50
Col3=short_english_desc char width 50
Col4=short_french_desc char width 50
Col5=english_desc char width 255
Col6=french_desc char width 255
Visit the Microsoft site for more information on the Schema.ini file.
The Resulting Data File
At long last, here’s a sampling of the contents of our CSV data file.
“code_value_id”|”code_value_nme”|”short_english_desc”|”short_french_desc”|”english_desc”|”french_desc”| 10016697|”vessel_type_barge”|”Barge”|”Barge”|”Barge”|”Barge”|”abudge”|”04/06/2007 11:42:21.616 AM”|”abu 10016699|”vessel_type_canoe”|”Canoe”|”Canoë”|”Canoe”|”Canoë”|”abudge”|”04/06/2007 11:42:21.616 AM”|”abu 10016701|”vessel_type_dredger”|”Dredger”|”Dragueur”|”Dredger”|”Dragueur”|”abudge”|”04/06/2007 11:42:21. 10016703|”vessel_type_ferry”|”Ferry”|”Traversier”|”Ferry”|”Traversier”|”abudge”|”04/06/2007 11:42:21.61
Conclusion
Of course, creating an export file is only half the battle. We have to import it and work with the data at some point. That will be the topic of an upcoming article. Stay tuned!
