


JQuery UI is basically a set of components, effects, interactions, etc., in a full-fledged JavaScript solution that enables content developers and front-end applications to have powerful web development capability in hand. In the midst of this, two of these features stand out and provide very interesting elements to jointly generate creative and different applications: Selectable and Draggable features.
Through the functions that the language provides you will be able to create drag and drop effects, as well as select multiple elements at the same time and have all that power at hand to be able to turbo power your web pages.
In this article, we will see some practical examples on the use of these resources with explanation about the code we’ll create.
Downloads and Installation
To configure the use of jQuery UI in your project, it is necessary to first discern which of the following models you will follow up:
- Downloading JS files: With this option, you will have all the files (or just the resources you want to use) of JavaScript code, CSS, images, etc., available to work within the library. This gives you the power to work offline, but at the same time can make code maintenance and/or versions more complicated;
- Direct access via public link: With this option you can work directly with the latest JavaScript code files for the jQuery UI library versions. Access is done via web, so your application needs an internet connection to work.
For any selected option, you will need to access the jQuery UI download page.
On the same download page, you can find the option Download Builder. Select the jQuery version and uncheck all component options except the two that interest us: Draggable and Selectable. Click the Download button and wait until it completes.
When working with this option you should select the right files (js and css), adding the same imports correctly to the “head” tag of the HTML document. They are:
- jquery-xxx.min.js: the core of the jQuery framework
- ui.core.js: the core UI of JavaScript
- ui.draggable.js: JavaScript file for Draggable functions
- ui.selectable.js: JavaScript file for Selectable functions
In contrast, to work with the second option it is only necessary to directly import the file links (js and css) to the application. We will see how to do this when we get to the programmatic part.
JQuery UI adds CSS classes to different mouse events, for example:
JQuery UI Draggable
- .ui-draggable: The class that it adds when creating the object draggable();
- .ui-draggable-dragging: The class that it adds by dragging an object along the page.
JQuery UI Selectable
- .ui-selectee: The class that it adds when creating the object selectable();
- .ui-selectable: The class that it adds when selecting the object;
- .ui-selecting: The class it adds when clicking and start creating the checkbox around the elements you want to select; as soon as you start selecting it, it will become “.ui-selectable.”
This is the basic structure of how the jQuery UI draggable and selectable generate classes to handle the changing for each action.
Let’s use the “console.log()” function to report what the code is doing after different steps along the page. Make sure that if you use this technique in a real-world example, remove console.log() to decrease page load time. This little function allows us to see what our code is doing:
console.log(variable);Now that we understand how it works with different classes, let’s start looking at the code that makes it work.
Coding
Let’s look at the development of a basic example of drag and drop where we have five divs that can be dragged and dropped within a preset region on the page. Copy the code contained below to an HTML page and run it in the browser:
<html lang="en">
<head>
 <meta http-equiv="Content-Type" content="text/html; charset=ISO-8859-1">
 <title>jQuery UI - Selectables and Draggables</title>
  <! -- Importing jQuery and jQuery UI files -- >
  <script type="text/javascript" src="http://code.jquery.com/jquery-1.9.1.js"></script>
  <script type="text/javascript" src="http://code.jquery.com/ui/1.10.3/jquery-ui.js"></script>
    <style type="text/css">
        /* Paste the CSS here */
    </style>
    <script type="text/javascript">
    $(function() {
        var selected = $([]),
        offset = {top:0, left:0};

        $("#selectable1").selectable();

        $("#selectable1 div").draggable({
           start: function(ev, ui) {
              $(this).is(".ui-selected") || $(".ui-selected").removeClass("ui-selected");

              selected = $(".ui-selected").each(function() {
                  var el = $(this);
                 el.data("offset", el.offset());
                  $(this).text("Objects \"Selected and dragging\"");
              });
              offset = $(this).offset();
           },
           drag: function(ev, ui) {
              var dt = ui.position.top - offset.top, dl = ui.position.left - offset.left;

              selected.not(this).each(function() {
                 var el = $(this), off = el.data("offset");
                  el.css({top: off.top + dt, left: off.left + dl});
              });
           },
           stop: function(ev, ui){
              $(this).text("Stopped dragging");
           }
        });
    });
    </script>
  </head>
  <body>
  <div id="selectable1">
   <div id="dragee" >Click to drag</div>
   <div id="dragee" style="top:100px;">Click to drag</div>
   <div id="dragee" style="left:120px;">Click to drag</div>
   <div id="dragee" style="top:400px;left:300px;">Click to drag</div>
   <div id="dragee" style="top:200px;left:200px;">Click to drag</div>
 </div>
 </body>
</html>At the beginning of the listing we have the import of the two jQuery and jQuery UI JavaScript files. Note that their versions must be compatible with the version of the UI lib always being equal to or greater than the jQuery’s version. On line 9 we’ve subtracted the CSS code to simplify the listing, but before testing you should replace it for the CSS code below.
In line 13 we create the variable selected as a vector that will save all HTML objects that are added to the drop div. Next, we call the selectable() function to define that its internal objects (other divs) can be selected, clicked. On the line 18 we created the jQuery selection rule that defines all child divs as draggable objects.
Among the functions and properties available in this object, we have:
- start: a function that will be executed when the object in question starts to be dragged. In line 20 we check if the object is selectable (via the “ui-selected” CSS class generated by the jQuery UI itself) and, if we do, remove the class so that a new one is added according to the rules of the drag function (below). Then we iterate over each of the selectable divs, retrieve their position on the page and print the message “Objects Selected and Dragging” inside it;
- drag: basically, saves the value of the position where the div object was before being dragged and sets the new position to the same. In line 32 we iterate over all the selected items and configure the new values ??of the position properties;
- stop: displays the “Stop dragging” text in the div when the event occurs.
Code Listing: CSS code for style
#selectable1 {
     font-size:70%;
     font-family: Segoe UI, Arial;
     font-weight: bold;
     width:600px;
     height:600px;
     border:1px solid #999999;
     margin:0 auto;
  }
  #selectable1 .ui-selecting {
     background: #aad284;
     border:1px solid #666666;
  }
  #selectable1 .ui-selected {
     background: #e2ecf5;
     border:1px solid #666666;
  }
  #selectable1 div {
     position: absolute;
     width: 100px;
     height: 75px;
     border: 1px solid #efefef;
  }
  #selectable1 .ui-draggable {
     padding:5px;
     background-color:#FFF9D8;
  }
  #selectable1 .ui-draggable-dragging {
     background-color:#91B168;
     font-color:#202020;
  }
Look at the result below. Note that with this model it is possible to drag individual elements together, as well as observe the changing state of the messages as the elements are manipulated. Now, you can play a bit more with these effects, creating your own pages along with the elements that can be dragged and dropped for the measure of this purpose.
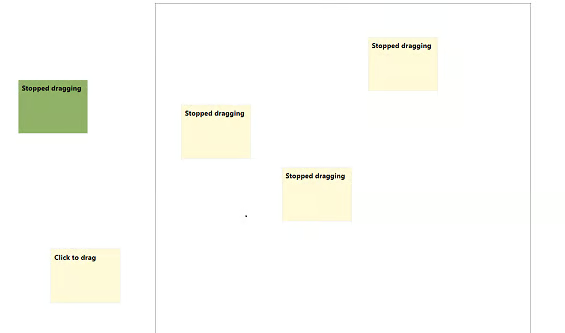
Figure 1. Result of our drag and drop page.
About the Author
Diogo Souza works as Java Developer at PagSeguro and has worked for companies such as Indra Company, Atlantic Institute and Ebix LA. He is also an Android trainer, speaker at events on Java and mobile world and a DevMedia consultant.
