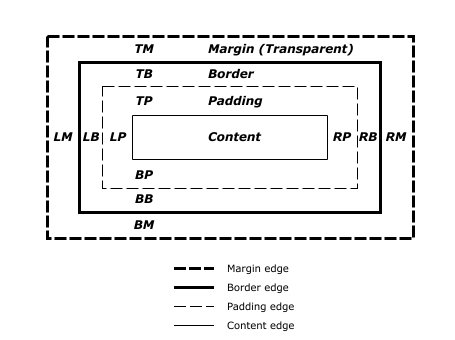
The box model refers to the square or rectangular boxes that are generated by HTML elements on the page. All HTML elements generate boxes. The boxes have a content area that may be surrounded with optional margins, padding, and borders. The box model provides a way of adding a border and spacing around HTML elements.
Box Model Example
Image provided by W3.org
Margins
	Syntax: margin-top: <value>
	Syntax: margin-right: <value>
	Syntax: margin-bottom: <value>
	Syntax: margin-left: <value>
	Syntax: margin: <margin-top> <margin-right> <margin-bottom> <margin-left>
Margins are transparent and do not have a background color. The margin clears the area around the border. The values of the margins can be expressed as a length or percentage. There are two different ways to set the values of the margin. The first is to set each property (top, right, bottom, and left) individually. The second is to use the "margin" shorthand. When you set the margins individually, you do not have to specify all four sides. If you want to create a top margin, but leave the others alone, you can do so by using only the margin-top property.
Margin shorthand property can be used a few different ways. First, you can set each side individually by specifying a different value for each side.
margin: 20px 15px 20px 15px;
In the above example, you will notice that the top and bottom values and the right and left values are the same. We can shorten this further, but just using the values for top/bottom and left/right.
margin: 20px 15px;
As you can see, there is no reason to specify redundant values. But what if you want to have the left/right margins the same, but with different top/bottom margins? You can do that like this:
margin: 20px 15px 35px;
This gives the top and bottom margins different values, but keeps the left/right values the same. Of course, if you want all margins to have the same values, you can shorten it further.
margin: 20px;
This will give you a margin of 20 pixels all around the HTML element.
Border
Borders are the next level "in" on the box model. Unlike margins, borders can have color. If no color is specified, the color of the text content is used. Borders must have a style associated with it. If a style is not supplied, the border will not show. Also, border style, color, and width can be set individually for each of the four sides.
Border-Style:
	Syntax: border-style: none|hidden|dotted|dashed|solid|double|groove|ridge|inset|outset
	Syntax: border-top-style: none|hidden|dotted|dashed|solid|double|groove|ridge|inset|outset
	Syntax: border-bottom-style: none|hidden|dotted|dashed|solid|double|groove|ridge|inset|outset
	Syntax: border-right-style: none|hidden|dotted|dashed|solid|double|groove|ridge|inset|outset
	Syntax: border-left-style: none|hidden|dotted|dashed|solid|double|groove|ridge|inset|outset
Since you must specify a border style and this is the only "required" value, we will start with this one. The border style values are: none, hidden, dotted, dashed, solid, double, groove, ridge, inset, and outset. The "none" and "hidden" styles are the same and specify that the border should not show. This is good if you want to remove the border from an image that is being used as a hyperlink.
Without border: none;
With border: none;
Dotted, dashed, solid, double, groove, ridge, inset, and outset styles provide line styles of the border. If you do not specify a color, the text color will be used.
Dotted Border
Dashed Border
Solid Border
Double Border
Groove Border
Ridge Border
Inset Border
Outset Border
Red Text with Border Color Inherited from Text Color
Border-Color:
	Syntax: border-color: <keyword> | <RGB>
	Syntax: border-top-color: <keyword> | <RGB>
	Syntax: border-bottom-color: <keyword> | <RGB>
	Syntax: border-right-color: <keyword> | <RGB>
	Syntax: border-left-color: <keyword> | <RGB>
As stated before, the default color of the border is specified by the color of the text content. You can specify your own color using either a keyword or RGB values. On the groove, ridge, inset and outset styles, the "shade" color is calculated by the user agent of the browser using the border color as a reference.
Border-Width:
	Syntax: border-width: thin | medium | thick | <value>
	Syntax: border-top-width: thin | medium | thick | <value>
	Syntax: border-bottom-width: thin | medium | thick | <value>
	Syntax: border-right-width: thin | medium | thick | <value>
	Syntax: border-left-width: thin | medium | thick | <value>
Border width is specified by a keyword or a length value. The keywords are: thin, medium, and thick. The actual value of these keywords is set by the user agent in the browser. For more control, you can specify a length value using px, in, em, etc.
Thin Border
Medium Border
Thick Border
10px Border
Multiple Border Properties and Shorthand:
Remember, you can specify different styles, colors, and widths for the four sides of the HTML element.
Border with different side properties
Another way to specify the properties is using shorthand. In the syntaxes above, you will notice there are shorthand syntaxes for the top, bottom, left and right border properties. There is also shorthand for the single border property. This is useful if you want to specify the same border properties for all four sides. The only value actually needed is style. A default width will be used (usually thin) and the color would be set by the text color.
Syntax: border: <width> <style> <color>
Padding
	Syntax: padding-top: <value>
	Syntax: padding-right: <value>
	Syntax: padding-bottom: <value>
	Syntax: padding-left: <value>
	Syntax: padding: <padding-top> <padding-right> <padding-bottom> <padding-left>
Padding is the space between the HTML elements border and the content. Padding is set similar to margins. The syntax is very similar and can be expressed as a length or percentage. You can also set the padding values individually or all at once using shorthand just like the margins.
Conclusion
The box model allows you to lay out all your elements on the page. It gives you the flexibility to add spacing and borders around your elements.


