Today we begin a new series on how to use WordPress, one of the most popular content management systems (CMS’s). Over the course of this series, we’ll look at the following topics:
- Automatic and Manual WordPress Installation
- Security and Spam Control in WordPress
- Backing Up the Database
- Finding and Installing a WordPress Template
- Customizing a WordPress Template
- How to Use Page and Articles in WordPress
- How to Use Images and Photo Galleries in WordPress
- Social Media Options in WordPress
- Advertising in WordPress
- E-Commerce in WordPress
- Must-have Plugins for WordPress
When you decide to install WordPress 3.1.1 (the latest version), you can use it in one of two ways, as a free account hosted with WordPress.org or with your own hosting provider. I recommend using your own provider because this gives you more control over the installation.
Many hosting providers offer WordPress as an option for installation, including: Hostgator, Turnkey Internet and GoDaddy. I’ve been using GoDaddy for several years so this is what I’ll use for this series. Having said that, Hostgator or Turnkey Internet might be a better choice, partly due to the issue of backing up the database. GoDaddy can be a bit cumbersome. In contrast, Turnkey Internet and Hostgator use cPanel, which makes it both easy and quick to back up the database.
Another conideration is how WordPress will be set up on your server. There are two major choices, to use the automatic installation or to use a manual installation. We’ll look at both options here.
Before you can install WordPress on your hosting account, you need to make sure that it supports PHP and MySQL. You’ll also need an FTP account and login information. Next, you’ll need to create a MySQL database and finally, you’ll need the latest version of WordPress, which you can download here.
Automatic WordPress Installation
This is the simplest form of installation. Frequently, all you have to do is navigate to the section on the hosting company’s site where different CMS’s are available, click on a button and the software is intalled automatically. GoDaddy is no exception.
To get started, you’ll need to log in. Once you do, go to the My Account tab (the gray box) and in the drop down list, choose My Products. When the page refreshes, you’ll see a gray menu section on the left. Click on Hosting. When the page refreshes, you’ll see a large green button with the word “Launch” on it. Click on it.
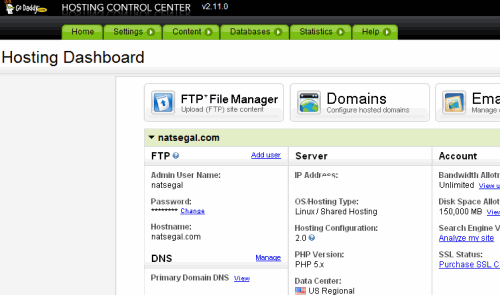
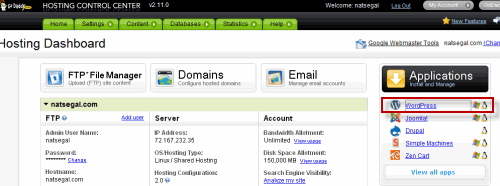
This takes you to the Hosting Control Center. On the right, you’ll see a list of Applications. Click on WordPress.
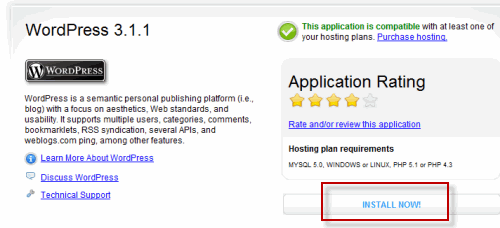
This will take you to another page which gives you information about WordPress, along with an INSTALL NOW! link at the bottom of the page. Click on it.
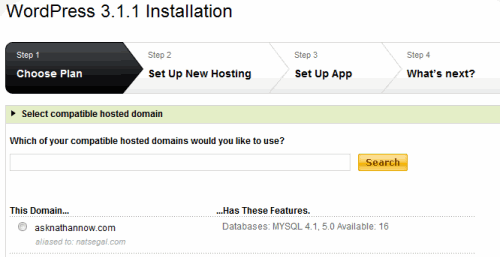
On this screen, you’re asked to choose which domain name you want to use for the installation. Once you choose it, click on the Next button at the bottom of the page.
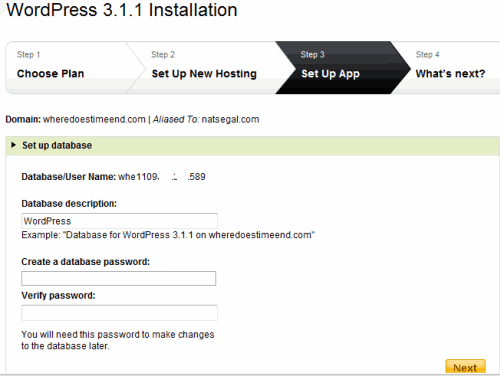
Normally, the next step is to choose hosting, but since I already have an account with GoDaddy, the process jumps to Step 3, In this step, the user name is created for you. You can edit the Database Description and you’ll need to choose a password. Click on the Next button at the bottom of the page.
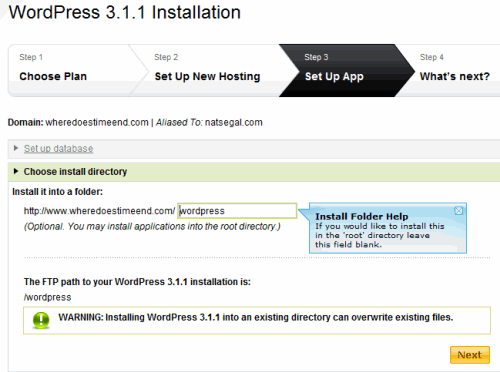
Here, you can use the default WordPress directory, create your own or install the software to the root directory. When you’re done, click on the Next button at the bottom of the screen.
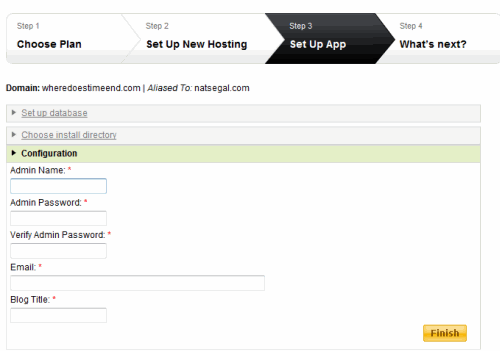
In this step you set up the configuration and choose the Administrator name and Password. I recommend using strong passwords for both. I also recommend using alphanumeric characters. Never use “admin” for the Administrator name. This will make it easier for hackers to gain entry to your installation.
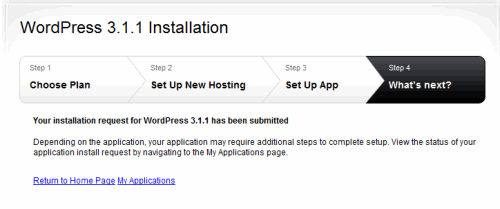
Once you’ve entered in all your settings and your email address, you’ll get the following message. Your account will be created on the GoDaddy server and you’ll receive an email message when it’s complete. After that, you’ll be able to access WordPress and start learning how to use the program. For now, we’ll move onto the next area in this article, where you’ll learn how to do a manual installation.
Manual WordPress Installation
In this section, you’ll learn how to do a manual installation of WordPress 3.1.1.
The first thing you need to do is to download the latest version of WordPress, which you’ll find here.
When installing WordPress, a common document is the famous five minute installation, which is found here. The only problem with the instructions is that they tell you to enter in the database information in step four of the installation process, but this is a cumbersome way of installing the program. It’s better to create the database first, before you begin to upload the program.
Here’s the process I use: In GoDaddy (and other hosts are very similar), you’ll need to log into the Account Manager, then, in the Products section, click on Web Hosting. From there, you’ll see a page with a Launch icon on it. Click on that.
This takes you to the Hosting Control Center.
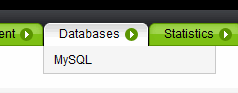
Under the Databases tab, click on MySQL. This takes you to the MySQL page. Here, click on the Create Database icon.
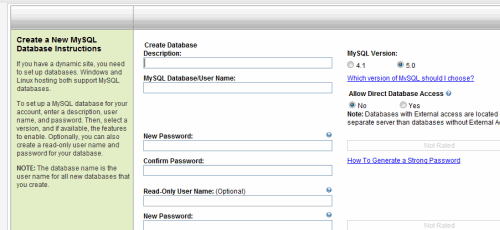
In this page, you enter a description of your databease, and enter a user name and a password. These should be strong passwords. You don’t want to make it easy for a hacker to guess this down the road. Once you’re satisfied with your settings, click on OK. Creating your database will take only a few minutes. When it’s complate, you’re ready for the next step, which is to configure WordPress.
Make sure to note the host name, database name and database user name. You’ll need these settings to configure WordPress.
The next step is to unzip WordPress into a folder. Next, upload the entire contents of the unzipped WordPress directory (not the folder itself) to your server using FTP.
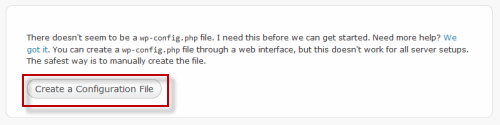
Next, go to the domain you’ve decided to use and type in: http://www.yourdomain.com/wp-admin/install.php You’ll immediately get an error message and you’ll be prompted to click on the Create a Configuration File button.

You’ll be taken to the page above, which gives you all the requirements to set up WordPress. To get started, click on the Let’s Go button at the bottom of the page. Note that it’s a good idea to have the database section on your host open for reference.
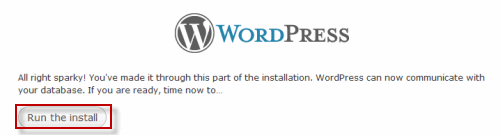
When you enter all the settings correctly, you’ll get the message above. Click on the Run the Install button to continue.
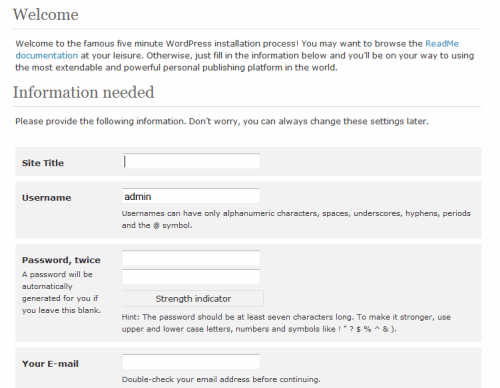
This is where you set up your blog. Note that in this section it’s strongly recommended that you use strong passwords. Also, make sure you change the default “admin” to a strong password, as well. This will help to secure your blog from hackers. Also, make sure you use alphanumeric characters for extra password strength.
When you’ve finished, you’ll be asked to log in with your username and password. You’ll also get a confirmation email message with the login URL and your username. Make sure to note your password so you don’t lose it. For password storage I recommend Roboform. It makes life MUCH easier.
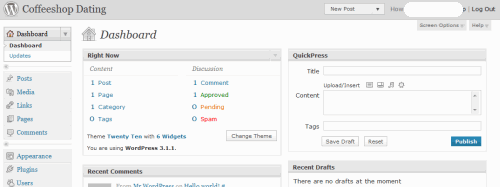
Once you log into WordPress, you’ll be taken to the Dashboard. While it’s tempting to start blogging, we’ll hold off a bit. While WordPress is a great blogging platform, it’s also prone to security issues, which we’ll look at in the next tutorial.