The Joomla! content management system can be as basic or as complicated as you want it to be. For most people, you start off with one of the templates provided as part of the installation. Then, you might branch off and start exploring third-party template clubs. Eventually, you’ll want to start customizing your site to suit your specific needs. To do this, you’ll want to discover new components, plugins and modules.
There are few basics to get started with. To get started, you might want to peruse the Joomla! Extensions page. Here, you will find more than everything you ever wanted. It can become a daunting task to discover which modules will best suit your needs. If you want to take some of the guess work out of getting started, here’s a good primer list of both basic and more advanced modules that I can personally vouch for.
First off, is Xmap by Vargas. This handy tool automatically creates a site map of your site. After you download it, you need to install it from the Joomla! Extensions menu.
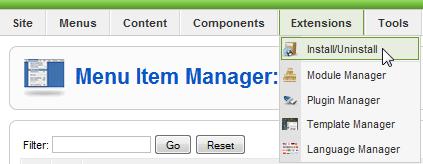
Now comes the tricky part on how to actually implement Xmap. I had to scratch my head over this one before I finally figured it out. Go to your Menu manager. Click the menu where you want the link to the site map to appear or create a new menu in which to place the link to the site map. Most sites have their site map appear at the bottom of the page.
With the Menu Item Manager open, click New from the right side of the screen and then select Xmap.
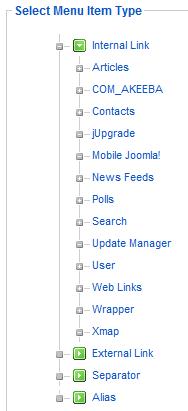
Now choose Xmap from the Item list.

You can now title the component and set the parameters as you see fit. Make sure it’s set to published and your new menu item should appear on your site. Click on that link and you should see a hierarchy of your site’s content based on your menus.
You can change the priority of where the articles appear along with how they appear. To do this, navigate to the Components menu and you should see Xmap listed. Click that and you’ll see a tabbed menu for CSS and Extensions. There’s also a little box labeled Options.
You might find that the default settings are pretty good. So, unless there’s content that you don’t want to appear in the Site Map, chances are you won’t have to tweak too much.
Here’s one example and a second example of Xmap in action. If you look at both examples, you will immediately notice that the Xmap component uses whatever template you happen to be using very nicely. Xmap’s output appears basic, but it gets the job done for both human visitors and for search engines that want to index your site.


