AngularJS is a JavaScript framework built and maintained by Google’s team of engineers to facilitate the development of Single-Page Applications (SPA), which is a kind of web application that fits in a single page, with the objective to provide a richer user experience, similar to a desktop application. In a SPA, all necessary code, such as HTML, JavaScript and CSS, is downloaded only once the application is initially loaded. The page does not need to be reloaded at any other time.
The objective of AngularJS is to simplify the development and testing of SPA applications by providing a framework for client-side model-view-controller (MVC) architecture, in conjunction with components used in rich internet applications (RIA).
In this article, we will create a simple application that has two HTML Select elements, in which the option selected in the first element will populate the options of the second element in a cascade.
Architecture
AngularJS, in a subtle way, leads to the adhesion of the MVC design pattern in the development of applications. The MVC is a standard that reinforces the separation of concepts into three parts: Model, View and Controller. In the context of an AngularJS application, these parts are associated with the following application layers:
- Model: These are JSON objects, which can either be returned by RestServices or declared and completed in the application itself.
- View: The application’s HTML pages
- Controller: These are the JavaScript files containing the code that interacts between the HTML and the data to be displayed.
Figure 1 illustrates the interaction model between layers, always triggered by a user event.
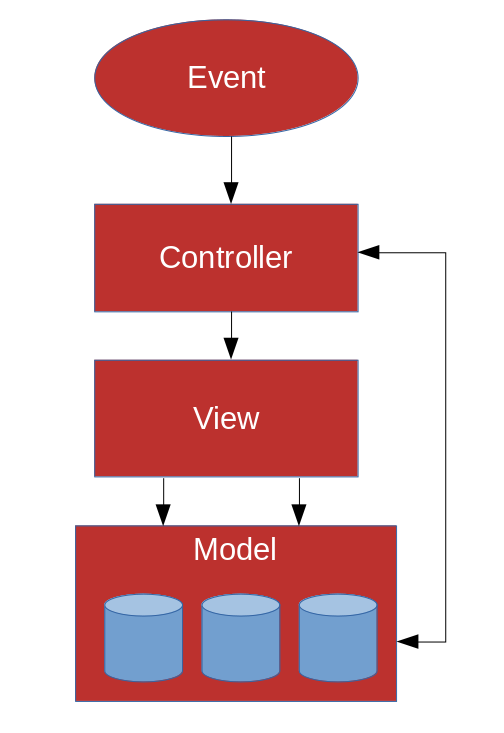
Figure 1. AngularJS application architecture
Directives
The directives tell the AngularJS compiler to include a specific behavior to the DOM element. AngularJS brings several native directives, but custom directives can be created by the developer. Native directives usually start with “ng-” (for example “ng-controller”) and are included in the HTML code as if they were attributes of the DOM elements.
Creating the application
For our example we will create only two files: an HTML page that we will call index.html, and a JavaScript file that we will call app.js.
In the app.js file we start by making the declaration of the application itself, as shown in Listing 1.
Listing 1. Definition of the app
(function () {
var app = angular.module ('article', [])
(...)
})()
The module method creates the application and receives two parameters: the name of the app and the auxiliary modules (for example, third-party components) that will be used in the application. An important detail is that even if no auxiliary module is used, it is necessary to pass an empty array as a parameter.
The second step is to set the Controller, as shown in Listing 2.
Listing 2. Controller definition
app.controller('ArticleController', function($scope) {
(...)
)}HHT;
The $scope object encapsulates the application’s Model. It is this object that maintains the state of the application and interfaces with the View. Another important detail of $scope is that it is hierarchical.
In the HTML page you must first add the reference between the page and the application. This is done through the ng-app directive, as shown in the following command:
<html ng-app="article">
Next, we’ll include a reference to the AngularJS Framework, as shown in Listing 3.
Listing 3. Reference to AngularJS Framework
<script type="text/javascript" src="//ajax.googleapis.com/ajax/libs/angularjs/1.7.5/angular.min.js"></script>
Finally, we add the app.js reference using the following command:
<script type="text/javascript" src="app.js"> </script>
Now we can make use of our controller by the command in Listing 4.
Listing 4. Controller Association with HTML
<div ng-controller="ArticleController">
(...)
</div>
The scope of the Article controller covers all the contents of the DIV tag in which it is inserted. In Listing 5, we will create, within the controller, in the app.js file, two JSON objects that will define the data structure containing six employee records divided into two sectors of a fictitious company: the commercial sector and the IT sector.
Normally, this data would be obtained from a database, through a RESTful service, but to simplify the example we will define the hard-coded objects.
Listing 5. Definition of JSON objects
var sector1 = {
    code: 1,
    name: 'IT',
    employees: [{
            code: 1,
            name: 'Mary Joanne Pearson'
        },
        {
            code: 2,
            name: 'Anne Van Di Helm'
        },
        {
            code: 3,
            name: 'John Fitzgerald'
        }
    ]
};

var sector2 = {
    code: 2,
    name: 'Commercial',
    employees: [{
            code: 4,
            name: 'Jennifer Stone'
        },
        {
            code: 5,
            name: 'Karl Stephen'
        },
        {
            code: 6,
            name: 'Ana Grande'
        }
    ]
};
As above, objects cannot be accessed by View because they were not assigned to the scope. We will assign the objects to the scope by creating an array containing the two objects, as shown in the following code:
$scope.sectors=[sector1, sector2];
Our View will have two nested DropDownLists: one for the user to select the sector, and once selected the sector, the second DropDownList should load employees in that sector.
It is necessary to define the objects that will store both the Sector and the Professional that the user will select. This is done on the Controller with the following commands:
$scope.selectedSector = {};
$selected.selectedEmployee = {};
The application will start without any record being selected. So why define empty objects? Because if the objects are not defined, at the moment the View is loaded, and the HTML element refers to the objects, the compiler will interpret as an error, since the objects will be interpreted as undefined.
Within the View, you need to include the HTML elements of Listing 6.
Listing 6. Definition of Select elements
<select>
 <option value="">Select</option>
</ select>
But this will only create empty elements. In order for the elements to be bound to the data of the scope, contained in the “sectors” property, we’ll use the ng-options directive, as shown in Listing 7.
Listing 7. The select element receives the ng-options directive, which will populate the element.
<select ng-options="s.name for s in sectors track by s.code">
 <option value="">Select</option>
</select>
The above directive is equivalent to making a “repeat” loop in the “sectors” variable, sorted by “code,” and for each item in the “sectors” array, a row is added in the “Select” element, containing the contents of the name property defined in JSON within the controller.
We still need to attach the selectedSector property to the selected record in the Select element. This is done through the “ng-model” directive, as shown in Listing 8.
Listing 8. Select element receives the ng-model directive, which will store the selected option.
<select ng-options="s.name for s in sectors track by s.code" ng-model="selectedSector">
 <option value="">Select</option>
</select>
Nesting between DropDownLists, also known as Cascade, occurs in the ng-options directive of the second Select element. The options will be read from the selected sector object, which will be fed into the first Select (Listing 8), as shown in Listing 9.
Listing 9. Nested select element, which will be loaded based on the selection of the first element.
<select ng-options="p.name for p in selectedSector.employees track by p.code" ng-model="selectedEmployee">
 <option value="">Select</option>
</select>
Conclusion
Each time the user selects a record in the first Select element, the second choice changes. This does happen without any need to reload the page (refresh). This is what brings a rich user experience.
var sector1 = { code: 1, name: 'IT', employees: [{ code: 1, name: 'Mary Joanne Pearson' }, { code: 2, name: 'Anne Van Di Helm' }, { code: 3, name: 'John Fitzgerald' } ]};
var sector2 = { code: 2, name: 'Commercial', employees: [{ code: 4, name: 'Jennifer Stone' }, { code: 5, name: 'Karl Stephen' }, { code: 6, name: 'Ana Grande' } ]};
About the Author
Diogo Souza works as a Java Developer at PagSeguro and has worked for companies such as Indra Company, Atlantic Institute and Ebix LA. He is also an Android trainer, speaker at events on Java and mobile world.


