Create a Java EE Web Application using the Glassfish Server
Not long after Java first released Java Beans, rumblings began about how darn complicated it was to implement. I remember learning it in School and the instructor practically pulled his hair out trying to get it to work! Soon after, the Spring Framework was introduced to ease our pain. For a while, you’d be hard pressed to find anyone developing Enterprise level applications without it. Of course it wasn’t a perfect solution either. Spring depends a lot on XML files which can quickly become very large and unwieldy. Now, Oracle, the makers of Java, have fought back with the EJB 3.1 spec. It’s more lightweight that Spring and adheres more closely to the convention over configuration principle, whereby the number of decisions that developers need to make is decreased in order to gain simplicity. In today’s article we’ll discover what makes an Enterprise Application and learn how to create a Java EE application project and configure a Glassfish server in the ever-versatile Eclipse IDE.
Java EE vs. Java SE
A lot of developers don’t realize that Java comes in several different flavors, including:
- Standard Edition (Java SE)
- Enterprise Edition (Java EE)
- Micro Edition (Java ME)
- JavaFX
If you’ve ever used Java before, I would be willing to bet that it was the SE version. (If you haven’t, you may want to learn the basics of the language before trying to follow this tutorial because Enterprise Java is an advanced topic.) Built on top of the Java SE platform, Java EE provides an API and runtime environment for developing and running large-scale, multi-tiered, scalable, reliable, and secure network applications. In other words, industrial-strength apps!
What You’ll Need
For this tutorial you will need the following software:
The tutorial was written using Eclipse Luna but it should work with other Eclipse versions as well. Dialog boxes and menus might look slightly different but the code should be exactly the same.
Components of a Java EE Application
Before you fire up Eclipse, let’s get a bird’s eye view of the components that make up a Java EE application, since we’ll have to put each of these in place to get our project off the ground.
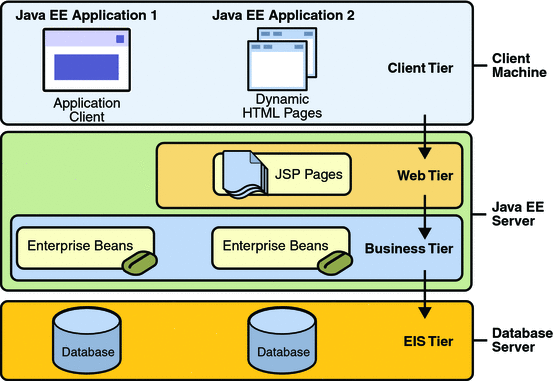
A Java EE application, going from the “back” to “front” end, consist of the four following parts:
- Persistence Unit and Models: A data store and classes that represent each data entity. Part of the the Enterprise Information System (EIS) tier, the data store may in fact include enterprise infrastructure systems such as enterprise resource planning (ERP), mainframe transaction processing, database systems, and other legacy information systems.
- EJB Session Beans: Special classes that manage specific business transactions and processes.
- Servlet: A small Java program that runs within a Web server. The Servlet receives and responds to requests from Web clients, made via HTTP or SHTTP.
- JSP Page: A special kind of Web page that may contain server-side scripts.
We’ll be covering each in more detail as we implement them.
Creating a Java EE Project in Eclipse
Now it’s time to start Eclipse!
The Web application that we’ll be creating manages a collection of fitness exercises – something that all of us desk jockeys are in dire need of! New exercises may be added using a basic HTML form. All of the stored exercises are listed below the input fields.
- Choose a workspace location. I always recommend that you create a directory called “workspace” in order to identify it as such in the future. Hence, a good path might be “C:\My Documents\Java EE\tutorials\Glassfish Web app\workspace”.
- Once you’ve dismissed the Welcome screen and any popups that might appear, create a new project via the New Project dialog box, accessible from File > New > Project… on the main menu.
- Select Web > Dynamic Web Project and click Next.
- Enter “Exercises” in the Project name field.
Setting the Target Runtime
The Target runtime field is where you designate the server to which you’ll be deploying your Web project.
- If you click the New Runtime… button, you’ll get a list of servers to choose from.
- In all likelihood, Glassfish won’t be in there, because you still have to install the server adapter for it using the “Download additional server adapters” link, even if you’ve already installed the server. The Install New Extension dialog will contain a complete list of server adapters to choose from:

- Select the Glassfish server adapter and click Finish to close the dialog.
- Back on the New Server Runtime Environment dialog, you should now see entries for Glassfish 3.1 and 4. Select 4, check the Create new local server box, and click Next to proceed.
- On the GlassFish runtime properties screen, give your server environment a name (or just keep the default of “GlassFish 4”), browse to the root of your server installation, and select the version of Java that you want to run against. Click Next.

- The next screen contains properties that pertain to the specific server.
You can either just use the default domain which is under “glassfish\domains\domain1” use the new domain button on the far right to create a new one. Then set your id and password (blank is permissible) and click Finish.
- Complete the remaining fields on the main wizard dialog as illustrated below and click Finish to create the project.
Conclusion
In the next article, we’ll set up the database and code our application.


