The HTML table represents an HTML structure for creating rows and columns on a web page (tabular data). The row in the table is defined by the <tr> tag, the table header is defined by the <th> tag and the date table is defined by the <td>.
Through the table, you can interpret between different types of data and values.
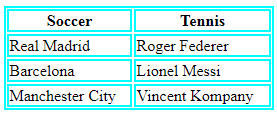
Listing 1. Example of a simple table
<!DOCTYPE html>
<html>
<head>
<style>
table, th, td {
    border: 1.5px solid aqua;
}
</style>
</head>
<body>
<table style="width:100%">
  <tr>
    <th>Soccer</th>
    <th>Tennis</th>
  </tr>
  <tr>
    <td>Real Madrid</td>
    <td>Roger Federer</td>
  </tr>
  <tr>
    <td>Barcelona</td>
    <td>Lionel Messi</td>
  </tr>
  <tr>
    <td>Manchester City</td>
    <td>Vincent Kompany</td>
  </tr>
</table>
</body>
</html>
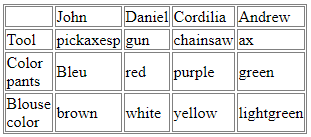
Another example of a table that includes several headers. The contents of each table are between these two tags: <table>, </ table>:
<!DOCTYPE html>
<html>
<body>
<style>
table, th, td {
    border: 0.5px solid grey;
}
</style>
<table style="width:100%">
  <tr>
    <td> </td>
    <td>John</td>
    <td>Daniel</td>
    <td>Cordilia</td>
    <td>Andrew</td>
  </tr>
  <tr>
    <td>Tool</td>
    <td>pickaxesp</td>
    <td>gun</td>
    <td>chainsaw</td>
    <td>ax</td>
  </tr>
  <tr>
    <td>Color pants</td>
    <td>Bleu</td>
    <td>red</td>
    <td>purple</td>
    <td>green</td>
  </tr>
  <tr>
    <td>Blouse color</td>
    <td>brown</td>
    <td>white</td>
    <td>yellow</td>
    <td>lightgreen</td>
  </tr>
</table>
</body>
</html>
In the following samples we will use some more advanced methods such as summaries, subtitles, and rows in the table.
Using the <caption> tag
This tag defines a table subtitle and should be used immediately after using the <table>:
<!DOCTYPE html>
<html>
<head>
<style>
table,th,td {
border:1px solid black;
}
caption {
display: table-caption;
text-align: left;
}
</style>
</head>
<body>
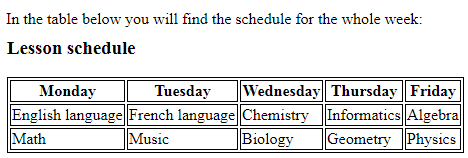
<p>In the table below you will find the schedule for the whole week:</p>
<table>
<caption><h3>Lesson schedule</h3></caption>
<tr>
<th>Monday</th>
<th>Tuesday</th>
<th>Wednesday </th>
<th>Thursday</th>
<th>Friday</th>
</tr>
<tr>
<td> English language</td>
<td>French language</td>
<td>Chemistry</td>
<td>Informatics</td>
<td>Algebra</td>
</tr>
<tr>
<td>Math</td>
<td>Music</td>
<td>Biology</td>
<td>Geometry</td>
<td>Physics</td>
</tr>
</table>
</body>
</html>
We can also use the <thead>,<tfoot> and <tbody> tags. The <thead> tag is used to group header content into the table, this tag is used together with the <tbody> and <tfoot> tags to specify the header, body, and footer.
Listing 4. Table Example Using the Labels Above
<!DOCTYPE html>
<html>
<head>
<style>
thead {color:Brown ;}
tbody {color:CadetBlue ;}
tfoot {color:LightCoral;}
table, th, td {
border: 1px solid black;
border-collapse: collapse;
}
</style>
</head>
<body>
<table>
<thead>
<tr>
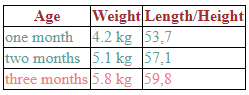
<th>Age</th>
<th>Weight</th>
<th>Length/Height</th>
</tr>
</thead>
<tfoot>
<tr>
<td>three months</td>
<td>5.8 kg</td>
<td>59,8</td>
</tr>
</tfoot>
<tbody>
<tr>
<td>one month</td>
<td>4.2 kg</td>
<td>53,7</td>
</tr>
<tr>
<td>two months</td>
<td>5.1 kg</td>
<td>57,1</td>
</tr>
</tbody>
</table>
<p>Growth chart for girls</p>
</body>
</html>
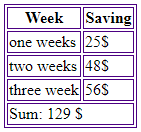
Using the <colspan> Tag
COLSPAN is the attribute of the <table> tag and can be used on the following elements: <td>, <th> . COLSPAN defines the number of columns a table cell can contain
Listing 5. Colspan
<!DOCTYPE html>
<html>
<head>
<style>
table, th, td {
    border: 1px solid Indigo;
}
</style>
</head>
<body>
<table>
  <tr>
    <th>Week</th>
    <th>Saving</th>
  </tr>
  <tr>
    <td>one weeks</td>
    <td>25$</td>
  </tr>
  <tr>
    <td>two weeks</td>
    <td>48$</td>
  </tr>
  <tr>
    <td>three week</td>
    <td>56$</td>
  </tr>
  <tr>
    <td colspan="2">Sum: 129 $ </td>
  </tr>
</table>
</body>
</html>
Using the ID Attribute to Create a Table
The ID attribute is unique, so it can model a single item on the web page. This attribute is used to indicate a style in a style sheet
Be careful! The specified value should not be repeated in the HTML document.
Listing 6. The ID Attribute
<!DOCTYPE html>
<html>
<head>
<style>
table, th, td {
    border: 2px solid white;
    border-collapse: collapse;
}
th, td {
    padding:9px;
    text-align: right;
}
table#table {
    width: 100%;
    background-color: LightSteelBlue ;
}
</style>
</head>
<body>
<table style="width:100%">
<table id="table">
  <tr>
    <th>Quarter 1</th>
    <th>Quarter 2</th>
    <th>Quarter 3</th>
  </tr>
  <tr>
    <td>Ana - 1</td>
    <td>Simona - 1</td>
    <td>Stefan - 3</td>
  </tr>
  <tr>
    <td>Simona - 2</td>
    <td>Ana - 2</td>
    <td>Simona - 2</td>
  </tr>
  <tr>
    <td>Stefan - 3</td>
    <td>Stefan - 3</td>
    <td>Ana - 3</td>
  </tr>
</table>
</body>
</html>

Using the Scope Attribute
The SCOPE attribute indicates what is the header cell — a column, a group of columns, a row or row of rows. This attribute is defined by both <td> and <th>
Syntax: <th scope = "col | row | colgroup | rowgroup">
Listing 7. The Scope Attribute
<!DOCTYPE html>
<html>
<head>
<style>
table, th, td {
    border: 2px solid grey;
    border-collapse: collapse;
}
th, td {
    padding:9px;
    text-align: left;
}
table#table {
    width: 100%;
    background-color: Moccasin  ;
}
</style>
</head>
<body>
<table style="width:100%">
<table id="table">
<tr>
    <th></th>
    <th scope="col">Evidence 1</th>
    <th scope="col">Evidence 2</th>
  </tr>
  <tr>
    <th>Quarter 1</th>
    <th>Quarter 2</th>
    <th>Quarter 3</th>
  </tr>
  <tr>
    <td>Ana - 1</td>
    <td>Simona - 1</td>
    <td>Stefan - 3</td>
  </tr>
  <tr>
    <td>Simona - 2</td>
    <td>Ana - 2</td>
    <td>Simona - 2</td>
  </tr>
  <tr>
    <td>Stefan - 3</td>
    <td>Stefan - 3</td>
    <td>Ana - 3</td>
  </tr>
</table>
</body>
</html>

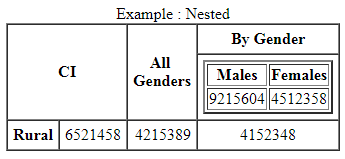
Nesting Tables
We can nest a table inside another one, by including the complete structure, also the <table> element, but, in general, this is not recommended, because it makes the code confusing. But it might sometimes be necessary, for example when you want to import content easily from other sources. An example of nesting tables is listed below:
Listing 8. Nesting tables
<html>
<body>
<TABLE CELLPADDING="5" CELLSPACING="0" BORDER="1" align="center">
    <CAPTION> Example : Nested  </CAPTION>
    <TR>
    <TH class="center" COLSPAN="2" ROWSPAN="2"> CI
      </TH>
    <TH class="center" ROWSPAN="2"> All <BR> Genders </TH>
    <TH class="center" COLSPAN="2"> By Gender </TH>
    </TR>
    <TR><TD><TABLE border="2px"><TR>
		<TH class="center"> Males </TH>
		<TH class="center"> Females </TH>
        </TR>
		<TR>

		<TD ALIGN="right"> 9215604 </TD>
		<TD ALIGN="right"> 4512358 </TD>
		</TR></TABLE></TD>
    </TR>
    <TR>
    <TH> Rural </TH>
    <TD ALIGN="right"> 6521458 </TD>
    <TD ALIGN="right"> 4215389 </TD>
    <TD ALIGN="center"> 4152348 </TD>
    </TR>
</TABLE>
</body>
</html>
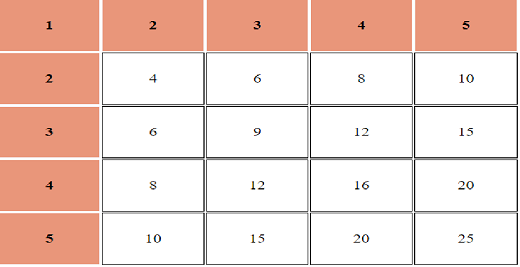
We can differentiate between the two tabs of the tab data exactly as in the model below:
<!DOCTYPE html>
<html>
<head>
<style>
td, th {
  width: 6rem;
  height: 4rem;
  border: 1px solid black;
  text-align: center;
}
th {
  background: DarkSalmon ;
  border-color: GhostWhite ;
}
body {
  padding: 3rem;
}
</style>
</head>
<body>
 <table>
  <tr>
    <th>1</th>
    <th>2</th>
    <th>3</th>
    <th>4</th>
    <th>5</th>
  </tr>
  <tr>
    <th>2</th>
    <td>4</td>
    <td>6</td>
    <td>8</td>
    <td>10</td>
  </tr>
  <tr>
    <th>3</th>
    <td>6</td>
    <td>9</td>
    <td>12</td>
    <td>15</td>
  </tr>
  <tr>
    <th>4</th>
    <td>8</td>
    <td>12</td>
    <td>16</td>
    <td>20</td>
  </tr>
  <tr>
    <th>5</th>
    <td>10</td>
    <td>15</td>
    <td>20</td>
    <td>25</td>
  </tr>
</table>
</body>
</html>
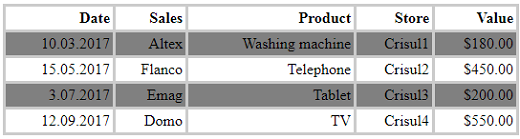
Zebra Tables
If you do not give a background color to the table, you can set a certain row color:
<!DOCTYPE html>
<html>
<head>
<style>
body {
  font: colibri;
}
table {
  border-collapse: collapse;
  width: 100%;
}
th, td {
  padding: 0.2rem;
  text-align: right;
  border: 3px solid #ccc;
}
tbody tr:nth-child(odd) {
  background: grey  ;
}
</style>
</head>
<body>

 <table class="ZEBRA">
<thead>
<tr>
    <th>Date</th>
    <th>Sales</th>
    <th>Product</th>
    <th>Store</th>
    <th>Value</th>
</tr>
</thead>
<tbody>
<tr>
    <td>10.03.2017</td>
    <td>Altex</td>
    <td>Washing machine</td>
    <td>Crisul1</td>
    <td>$180.00</td>
</tr>
<tr>
    <td>15.05.2017</td>
    <td>Flanco</td>
    <td>Telephone</td>
    <td>Crisul2</td>
    <td>$450.00</td>
</tr>
<tr>
    <td>3.07.2017</td>
    <td>Emag</td>
    <td>Tablet</td>
    <td>Crisul3</td>
    <td>$200.00</td>
</tr>
<tr>
    <td>12.09.2017</td>
    <td>Domo</td>
    <td>TV</td>
    <td>Crisul4</td>
    <td>$550.00</td>
</tr>
</tbody>
</table>
</body>
</html>
Conclusion
In the article above, I have tried to specify some of the HTML table’s features. You can give a specific order, you can enter a header, you can customize some columns or rows. In other words, you can make the table on your dynamic web page unique and functional. You should now have enough information to create your own tables.