The jQuery UI Autocomplete widget provides a highly versatile set of functionality right out of the box, including support for remote data sources, caching, scrollable results, categories, and more. To fine tune its appearance and behavior, developers can override a number of exposed methods, events and extension points. In the Tame Unwieldy Lists with the jQuery Autocomplete Widget article we learned how to include the Autocomplete widget in your web pages with a remote datasource. In today’s follow-up, we’ll customize the menu content and appearance using the response event and _renderItem extension point.
The Demo
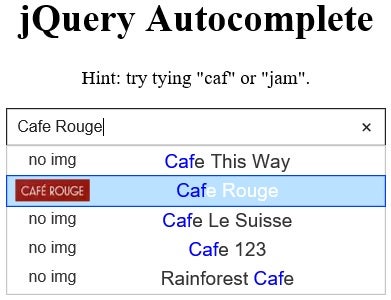
Today’s demo will follow the same theme as in the last tutorial and match search terms against a list of restaurants. But rather than simply display the restaurant names in the list, our new implementation will also fetch each list entry’s logo icon and include it along side the restaurant name. To do that we will add an icon data attribute to the Autocomplete’s response object and then render menu items based on our custom attribute.
Here is what the finished product will look like:
Modifying Response Data via the response() Event
There really are two places that the Autocomplete widget provides access to search results: the source and response events. The one that you choose will depend on how you’re accessing your data. By and large, a dynamic remote lookup would be best served by the source event, whereas the response event is best for the manipulation of local static data, which is what we’ll be using today.
The response event is triggered after a search completes, before the menu is shown, and passes the following objects as local function scoped variables:
- event: the Event object
- ui: the Autocomplete widget Object
- ui.content: An Array containing the response data.
Modifying the ui.content array changes the results that will be displayed in the Autocomplete menu. This data is normalized as [{label:"label1",value:"value1"}, {label:"label1",value:"value1"}, etc], so when modifying the data, make sure to retain both the value and label properties for each item. Beyond that, we’re free to add our own attributes as well. For example, we are checking the ui.content.length to display a “no matches found” message if it’s an empty array. If there are matches, we proceed to iterate over them and compare the labels to the keys of an array that contains some restaurant logos. A bit of transformation is applied to replace spaces with underscores, remove non word characters, and convert all letters to lower case:
response: function(event, ui) {
if(ui.content.length == 0) {
$('#autocomplete-suggestion').html('No matches found.');
}
else {
$.each(ui.content, function( key, value ) {
var logoKey = value.label.replace(/\s+/g,'_')
.replace(/[^\w]/gi, '')
.toLowerCase()
if ( logos[logoKey] ) value.icon = logos[logoKey];
});
}
}
jQuery Autocomplete Extension Points are special methods for customizing auto-complete drop-down content. These begin with an underscore (_), indicating that they should be hidden from your plugin, should you be creating your own widget, based on jQuery Autocomplete. They are exposed via the jQuery .data() method with the “ui-autocomplete” key. It allows us to attach data of any type to DOM elements in a way that is safe from circular references and thus prevents memory leaks. It provides both the <ul> element that the newly created <li> element must be appended to, as well as the current menu item – that is, the response object that holds the label and value attributes. Overriding a method to improve it or suit it to our purpose is often referred to as “monkey patching”!
Our code adds two elements to the menu item: an <img> element (or <span> if none exists) and a <span> for match highlighting. Both solutions come to us from Salman Arshad’s excellent Autocomplete demos. When done, the list item code will look much like the following:
<li class="ui-menu-item">
  <div tabindex="-1" class="ui-menu-item-wrapper" id="ui-id-2">
    <img class="m-icon" src="/wp-content/uploads/2021/04/282b4638425e24923f434dfe87fa1878.jpeg…/Z">
    <span class="m-name">
      <span class="highlight">Jam</span>ie's Italian
    </span>
  </div>
</li>
Here’s the _renderItem() method with the code that sets the logo source based on the item.icon that we set earlier:
$('#autocomplete').autocomplete({
}).data('ui-autocomplete')._renderItem = function( ul, item ) {
var $div = $("<div></div>");
if (item.icon) {
$("<img class='m-icon'>").attr("src", item.icon).appendTo($div);
} else {
$("<span class='x-icon'>no img</span>").appendTo($div);
}
};
The remainder of the _renderItem() method code applies match highlighting to the .m-name <span> by enclosing the matched search term within another <span>:
  var mName       = $("<span class='m-name'></span>").text(item.label).appendTo($div),
      searchText  = $.trim(this.term).toLowerCase(),
      currentNode = mName.get(0).firstChild,
      matchIndex, newTextNode, newSpanNode;
  while ((matchIndex = currentNode.data.toLowerCase().indexOf(searchText)) >= 0) {
    newTextNode = currentNode.splitText(matchIndex);
    currentNode = newTextNode.splitText(searchText.length);
    newSpanNode = document.createElement("span");
    newSpanNode.className = "highlight";
    currentNode.parentNode.insertBefore(newSpanNode, currentNode);
    newSpanNode.appendChild(newTextNode);
  }

  return $("<li></li>").append($div).appendTo(ul);
};
Finally, the method returns the modified <li> element.
The complete source code and working demo is up on Codepen for you to examine.
Conclusion
From the source and response events to the _renderItem extension point, there is no shortage of opportunity to modify and format response data. The trick is in knowing when to use which function or method. To summarize:
- Use the source event to modify response data when you are managing the search yourself, i.e., your source is a function.
- Use the response event to modify response data when you are providing the name of a local array variable or external script file such as PHP as your source.
- Use the _renderItem extension point to format the appearance of menu items.
In the next installment, we’ll use the source event to perform a search of complex data via an Ajax request.


