In Angular applications, the NgClass directive is the de facto way to set CSS classes dynamically on DOM elements. We learned all about its many permutations in the Assigning Dynamic Classes with NgClass article. Today, we’ll be exploring a specific use of NgClass to toggle an element’s visibility on and off according to user interactions. Specifically, we’ll be using it to display a drop-down menu on both touch and traditional screens.
The Problem Defined
On traditional screens, it’s nice to bind a drop-down menu’s visibility to the mouseenter and mouseleave events so that users don’t have to click the menu trigger to bring up the drop-down. However, touchscreens do not support hover events. In many cases, they convert mouseenter events into clicks. This is a problem because once fired, triggering the correlated mouseleave event is not a trivial task.
One solution to this challenge is to replace CSS rules that rely on the :hover pseudo class with ones that include a class with a specific connotation that denotes the menu’s open state. As you’ll see shortly, it can be something as simple as “menu-opened”.
The end result of today’s tutorial will be a menu that, in many ways, resembles the Angular Material MatMenu control. While a good choice if you require more advanced functionality, if you just want a simple DIY implementation, then the approach outlined here will do just fine!
The Trigger Element
Rather than create a new project from scratch, we’ll just add a Menu link to the MatToolbar that we built in a previous tutorial:
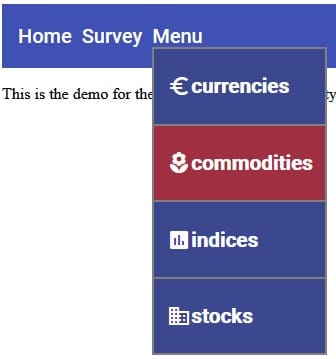
In the HTML markup below, the menu-container DIV is the drop-down trigger. On click and mouseenter events, the menuOpened variable is set to true; it is also set to false on mouseleave. Hence, that takes care of devices with traditional screens. For touchscreens, the click event duplicates the mouseenter action to display the drop-down. The corresponding drop-down close happens in the dropdown-menu DIV’s click handler:
<mat-toolbar color="primary">
<a [routerLink]="['/']">Home</a>
<a [routerLink]="['/survey']">Survey</a>
<div class="menu-container"
	 (click)="menuOpened = true" (mouseenter)="menuOpened = true" (mouseleave)="menuOpened = false">
<span>Menu</span>
<div [ngClass]="{ 'menu-opened': menuOpened }" class="dropdown-menu">
<a *ngFor="let ic of investmentClasses" (click)="onClick($event)">
<mat-icon mat-list-icon>{{ ic.icon }}</mat-icon>
<span class="dropdown-menu-item">{{ ic.text }}</span>
</a>
</div>
</div>
</mat-toolbar>
The dropdown-menu DIV contains the ngClass directive that adds the menu-opened class whenever the menuOpened variable evaluates to true. Each menu item is a link whose click is bound to the the onClick($event) method.
The Investment Classes
The list items are dynamically generated using an ngFor loop in the template. Normally, these would probably be provided by a service, but, for the purposes of this tutorial, you’ll find them in the Component class. To enforce consistency between investmentClasses’ elements, it implements the InvestmentClass interface:
import { Component } from "@angular/core";


export interface InvestmentClass {
icon: string;
text: string;
value: string,
}


@Component({
selector: "app-root",
templateUrl: "./app.component.html",
styleUrls: ["./app.component.css"]
})
export class AppComponent {
public menuOpened = false;
public investmentClasses: InvestmentClass[] = [
{
icon: "euro_symbol",
text: "currencies",
value: "currency"
},
{
icon: "local_florist",
text: "commodities",
value: "commodity"
},
{
icon: "insert_chart",
text: "indices",
value: "index"
},
{
icon: "business",
text: "stocks",
value: "stock"
}
];


//...
}
The onClick() Event Handler
Whereas we were able to incorporate all of the menu trigger’s event handlers directly into the template, we should employ a proper event handler here so that we can prevent event bubbling up to the parent. Without that extra step, the menu trigger’s click event would also fire, causing the menuOpened variable to be reset to true. As a result, the drop-down menu would never close! We could dispense with that step by moving the menu DIV outside of the trigger DIV, but that would make positioning it under the trigger more difficult:
public onClick(event: MouseEvent) {
event.stopPropagation();
this.menuOpened = false;
}
Styling
By default, the .dropdown-menu rule sets the display to “none”. Only when the menu-opened class is added via the NgClass directive does the menu’s display change to “flex”. It overrides the default rule thanks to its greater specificity. A z-index of “1” ensures that the drop-down is positioned over nearby elements:
.menu-container .dropdown-menu {
position: absolute;
display: none;
flex-direction: column;
top: 3.2rem;
width: auto;
word-break: keep-all;
z-index: 1;
background-color: #3b488f;
border: 2px solid gray;
}


.menu-container .dropdown-menu.menu-opened {
display: flex;
}


.menu-container .dropdown-menu a {
text-decoration: none;
display: inline-flex;
cursor: pointer;
align-items: center;
padding: 0 0.8rem;
}


.menu-container .dropdown-menu a:not(:last-child) {
border-bottom: 2px solid gray;
}


.menu-container .dropdown-menu a:hover {
background-color: #a12f42;
}
Conclusion
In Angular applications, it’s a bad practice to set element class names directly using code such as document.getElementById('myElt').classList.add('my-class'). It’s far preferable to let NgClass work its magic by supplying it with the class name, along with a boolean variable or expression that it can evaluate.


