For newbies, Angular’s component-based architecture takes a bit of getting used to. Unlike the Object-oriented (OOP) design of programming languages like Java, Angular is not able to enforce encapsulation with quite the same voracity, mainly due to JavaScript’s unrestricted access to the DOM. But, as they say, just because you CAN do something, doesn’t mean that you SHOULD. So, rather than rely on the compiler to prevent you from breaking the rules, it’s best to learn how to do things the “Angular way” from the get-go so that you code your applications in such a way that enforces component encapsulation rather than undermines it. To that end, this tutorial will provide an overview of how to pass data between parent and child components – both from the parent to child and vice versa.
The Demo App
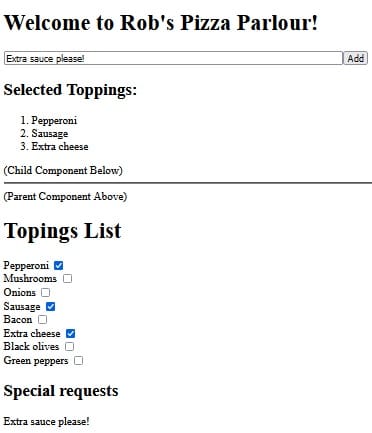
I usually post a link to the demo at the end of the article, but this time, I’m presenting it up-front, so that the stage is set for the coding to come. I hope you’re hungry, because this demo takes orders for pizza!
Above the horizontal line we’ve got the parent content, which includes a text input and button to submit special requests. Below it, there’s a list of toppings, selected from the child component below. Likewise, the special requests are displayed in the child underneath the toppings list. (I kept it to the top 10 toppings for the purposes of the demo)
Using that setup, the parent has to pass the special requests along to the child component, while the child has to send the selected toppings up to the parent.
Although I assigned the same name to the variable in both the parent and child for the sake of consistency, there is absolutely no requirement to do so.
We can now treat the requests variable just like any other. Since we don’t need to do any massaging of the data, we can reference it directly in the template using double curly braces {{}}:
<h2>Special requests</h2>{{requests}}
Advertisement
Passing Data From a Child Component to the Parent
Just as an @Input decorator defines a variable that comes from the parent component, an @Output() decorator defines a variable to be passed to the parent. Or, rather, it defines an EventEmitter that will emit() data to the parent. The EventEmitter is parameterized so that it knows what type of data it will be handling. In our case, it will be the selectedToppings array of strings:
The next step is to actually emit the selectedToppings. We’ll do that in the checkValue() method. It’s invoked every time that a topping checkbox is checked or unchecked. First, we add or remove the item from the array. Then, we emit the entire updated array to the parent:
public checkValue(event: Event) {
  const checkbox: HTMLInputElement | null = (event.target as HTMLInputElement);
  if (checkbox) {
    if (checkbox.checked) {
      this.selectedToppings.push(checkbox.value);
    } else {
      const index = this.selectedToppings.indexOf(checkbox.value);
      this.selectedToppings.splice(index, 1);
    }
    this.selectedToppingsEmitter.emit(this.selectedToppings);
  }
}
To invoke the checkValue() method, we need to bind it to the checkbox’s change event like so:
Back in the parent template, the selectedToppingsEmitter is bound to a public component method. Note that, in this case, the name of the Emitter must exactly match that of the child. The bound method name can be anything we like however. You can see it here in the app-child element markup:
In the setSelectedToppings() method, we will set our local toppings variable to the emitted selectedToppings. As such, it’s really nothing more than a setter:
Finally, an *ngFor loop is employed to list all of the selected toppings within an ordered list:
<h2>Selected Toppings:</h2><ol><li *ngFor="let topping of toppings">{{topping}}</li></ol>
Advertisement
Conclusion
In this tutorial, we learned how to pass data between parent and child components – both from the parent to child and vice versa. Next time, we’ll be answering the question of how to respond to @Input parameters updates as well as how to intercept them before outputting them in our template files.
Rob Gravelle resides in Ottawa, Canada, and has been an IT guru for over 20 years. In that time, Rob has built systems for intelligence-related organizations such as Canada Border Services and various commercial businesses. In his spare time, Rob has become an accomplished music artist with several CDs and digital releases to his credit.
Introduced in 2015, ES6 (also known as ECMAScript 2015 or ECMAScript 6) was the most impactful revision of JavaScript since ES5 (ECMAScript 5) in 2009. It added a veritable cornucopia of features, including Arrow Functions, the const and let keywords, default parameters, among others. Then ECMAScript 2016, 2017, and 2018 added even more, including the […]
If you have ever examined an Angular app’s file structure, you would find a lot of HTML, CSS, and JavaScript templates that all work together and get compiled to render a well-crafted web application. The compilation process consists of two approaches. The first one is the Just in Time (JIT) compilation, on which Angular relied […]
Sometimes it becomes necessary to convert an object into a string in order to view or store it. For the purpose of debugging, a simple console.log() will suffice, as just about any modern browser’s Dev Tools will provide a pretty printed version of an object. Meanwhile, relying on implicit conversion when writing an object to […]
All programming languages, including JavaScript (JS), have built-in data types; these include strings, numbers, Dates, Arrays, and so forth. What makes JS special is that it is loosely typed. Hence, variables are declared without a type, which allows them to be re-assigned values of a different type at any time. This feature makes the language […]
The original home of HTML tutorials. HTMLGoodies is a website dedicated to publishing tutorials that cover every aspect of being a web developer. We cover programming and web development tutorials on languages and technologies such as HTML, JavaScript, and CSS. In addition, our articles cover web frameworks like Angular and React.JS, as well as popular Content Management Systems (CMS) that include WordPress, Drupal, and Joomla. Website development platforms like Shopify, Squarespace, and Wix are also featured. Topics related to solid web design and Internet Marketing also find a home on HTMLGoodies, as we discuss UX/UI Design, Search Engine Optimization (SEO), and web dev best practices.
Advertiser Disclosure: Some of the products that appear on
this site are from companies from which TechnologyAdvice
receives compensation. This compensation may impact how and
where products appear on this site including, for example,
the order in which they appear. TechnologyAdvice does not
include all companies or all types of products available in
the marketplace.