The twin mouseenter and mouseleave Element events are the standard way to bind JavaScript code to hover events. But what happens if we need to detect hovered elements within another event handler? I myself had to answer this very question when I implemented focus handling for dozens of SVG elements. Part of the focus treatment including canceling any current hover action. Think of it like the popular whack-a-mole arcade game in which players use a mallet to hit randomly appearing toy moles back into their holes. Only one mole should appear at a time, so, if each mole was operating autonomously, it would have to check whether or not one of its compatriots was currently protruding from their hole.
In this tutorial, we’ll be playing a variation of whack-a-mole where we’ll have to detect a hovered image element so that we can transfer highlighting over to another image on focus.
When Mouse and Keyboard Collide
Below is the HTML for our demo. It contains three images that are tabbable thanks to their tabindex of “0”:
<h1>Hovered Element Demo</h1>

<button type="button">Click me to start, then press the "tab" key</button>

<p><img tabindex="0"  src="https://i1.sndcdn.com/artworks-b5jyk6LpdxWVWWz5-jGpxXw-t200x200.jpg" /></p>

<p><img tabindex="0" src="https://i1.sndcdn.com/artworks-OCRwxXbSBQwex4mM-LY2qWg-t200x200.jpg" /></p>

<p><img tabindex="0" src="https://i1.sndcdn.com/artworks-2n1JKCcFA6Gg6UH7-GsP3HA-t200x200.jpg" /></p>
On hover or focus, we would like to highlight the image by growing it, and adding a blue dashed outline, just for good measure. That’s easily done using some CSS rules:
img {
  width: 150px;
  transition: transform .2s;
}

.highlight {
  left: 50px;
  transform: scale(1.5) translate(25px);
  outline: 2px blue dashed;
}
Without special handling, there would be nothing preventing us from tabbing to an image, while hovering the mousepointer over another. Way to confuse the user!

Detecting Focused Images with JavaScript
Determining the currently focused element is simple, thanks to the document’s activeElement property. What’s a little more involved is figuring out whether or not the currently focused element is one of our images. There are a couple of ways to to that (probably more):
- We could check if the currently focused element is a child of the parent container using the jQuery.contains() method. The downside to this approach is that jQuery.contains() checks ALL children, not just the images that we are interested in.
- Since we need to store all of the focusable images in order to attach event handlers to them, why not just see if we can find the activeElement within the collection?
To me, it was a no brainer; the 2nd approach was the clear choice. While jQuery DOM collections do not have a “search” method per se, they do offer index(). It searches for a given element from among the matched elements and returns its numeric index, much like the native JS Array’s indexOf(). If no argument is passed to the .index() method, it returns the position of the first element within the jQuery object relative to its sibling elements. When passed a selector string, the return value is the position of the first element within the jQuery object relative to the elements matched by the selector. If the element is not found, .index() will return -1:
var images = $('img');

images.hover(function(elt) {
  if (images.index(document.activeElement) === -1) {
    $(this).toggleClass('highlight');
  }
})
Passing a single function to $(selector).hover(handlerInOut), will make it the handler for both mouseenter and mouseleave events. This allows us to use jQuery’s generic toggleClass() method within the handler. It will add the class when not present, and remove it when it is.
Detecting Hovered Images
Now we get to the heart of the article. Expecting a full page of code? Don’t worry, there’s an easy way to do it. The not-so-secret trick is the :hover Pseudo-class – the very same on that you use for CSS styling. It’s a special selector, so we can use it to reference the currently hovered element, or, more specifically, the full bubbling chain from the source element right on out to the HTML tag. Here is the code that returns the currently hovered image (or undefined if none are being hovered over):
function getHoveredImage() {
var hoveredElements = $(':hover'),
hoveredElement = hoveredElements.last();
if (hoveredElement.prop("tagName") === 'IMG') {
return hoveredElement;
}
}
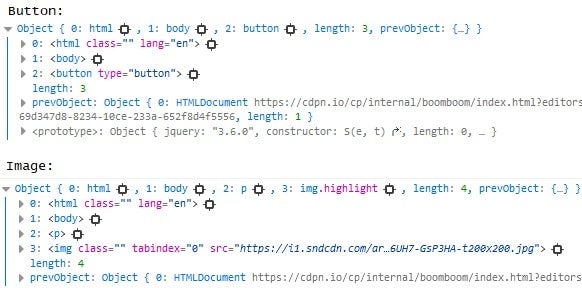
jQuery objects are never undefined, so it’s perfectly safe to check for properties and such whether an element is currently being hovered over or not. Here are a couple of examples of returned DOM collections from $(‘:hover’) – one where the top button is being hovered over, and another where one of our images is the hover source:
In the focus handler, we can now turn off the highlighting on the hovered image, if necessary:
.focus(function() {
var hoveredImage = getHoveredImage();
if (hoveredImage) {
hoveredImage.removeClass('highlight');
}
$(this).toggleClass('highlight', true);
})
There’s no need for a similar check in the blur handler because mouseenters are blocked once an image has focus. There’s a bit of extra code here to set the focus back to the top image so that we can TAB over the images in a loop:
.blur(function(evt) {
$(this).removeClass('highlight', false);
if (evt.target === images.last().get(0)) {
setTimeout(function() {
images.first().focus();
}, 1);
}
});
The Demo
On codepen.io, you’ll find the demo with all of the code that was presented in this article.
Conclusion
In today’s article we learned a bunch of useful stuff, such as how to detect the currently hovered and/or focused elements, find an element within a DOM Collection, and how to corral mouseenter and mouseleave event handlers into a single function. Keep in mind that everything we did here today can be achieved without the help of jQuery, but why bother? It’s ubiquitous and it rocks!


