Build a User Interface using the Vaadin Mobile App Framework

Create a package named “com.robgravelle.exercises.entities” and a class called “Exercises” as in the Persistence in Java EE Applications tutorial.
Coding the ExercisesUI Class
Create a new class in the “com.robgravelle.exercises” package named “ExercisesUI” that extends com.vaadin.ui.UI. Here is the generated code with an extra annotation to suppress the missing serial UID message:
package com.robgravelle.exercises;
import com.vaadin.annotations.Theme;
import com.vaadin.server.VaadinRequest;
import com.vaadin.ui.UI;
@SuppressWarnings("serial")
@Theme("myproject")
public class ExercisesUI2 extends UI {
@Override
protected void init(VaadinRequest request) {
}
}
The init() Method is where we set the layout and define the form fields. The easiest way to do that is to let Vaadin generate them from the Entity bean. To do that for our Exercises class:
- Instantiate a new BeanFieldGroup of type Exercises.
- Set the FieldGroup instance’s ItemDataSource to a new BeanItem, again of type Exercises, passing in a new instance of our Entity class.
- Iterate over each of the FieldGroup instance’s property IDs and add the component to the layout:
@Override
public void init(VaadinRequest request) {
VerticalLayout layout = new VerticalLayout();
setContent(layout);
FieldGroup fieldGroup = new BeanFieldGroup<Exercises>(Exercises.class);
fieldGroup.setItemDataSource(
new BeanItem<Exercises>(
new Exercises("Bench Press", "chest", "front delts, triceps, lats",
"barbell", "compound", "pushing")));
for (Object propertyId : fieldGroup.getUnboundPropertyIds()) {
layout.addComponent(fieldGroup.buildAndBind(propertyId));
}
}
The last required step before we can see the form in a browser is to provide Servlet information using annotations. Include the following code at the top of the class, just after the opening curly brace:
public class ExercisesUI extends UI {
    @WebServlet(value = "/*", asyncSupported = true)
    @VaadinServletConfiguration(
            productionMode = false,
            ui = ExercisesUI.class)
    public static class Servlet extends VaadinServlet {
    }
Viewing your Application in the Browser
Start up your server and enter the URL to your project:
http://localhost:8089/ExercisesMobileApp/
Make sure that the project name matches exactly what’s under your server in the server view:

Here is the auto-generated form in the browser:
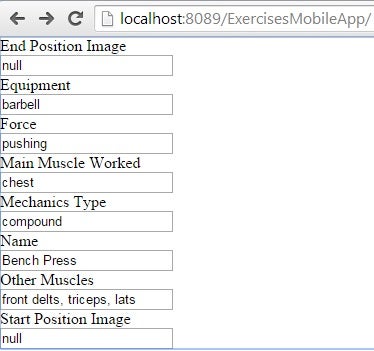
Conclusion
As with all things easy, the end results can leave a little to be desired. The fields are all there, but their ordering is not right, and the look is very plain to say the least. Luckily, as you’ll see in the next instalment, all these things are easily remedied!